The 8 Most Useful Buffer Features for a Powerful Social Media Presence


Former VP of Marketing @ Buffer

I manage the family budget with speed and efficiency. My spreadsheets are slick, my workflow is fast, and I’ve learned enough tricks along the way to shave hours off my process.
I’ve also never bothered to teach anyone else how I do what I do.
Don’t worry, this post isn’t about money management. (Phew!) Rather, I find that it can be hugely helpful to share the tools, tips, and tricks that make the things we do on a regular basis as efficient as possible. Using Buffer for social media management is one area we’re happy to share.
We’d love for you all to know just how quickly, easily, and simply you can supercharge your social sharing for a more powerful social media presence. If you’re familiar with the basics of Buffer, we’re hoping you’ll find some pro tips among the eight features below. Come see how we schedule, analyze, and integrate to form a truly fast social media workflow.

1. Share faster with Buffer’s browser extension
Browser extensions are one of our favorite productivity hacks at Buffer. So, needless to say, we love using the Buffer browser extension. If you haven’t yet, you can install the extension for free on your Chrome, Firefox, Safari, or Opera browser. You’ll be all set up in just a couple clicks.
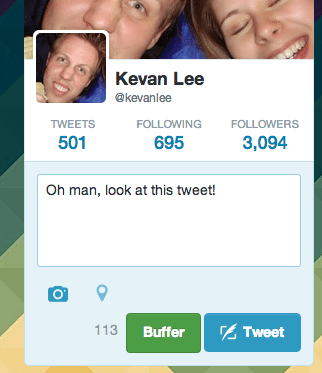
After it installs, you’ll first notice that the Buffer icon appears in the top right of your browser window, next to the address bar. Clicking this icon allows you to share directly from any page you’re on to however many connected accounts you choose.
(One of our favorite tips is to use the keyboard shortcut to share automatically. You can set the shortcut to whatever you’d like inside the Buffer extension settings. Mine defaults to Option+B on my Macbook.)
The Buffer extension will automatically grab the page title and a shortened URL and preselect your default Buffer accounts. You can add more accounts and completely customize the text and formatting of your finished update.
You can also mention Twitter usernames in your update, and Buffer will offer autocomplete options so you can quickly grab the folks you want. If you share to Twitter plus another network, the @ name will update to show a full name on Facebook, Google+, and LinkedIn updates.
Here’s the extension in action:
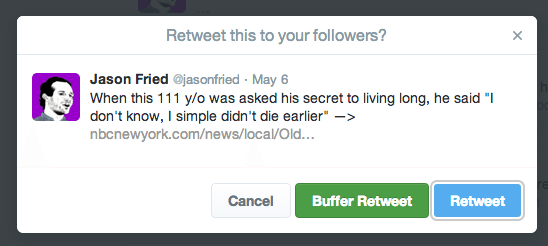
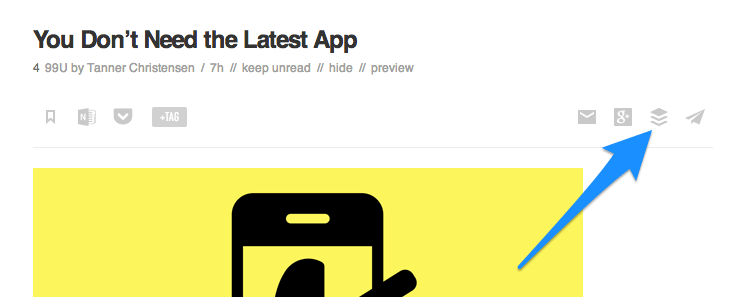
Another neat trick with the browser extension is buffering straight from Twitter, Facebook, Reddit, and Hacker News. If you have the extension installed, you’ll notice a Buffer link or Buffer button built right into the site, either in the post editor or inside the main content. You can add to Buffer directly from these links and choose all the same options as you could if you were buffering with the extension button—adding to profiles, setting the time, customizing text and mentions.
Here are a couple of ways the extension appears in Twitter. You’ll notice it when you’re composing a native tweet:
You’ll also have the Buffer option when you want to retweet:
Of course, if any of these options sound like too much or not your style, you can customize the way the extension works through your settings panel. Click the menu button in the top right of your Chrome browser and go to Tools > Extensions. There you’ll find the Buffer extension and a link to your settings.
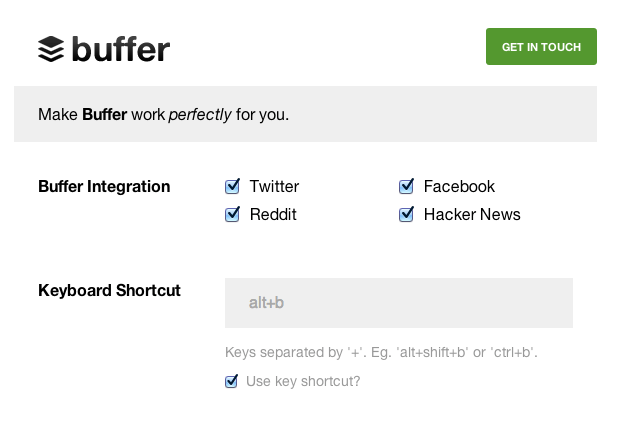
I like to run a pretty clean menu bar. I’ve hidden the icon from the main menu, and instead, I go straight to the keyboard shortcut when I want to buffer a page. To hide the icon, you can right-click on it and choose Hide Button.
2. Clip and queue text and images as you find them
With the browser extension installed, you gain the advantage of easily sharing your favorites bits of text and any awesome-looking image right when you find them.
For text, if you’re browsing a site and come across a neat stat or quotable blurb, simply highlight the text and click the Buffer button from your browser menu bar. The composer window will pop up with your highlighted text prepoulated as your update (with a link to the original, full page).
You can also buffer with the keyboard shortcut or by right-clicking on the selected text and choosing “Buffer Selected Text.”
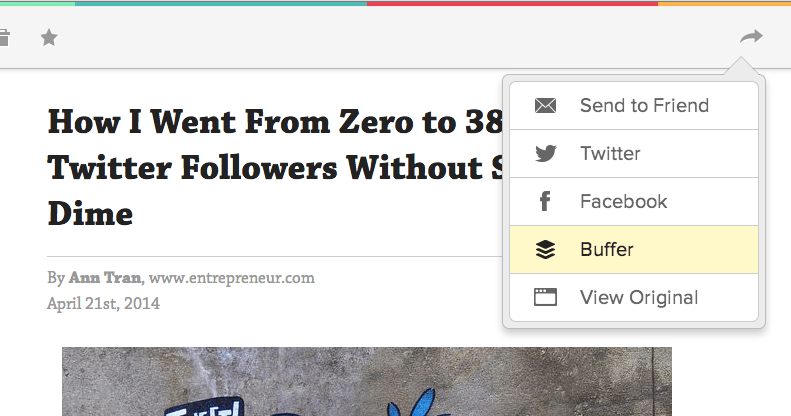
Right clicks also let you buffer any image you find on any site. We’re big believers in the power of sharing self-explanatory graphics, the kind that make sense with or without the text you add alongside. Many sites make some really fabulous images. Buffering them is super easy.
When you find an image you like, right-click on the image and choose “Buffer This Image.”
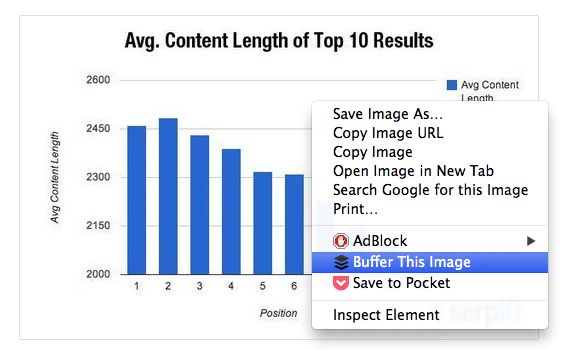
The composer window will pop up again, and you’ll be able to add this image to any of your connected profiles and change up the text as much as you want. The composer will be prepopulated with the page title and a “Found at URL” note that includes a shortened URL to the main page content.
3. Send your tweets at the perfect time
With Buffer, you can send an update one of four ways:
- Share immediately
- Add to the top of your queue
- Add to the bottom of your queue
- Share at a custom time
We start you off with some default times spread out throughout the day. But what’s the perfect time for your audience in particular?
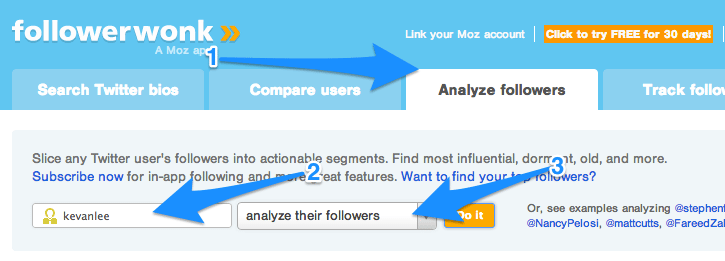
Followerwonk can help with this. Its Twitter analysis contains tons of neat stats, and the app syncs directly with Buffer. You can sign up for a free account—just sign in with your Twitter credentials—and right away see a sampling of the data that Followerwonk grabs.
One bit of data that is hugely helpful is their graph of the most active hours for your followers, set to your timezone. To get to this data, click on the “Analyze followers” tab, enter your Twitter username, and select “analyze their followers” from the drop-down menu.
My chart is below. You can see that 1:00 p.m. MT is when my followers are most active.
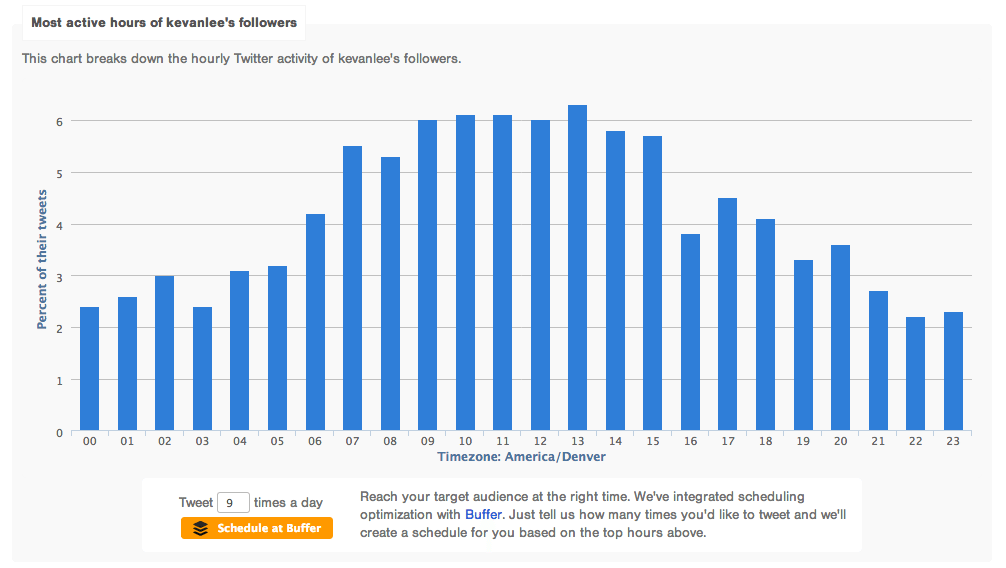
You may also notice in the above image that there’s an orange button at the bottom to schedule with Buffer. Followerwonk will analyze your follower data and create custom buffer times based on this data and the frequency you set. I post to Twitter four times per day. Here is what the Followerwonk results look like for me:
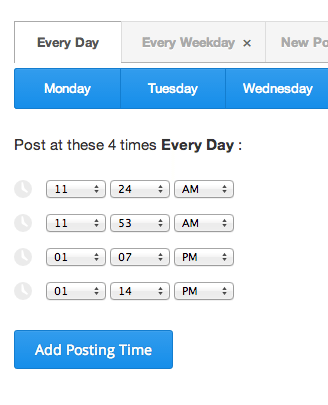
Voila! A custom schedule that posts when my followers are most likely to see it. It’s a great jumping off point for coming up with an ideal tweeting schedule (I’m going to adjust mine so that something posts earlier in the day, when I’m for sure online to respond). Simple, quick, and incredibly helpful.
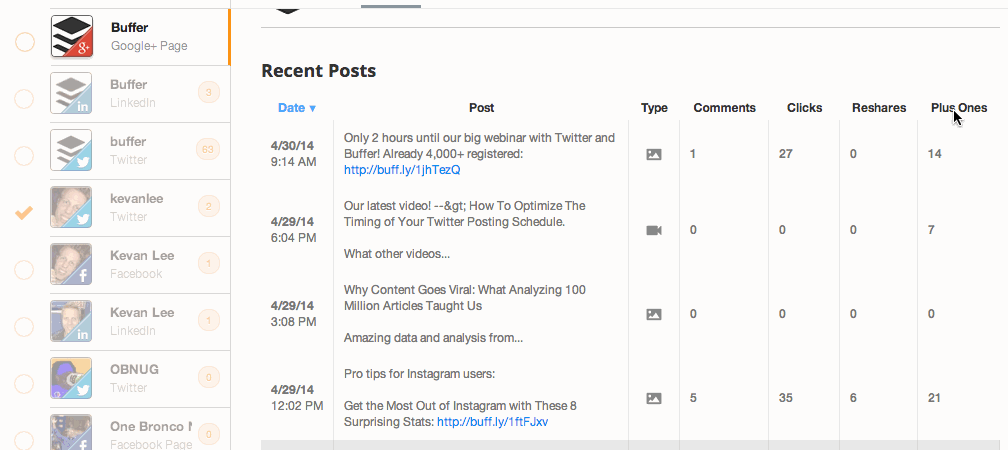
4. View, track, and recycle your top-performing posts
All Buffer accounts—Individual, Awesome, and Business—come with built-in analytics that track the all-important engagement metrics like clicks, shares, comments, and favorites. We even add a stat for your potential reach, which adds together the total of everyone who might see your post, including your followers and the followers of those who reshared your post.
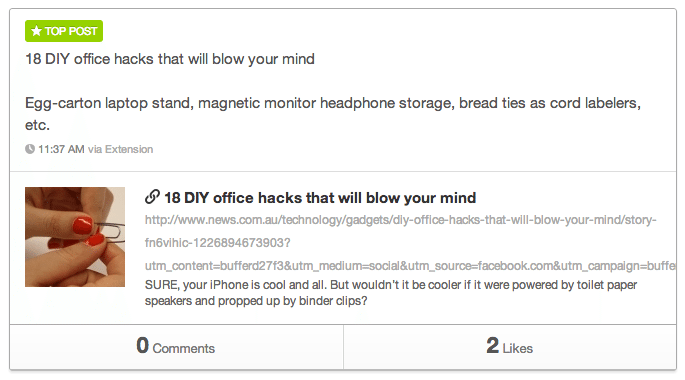
One of my favorite Buffer analytics feature is the visual high-five for those posts that have performed particularly well. The green Top Post tag reflects a bump in shares, retweets, and favorites compared to your historical trends. It’s awesome encouragement for a job well done.
These top updates are obviously well-liked content. You may want to share them again—either in a new way to the same network or as a repost to a different profile. Fortunately, this is as easy as dragging and dropping.
Hover over the post you want to reshare, and you’ll notice that the gray icon to the top left of the post changes to an arrow. Click this arrow and drag to whichever profile you want to share.

The same thing can happen from your queue as well. If you have an update pending on one profile and want to add to another, simply drag-and-drop. Once the post is in the queue, you can still enjoy complete customization of the text, link, attachments, and send time.
5. Check and compare your most important metrics
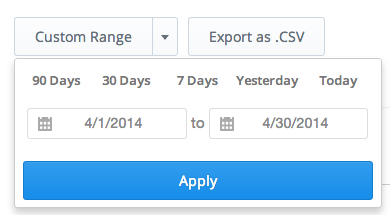
Advanced stats on all your sharing are available with our Buffer for Business plans. You can see graphs of your most important stats side-by-side, and you can set custom timeframes to change the way you view your metrics.
We’ve dropped in a few custom timeframes for you to start with: 90 days, 30 days, 7 days, yesterday, and today.
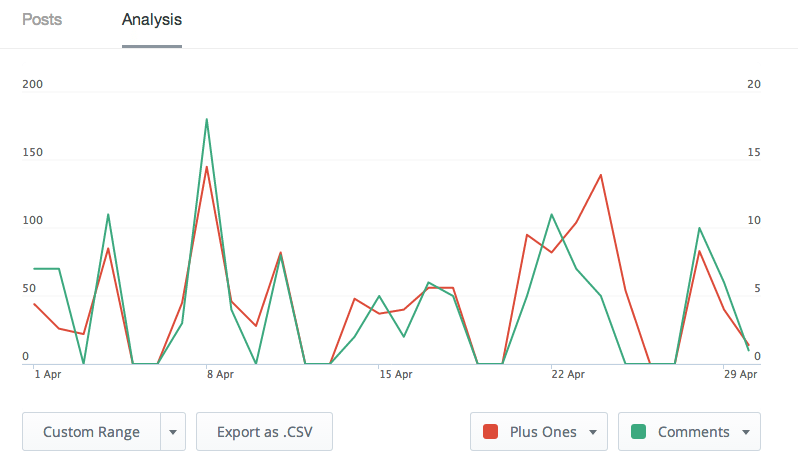
Once you have your time frame set, you can change and update the graph to reflect a comparison between engagement and follower stats that are unique to each network. Here is the full grid of options:

Comparing any of these two metrics lets you see how the stats correlate. Do commented posts correlate to retweets? Did share numbers jump when posting frequency increased? Here’s a sample graph of a Google+ chart comparing +1s (in red) and comments (in green).
6. Sort your recent history to see your biggest hits
Below the graph section in the advanced analytics, you can see a complete list of all the posts you’ve sent that fall into your chosen timeframe. All the data is there: date and time, full content of the post, post type, and all the share numbers. Posts are listed in chronological order starting with the most recent ones.
So what can you do with all this big data?
Well, if you’re interested in exporting it, the file we’ll hand you has all these numbers and figures split out into a spreadsheet. We often use exports here at Buffer, throw them into a Google spreadsheet, and apply some fancy formulas.
You can also gain insight right from the Buffer stats dashboard. The column headings for Recent Posts are clickable and sortable. Click any one of them, and you can see the posts with the most or the least numbers in any category.
7. Integrate Buffer with your most-used apps
We sure love social media tools. If there’s something that can help us work smarter, sign us up! We’ve been fortunate to partner with some of our favorite tools and to be featured in integrations with tools we use every day.
Buffer connects with 45 different services (plus an iPhone app and Android app, too). The full list is here. Recognize any that you use on a daily basis?
Two of our most-used ones are Pocket and Feedly. With Pocket, you can add to Buffer directly from the app, while reading the stories you’ve saved. We’ve worked this into our workflow by using the Pocket browser extension to save the stories we want to read later, then reading them in a batch of curation all at once. As we come across stories that are worth sharing, we add to Buffer as we read.
Feedly’s Buffer integration is just as slick. We use Feedly to manage our RSS subscriptions. Some members on our team follow up to 80 blogs (I’m a relative lightweight with only 45), and Feedly helps us keep track of what’s going on at the sites that matter to us. We’ll often read stories in Feedly that we think will resonate with our audience. It’s really simple to share these right from within the post by clicking the Buffer button in the header.
8. Import an RSS feed straight into Buffer
We’ve heard a lot of requests for the ability to add to Buffer from an RSS feed, and we’re happy to say that this feature is on its way!
We’ve had it turned on for Business users already, so you may have seen it popping up in your dashboard. With this new feature, you can add an RSS feed right from within Buffer, view the most recent posts from the feed, and add straight to your queue. Here’s a peek at what the process looks like:
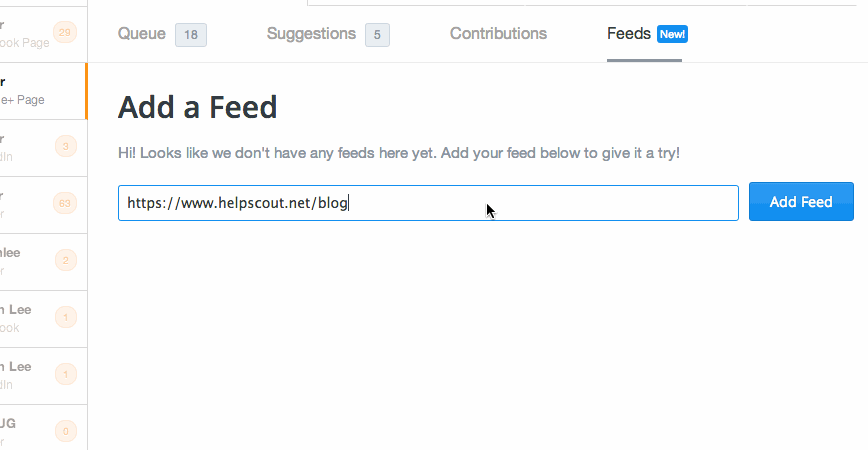
After grabbing the feed and pulling into Buffer, you can then add directly from the feed list to any of your connected accounts. The links and titles show up automatically, just as they would if you were using the extension, and you have the ability to completely customize the text, formatting, and send time of the update.
Want more insight? See all 8 of these tips on video
We had the privilege of sharing these tips in our first-ever Buffer-hosted webinar, led by Buffer’s Rodolphe Dutel. If you’d like to see Rodolphe walk you through each of these features and hear from him how these eight tips can impact your social sharing, we’d love for you to watch the video below.
How many of these Buffer features were new to you? Which ones have you tried so far and loved? It’d be awesome to hear your feedback in the comments and continue the conversation there.
And for those who aren’t yet on our Buffer for Business plan, we’d love to have you try out the fun features. You can grab a risk-free, cancel-any-time trial right here.
P.S. If you
liked this post, you might also like A Guide to High Quality Social Media Sharing: What, When, and How to Share and 29 Free Marketing Tools to Improve Your Work Today.Image credit: Éole
Try Buffer for free
140,000+ small businesses like yours use Buffer to build their brand on social media every month
Get started nowRelated Articles

If you always feel like you’re chasing the tail-end of audio trends on the app, you’ve come to the right place. In this article, I’ll guide you through all the methods you can use to find the most popular music and sounds on Instagram before they drop off the charts.

All the features on Bluesky, plus how to use them.
I put Meta Verified — and the coveted blue check — under the microscope for two weeks. The results were definitely not what I expected.