
How to Optimize Blog Images for Maximum Impact on Social Media and Search


Former VP of Marketing @ Buffer
You’ve likely heard the advice to add visual content to your blogposts whenever possible. Visual content is more than 40 times more likely to get shared on social media.
So I added images to blogposts.
And I learned there’s quite a bit more to it than that.
Adding images to blogposts is a great start. You’re likely to see increases in social sharing and time on page. Images just make everything more readable and shareable.
Adding images also brings with it another checklist of things to look for as you’re optimizing and adding – a checklist I’m afraid to say I missed out on for a long time with adding images to the Buffer blog. I’m happy to share with you all the things I did wrong with blog images over the past few months and tell you how I’ve learned from my mistakes and what I’ve changed since. I’d love to hear if any of this resonates with you!

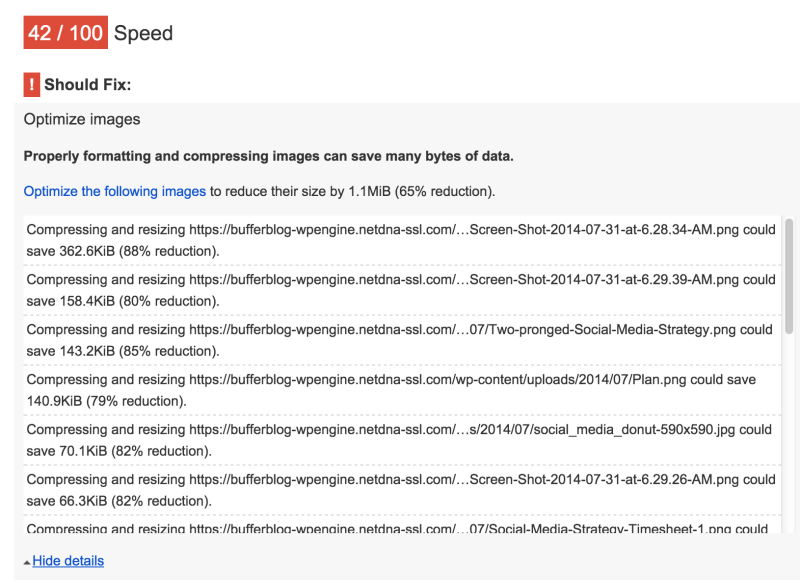
Mistake #1: We uploaded gigantic images
When I take a screenshot on my Macbook, the image size is often 1,500 pixels wide and 2 or more megabytes large.
Consider that most blog images are often less than 1,000 pixels wide and listed in kilobytes instead of megabytes and you start to get a sense of the load I was putting on our pages.
The stock photos, too, were incredibly large. I would often download stock photos from some of our favorite sites like Death to Stock Photo, Get Refe, and Startup Stock Photos. Their imagery is excellent, and it’d work wonders for blogpost headers (the way we use them) or for website backgrounds or even print pieces. As such, the image files are huge and rich and colorful. A typical image I’d upload from these would be 4,700 × 3,100 pixels and 11 MB!
When you consider that the blogposts we publish are upward of 1,500 words and steeped in graphics and imagery, I very easily could add dozens of extra megabytes to the page load.
And it showed up in our page speed report.
What we’re doing to fix this:
One reason why we got in so deep with these large images is because it’s so easy. You take a screenshot, drag it into WordPress, and you’re done!
So any solution we came up with we also wanted to ensure it would keep things moving fast with our workflow.
Fortunately, we found a useful setting in WordPress where you can choose the size of the image sizes that you use in blogposts. For instance, when you add an image from WordPress’s media library, you can choose to add it as Full Size, Large, Medium, or Thumbnail, and inside the WordPress settings, you can set the height and width for Large, Medium, and Thumbnail defaults.
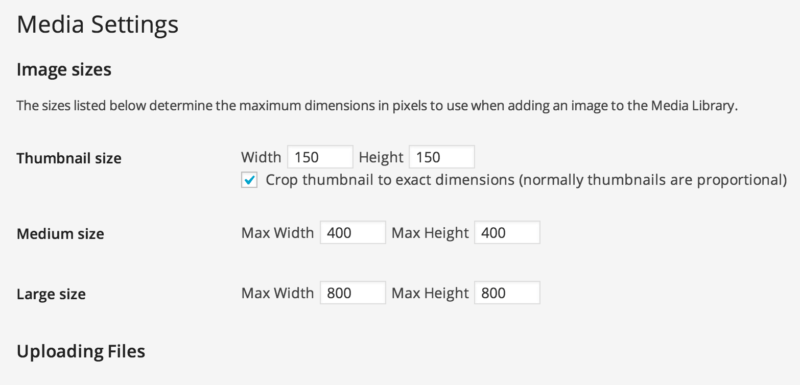
I adjusted the size of our Large images to 800 pixels wide, maximum (the height adjusts automatically to fit the aspect ratio).
This helped out with all the images inside the blogpost body. They’d look good on the largest monitor sizes, and they would be small enough files to not weigh down our page speed too much.
For our main header images, we came up with a different solution. Since we use WordPress’s Featured Image option to place these, we don’t quite have the option of choosing Large, Medium, or Thumbnail. The image that’s in the media library is the image that gets loaded on the page.
So we had to upload a smaller image.
We tried out several great WordPress plugins to see if they could help with image sizing. With our setup (we use a third-party system for hosting and web management), these didn’t quite work out. Here’s the list we tried in case you might find some useful ones here for you.
Our testing took us to Compressor.io, a free web tool that has you upload the image to the site and then it compresses the image into as small a file size as possible. I often see 60 to 70 percent reductions in image sizes when I go this route.
So now when we’re adding header images, we download the image from the stock photo site, upload it to Compressor.io, download the compressed version, then upload the compressed version to WordPress. It’s a couple extra steps but well worth the investment.
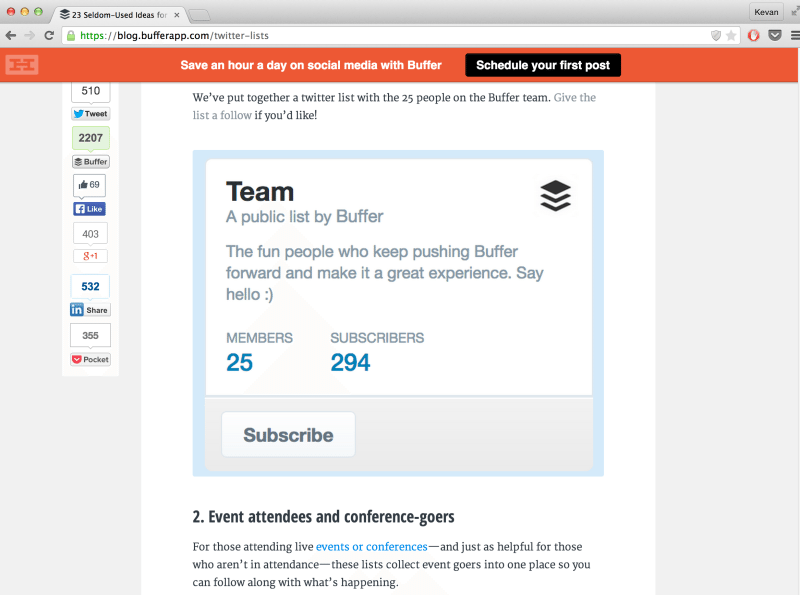
Mistake #2: We used small images as thumbnails
For a long time, we placed a featured stock image in the upper right corner of the blogpost. It helped with our paragraph width for our intros, and it provided a nice bit of imagery that people could click to share.
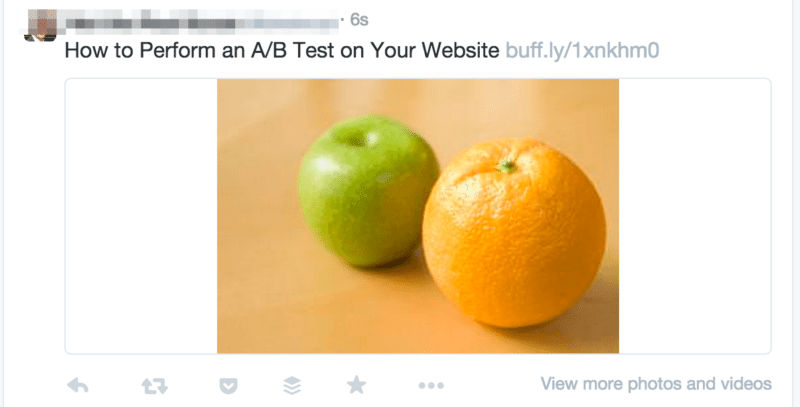
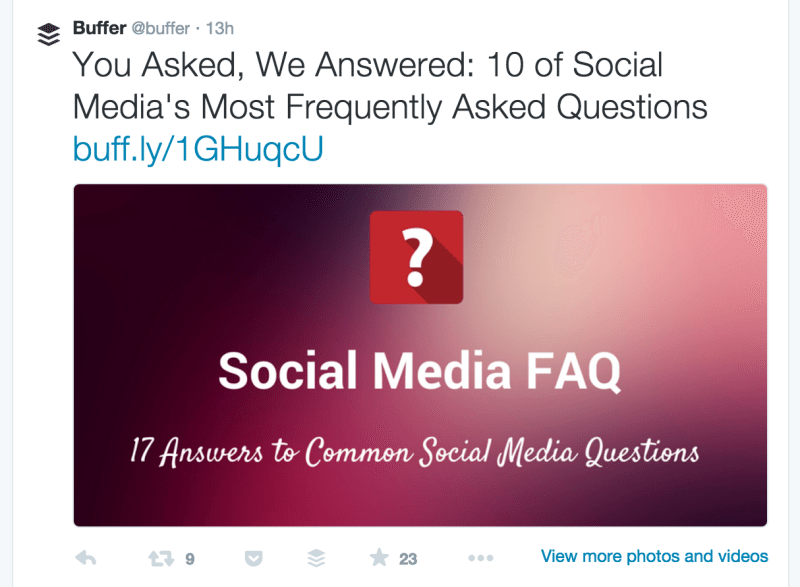
The only problem: The small image we used wasn’t exactly shareable.
When you would share a small thumbnail image from our blogposts, it wouldn’t look ideal on Twitter or Facebook.
Here’s how it looked on Twitter:
Here’s how it looked on Facebook:
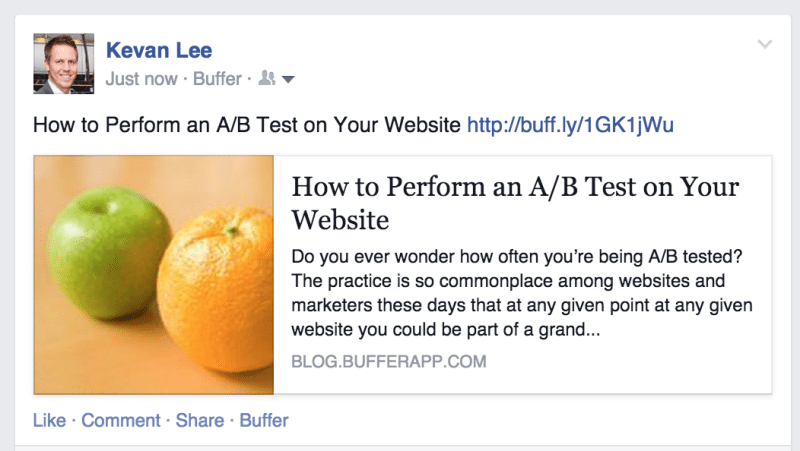
The image size wasn’t ideal for the way that these social networks handle preview images.
What we’re doing to fix this:
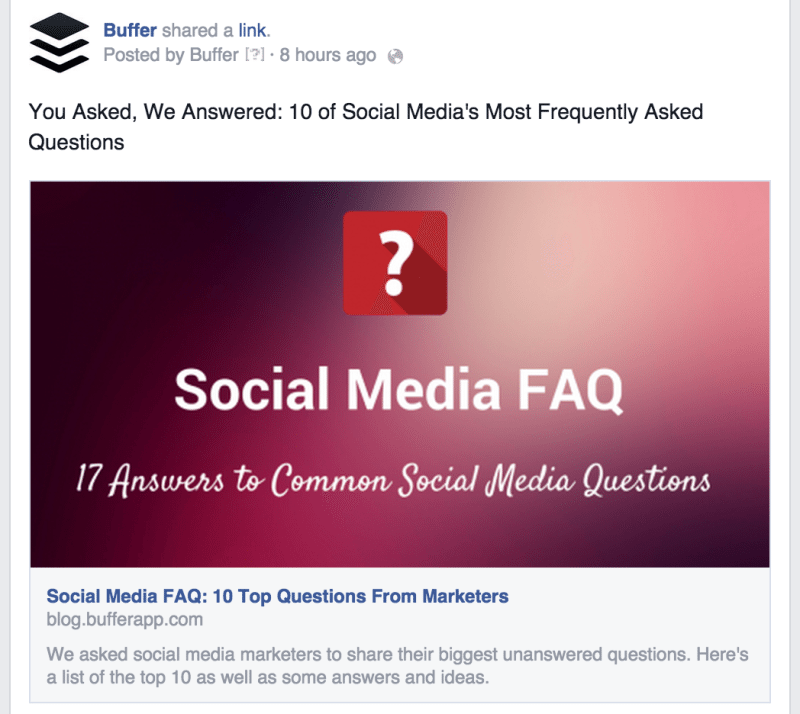
Through a lot of trial and error, we came across an ideal size that worked for both Twitter and Facebook (and Google+ and others, too). Now we can place one image that will work great no matter where you share it.
The image size we settled on is 1,024 pixels wide by 512 pixels tall.
Sharing this image on Twitter and Facebook shows it at full size with no cropping.
Twitter:
Facebook:
There are a couple different strategies for including this image in blogposts.
First, if we want to keep the image in the upper right corner, we can use WordPress’s settings to do so. WordPress resizes the image by appending a height and width to the end of the file name, essentially creating a new, smaller image for you.
For instance, let’s say you’re seeking to add this image file to your post:
/content/images/resources/wp-content/uploads/2014/12/blog-images.png
If you choose to insert the image at Medium size, the actual WordPress image file that gets added will be:
/content/images/resources/wp-content/uploads/2014/12/blog-images-300×150.png
In this case, we had to go back in and remove this code from images so they’d be shared at the size we wanted. Instead of adding height and width to the image file name, the size is controlled by the height and width attributes for the image.
<img class=”alignnone size-medium wp-image-10935″ src=”/content/images/resources/wp-content/uploads/2014/12/blog-images.png” alt=”blog images” width=”300″ height=”150″ />
The strategy we ended up employing was a bit simpler. Instead of placing an image in the upper, right corner of the post, we place the image below the introduction of the post, at full size. This way we ensure that the proper image at the proper size will be seen and shared.
Mistake #3: We failed to give our image files good names
If you happen to look through the image files associated with the Buffer blog, you’re likely to see a lot that look like this:
/content/images/resources/wp-content/uploads/2014/12/591.jpeg
… and this:
/content/images/resources/wp-content/uploads/2014/12/Screen-Shot-2014-12-15-at-13.48.49-PM.png
These are the file names of many of the images I have uploaded. Whoops. Not only are they completely non-descriptive, they’re also not helping us out any with SEO.
Image optimization and SEO is a theme that you might pick up on over these next few mistakes that we made. A lack of descriptive images hinders your site’s SEO. There’s a great question thread on Moz that gets at the heart of why file names (and alt tags and title tags) are so important, especially this answer from Benjamin at Gap Up Internet Marketing:
Yes, naming images does make a difference. Think about it from Google’s perspective. If you’re crawling a site and come across an image with no ALT tag, no title, and a name of C19823.JPG. What could that image be?
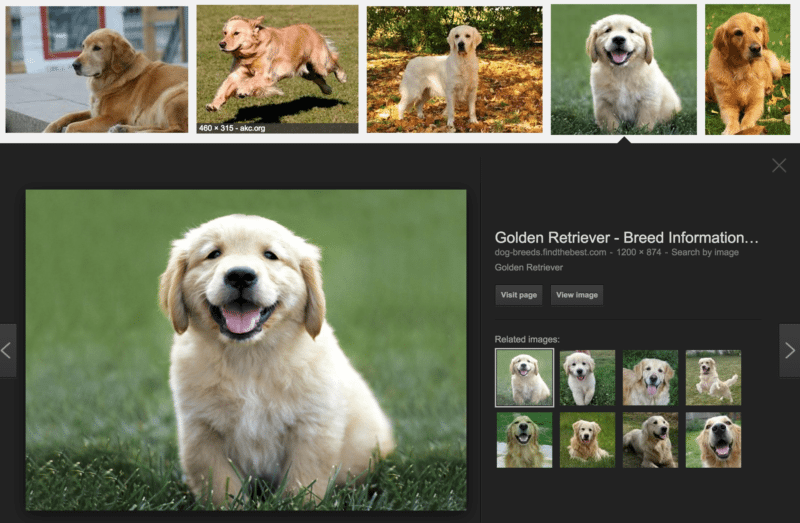
Now imagine you’re Google and you come across an image titled golden-retriever.jpg. There’s a pretty good chance that image is of a dog. Especially if the content on the page is also about dogs. The more clues that Google can use to figure out what a site is about the better.
Do a Google Image search for “golden retriever” and look at the file names. Notice any similarities?
I just tried the “golden retriever” image search challenge, and sure enough, the top images on the page are named descriptively and accurately.
- http://images.akc.org/breeds/action_images/golden_retriever.jpg
- http://upload.wikimedia.org/wikipedia/commons/b/b5/Canadian_Golden_Retriever.jpeg
- http://dog-breeds.findthebest.com/sites/default/files/465/media/images/Golden_Retriever_899814.jpg
What we’re doing to fix this:
I’ve yet to go back through all the misnamed images and correct them (if anyone knows of a useful WordPress plugin to help with this, I’d be keen to hear about it!). I’ve tackled some of the images on our most significant posts, the posts we’re trying to rank for a particular keyword or the images that have a direct and useful need for renaming.
I think the prospect of going back through hundreds (thousands?) of images is still a bit daunting! I’ll keep you posted on how I do with this.
Moving forward, I can say that we are now much more focused on making the extra effort to give our image files descriptive names.
- When I take screenshots on my computer, I’ll select the image on my desktop, click the filename, and type something descriptive before I upload the image to WordPress.
- In Skitch, when I save an image to my computer, I make sure to save it with a descriptive filename.
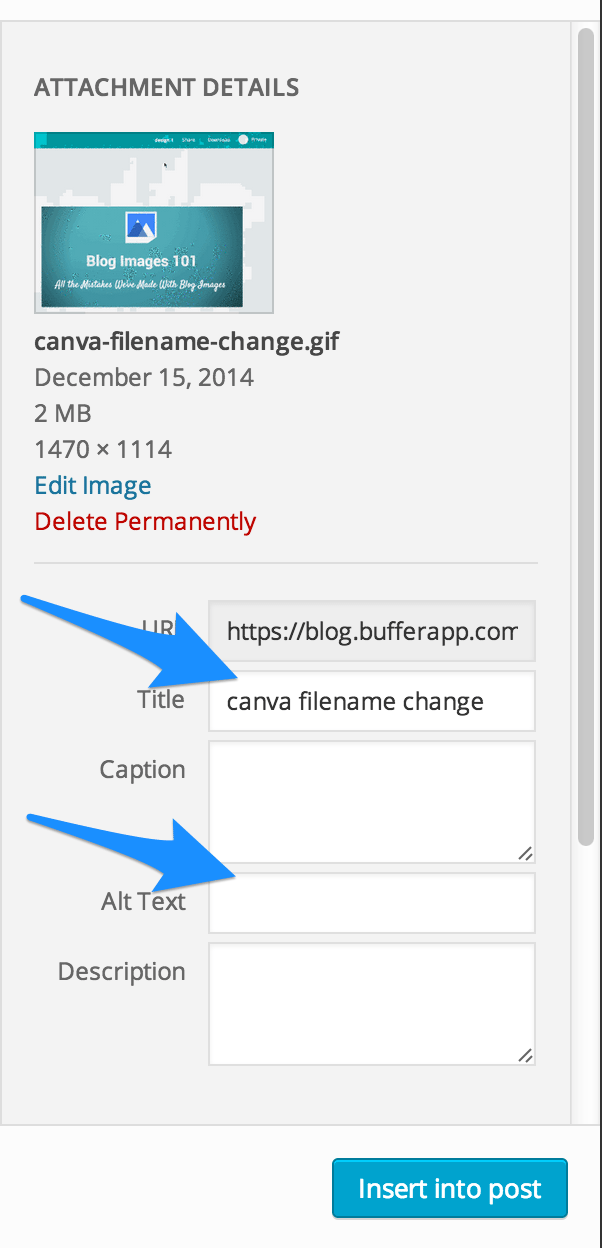
- When I create images with Canva, I make sure to give the image a good title before saving it (the title is what Canva uses for the filename).
Mistake #4: We failed to add alt tags and title tags
I’m not sure I fully understood the use and value of alt tags and title tags until just recently, so let me start with a quick definition.
The alt tag is a text alternative for an image that gets displayed when a browser doesn’t display the image. Some browsers choose not to display images for speed or safety reasons, and others rely on alt tags for accessibility so that those with disabilities can easily use and browse websites.
Title tags are quite similar to alt tags but are used to describe a link instead of an image.

You can see an alt tag or a title tag when you hover over an image or a link with your mouse.
In addition to accessibility benefits, the addition of title and alt tags makes a difference with SEO. Mark Hayes of Shopify wrote a great and simple rationale for why these tags matter so much (a lot of it can be owed to the “golden retriever” maxim above).
The alt attribute also adds SEO value to your website. Adding appropriate alt tags to the images on your website can help your website achieve better rankings in the search engines by associating keywords with images. As a matter of fact, using alt tags is probably the best way for your ecommerce products to show up in Google image and web search.
The #1 priority when it comes to image optimization is to fill out each alt tag for every (relevant) image on your site.
In the WordPress editor, adding the title and alt tag to an image is super simple. You upload an image, you enter in the title and alt tag, and you’re good to go.
What we’re doing to fix this:
Similar to the fixes for the filenames, we’ve got quite an archive of images to sort through. We’ve tackled the most significant ones on some of our most high-traffic posts, and we’re sorting a strategy to cover the rest. This may involve going back through and manually changing all the old images, seeking out a WordPress plugin to help with batches of these, or catching the images as they come, as we revisit past posts in our semi-regular content audits.
Going forward, we’ve made a more concerted effort to include title and alt tags for every image that we add to our blogposts.
WordPress is quite intuitive when it comes to adding these tags. By default, it adds the filename into the title tag of an image.
So having the photos named properly makes including title tags and alt tags even easier. Once the title tag is in place, we can simply copy-and-paste into the alt tag to complete the tagging process.
Here’s an example of what the output looks like:
<a href=”/content/images/resources/wp-content/uploads/2014/12/blog-images.png” title=”blog images”><img class=”alignnone size-full wp-image-10935″ src=”/content/images/resources/wp-content/uploads/2014/12/blog-images.png” alt=”blog images” width=”1024″ height=”512″ /></a>
Mistake #5: We didn’t size accordingly
If you look at some of the screenshots we’ve taken for use on the blog, you may notice that some of the size ratios seem quite extreme. A Twitter bio screenshot takes up the whole width of the post. A small snippet spans and stretches across a way-too-large space.
In many cases, I left the images the way they were when they were uploaded—as large as could be, and oftentimes larger than necessary.
What we’re doing to fix this:
WordPress has some simple ways to manage this better. For starters, you can set a custom image height and width by clicking on the Pencil icon above any image and editing the image size.
The problem for me was that changing these numbers left me with an abstract view of what these sizes would actually mean. I had to try multiple times to get it right, and when I was working fast, I neglected to take the extra time.
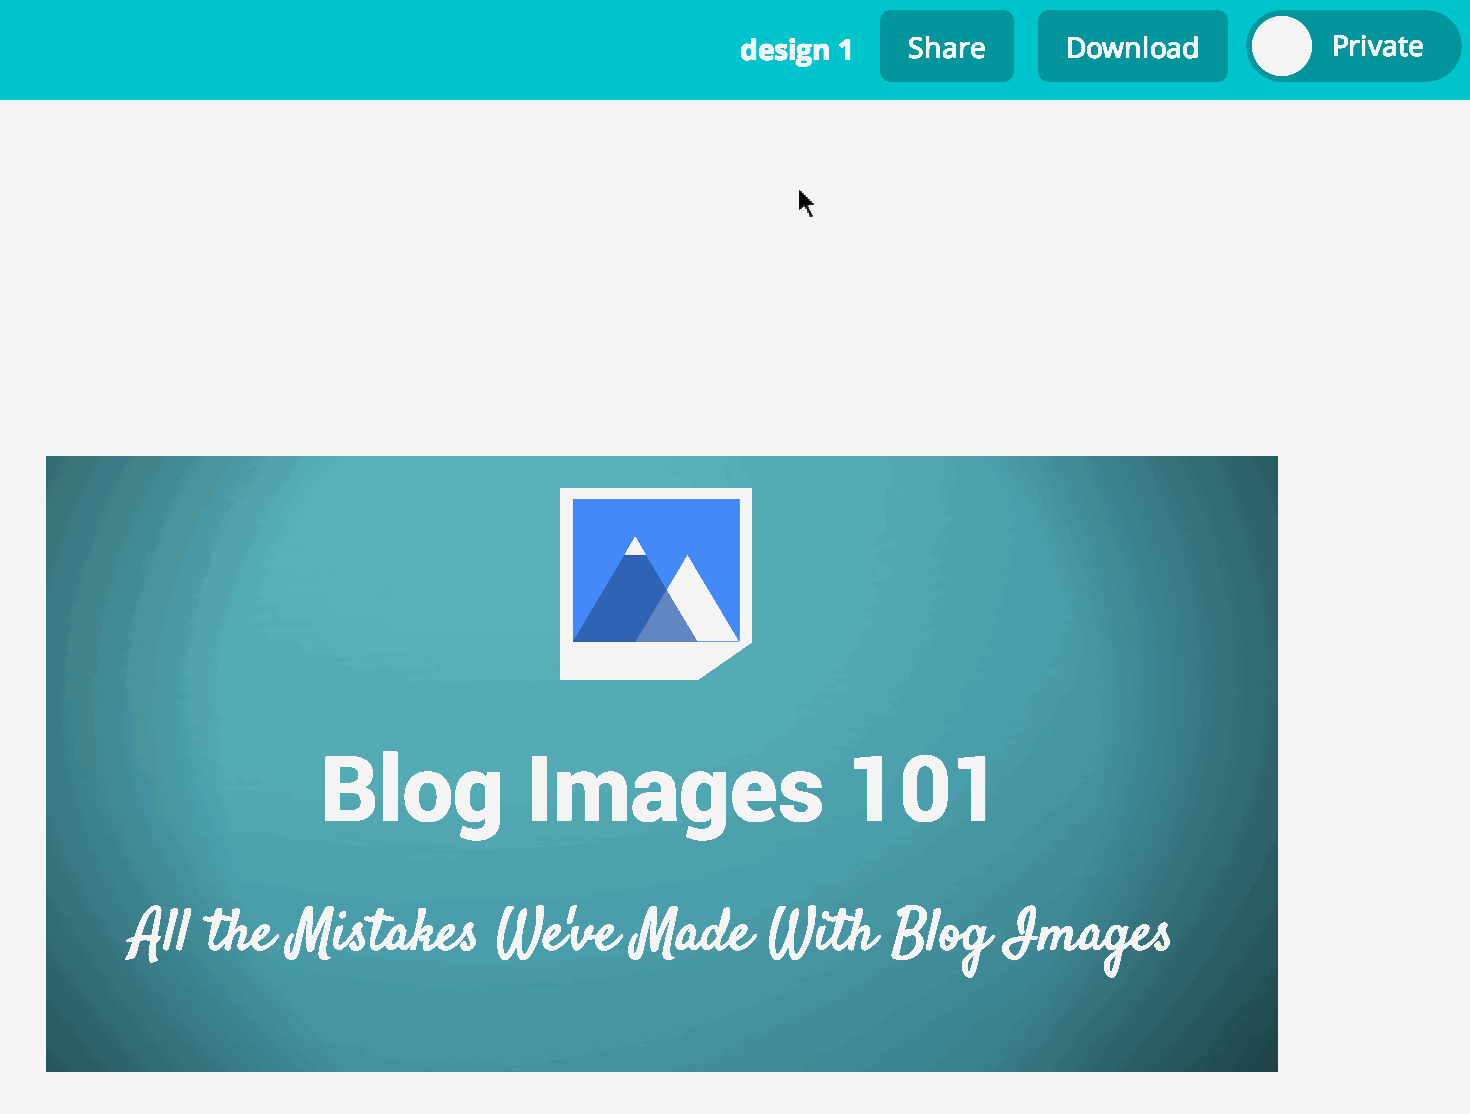
So one workaround we’re experimenting with is adjusting the size of our default Medium images. Currently, the medium size is 300 pixels, which often ends up being too small for the images I want to resize. I’m bumping that image size to 400. Here’s an example of how the new size looks.

9 ways to get the most from your blog images
Jeremy Rivera of Authority Labs put together a great overview of the many mistakes that can be made with images on a blog. Jeremy’s list of nine common errors can just as easily be turned into a checklist for doing images right. I think I’ve learned several of these lessons the hard way. How do you fare with this checklist?
How to get the most from imagery on your blog:
- Use images
- Place full-size images in your post—no more right-aligned thumbnails
- Give your image file a descriptive name
- Make sure your image size is small and reasonable
- Create a title and alt tag for each image
- Steer away from generic stock image (try some of these free photo sites instead)
- Place a caption on your image (we’ve yet to try this one—what do you all think?)
- Link to the source of your image
- Try taking an image yourself
Over to you
What strategies and techniques have you discovered for getting the most out of images on your blog?
What mistakes have you made? What have you learned along the way?
Hopefully this glimpse inside our learnings at Buffer will help as you set up the visuals on your blog. If I can add any more context to anything mentioned here, feel free to ask in the comments!
Image sources: IconFinder, Blurgrounds, Startup Stock Photos, Shopify
Try Buffer for free
140,000+ small businesses like yours use Buffer to build their brand on social media every month
Get started nowRelated Articles

Sending ads by mail may seem like a thing of the past, but this marketer thinks it’s a surprisingly effective approach for e-commerce brands.
Learn how to leverage AI social media content creation tools and save valuable time in your social media marketing efforts.

With the newsletters on this list, you'll be able to stay on top of all developments in social media and learn from amazing experts