


Imagine forming a group chat with your audience. Like-minded people with a common interest share their struggles, others respond with helpful solutions, and everyone feels like they belong.
A Facebook Group is exactly that — building a community of your followers and bringing them together. It’s a direct line to your audience without worrying about algorithms or organic reach.
In this article, we’ll cover Facebook Groups from A to Z — how to create, manage, and use them to drum up engagement.
Are Facebook Groups the same as Facebook Pages? (No.)
Facebook Pages are a one-way conversation, while Facebook Groups are a group chat.
- In the former, you post marketing or business updates, and your audience can like the content, interact with it via comments, or share it on their own profile.
- In the latter, anyone in the community can post, and anyone in the Group can respond. (If your Facebook Group is public, people who haven’t joined your community can also interact with posts.)
Ideally, you should have both — a Facebook Page to keep your audience in the loop with business updates and a Facebook Group to build an intimate community of your followers or customers.
But if you are just starting out, begin with Facebook Pages. You can cross-post content from other social media profiles onto your Facebook Page easily, and it's a relatively low lift compared to running a full-fledged community via a Facebook Group.
3 signs you will benefit from creating a Facebook Group
Community management is no easy feat. If you create a Facebook Group, it’ll require significant time and energy from your team to make, run, and maintain it. But the payoff can be worth it when Facebook Groups are managed right.
Here are three signs your business will benefit from a Facebook Group:
1. Your audience hangs out on Facebook. Men between the ages of 25 and 34 comprise Facebook's largest audience, followed by men aged 18 and 24. Ask your audience if they spend time on Facebook and if they’d like to join your community on the platform. If the answer is no, consider hosting your community on another platform.
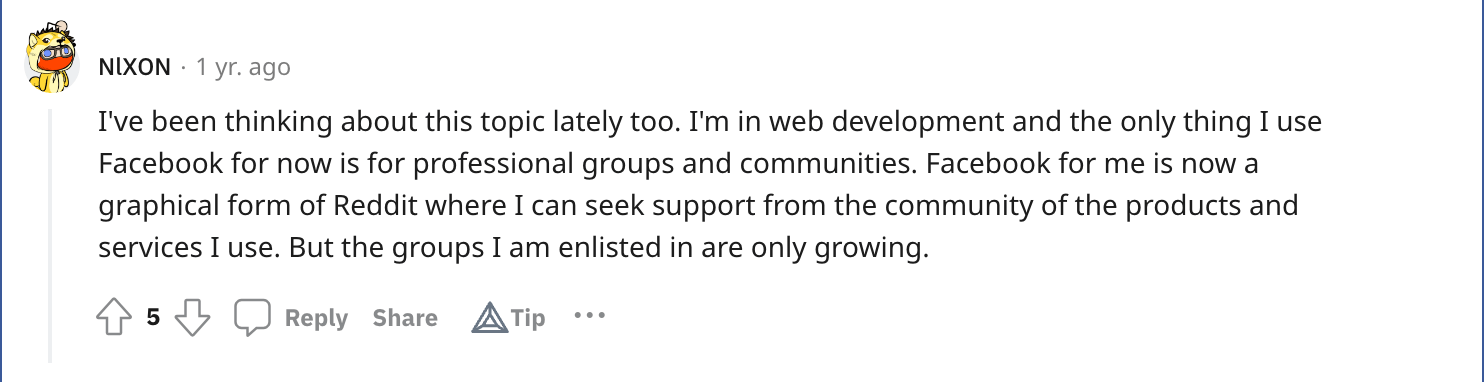
Remember: Just because your target customers don’t often use Facebook doesn’t mean they won’t be interested in having a community there. More than 1.8 billion people use Facebook Groups every month, and more than half of those people are a part of five or more active Groups, according to a study by NYU’s The Governance Lab. Your community might use Facebook simply to be a part of these Facebook Groups, like this Reddit user.
2. Your followers or customers would benefit from having a community. The success of a Facebook Group relies on its members. Think about what’s in it for them. Would your audience benefit from joining a community with a shared passion? For example, if you’re a vegan food creator, your audience would find it helpful to have a community where people share recipes.
But people don’t always need concrete solutions to join a community. They often also look for a sense of belonging and getting to know people with a niche, shared interest. For example, in The Write Life Facebook Group, writers ask technical questions about writing, sure. But often, people share their unique experiences in hopes that other writers relate with them, too.
3. Your business goals will benefit from having a community. Communities are built to serve the people in it, but it should also align with your business goals. Even if you have the world’s greatest Facebook Group, it won’t be sustainable if it doesn’t contribute to overarching business goals.
For example, if you aim to create more user-generated content, having a community can help you fulfill that because members will often share their experiences of using your product. Or, if you need fast feedback to improve your product, your community’s perspective can be helpful.
If you’re convinced that creating a Facebook Group is the right choice for your brand, let’s get into exactly how you can start building it.
How to create a Facebook Group in 3 steps
Creating a Facebook Group is easy-peasy. Here are step-by-step instructions:
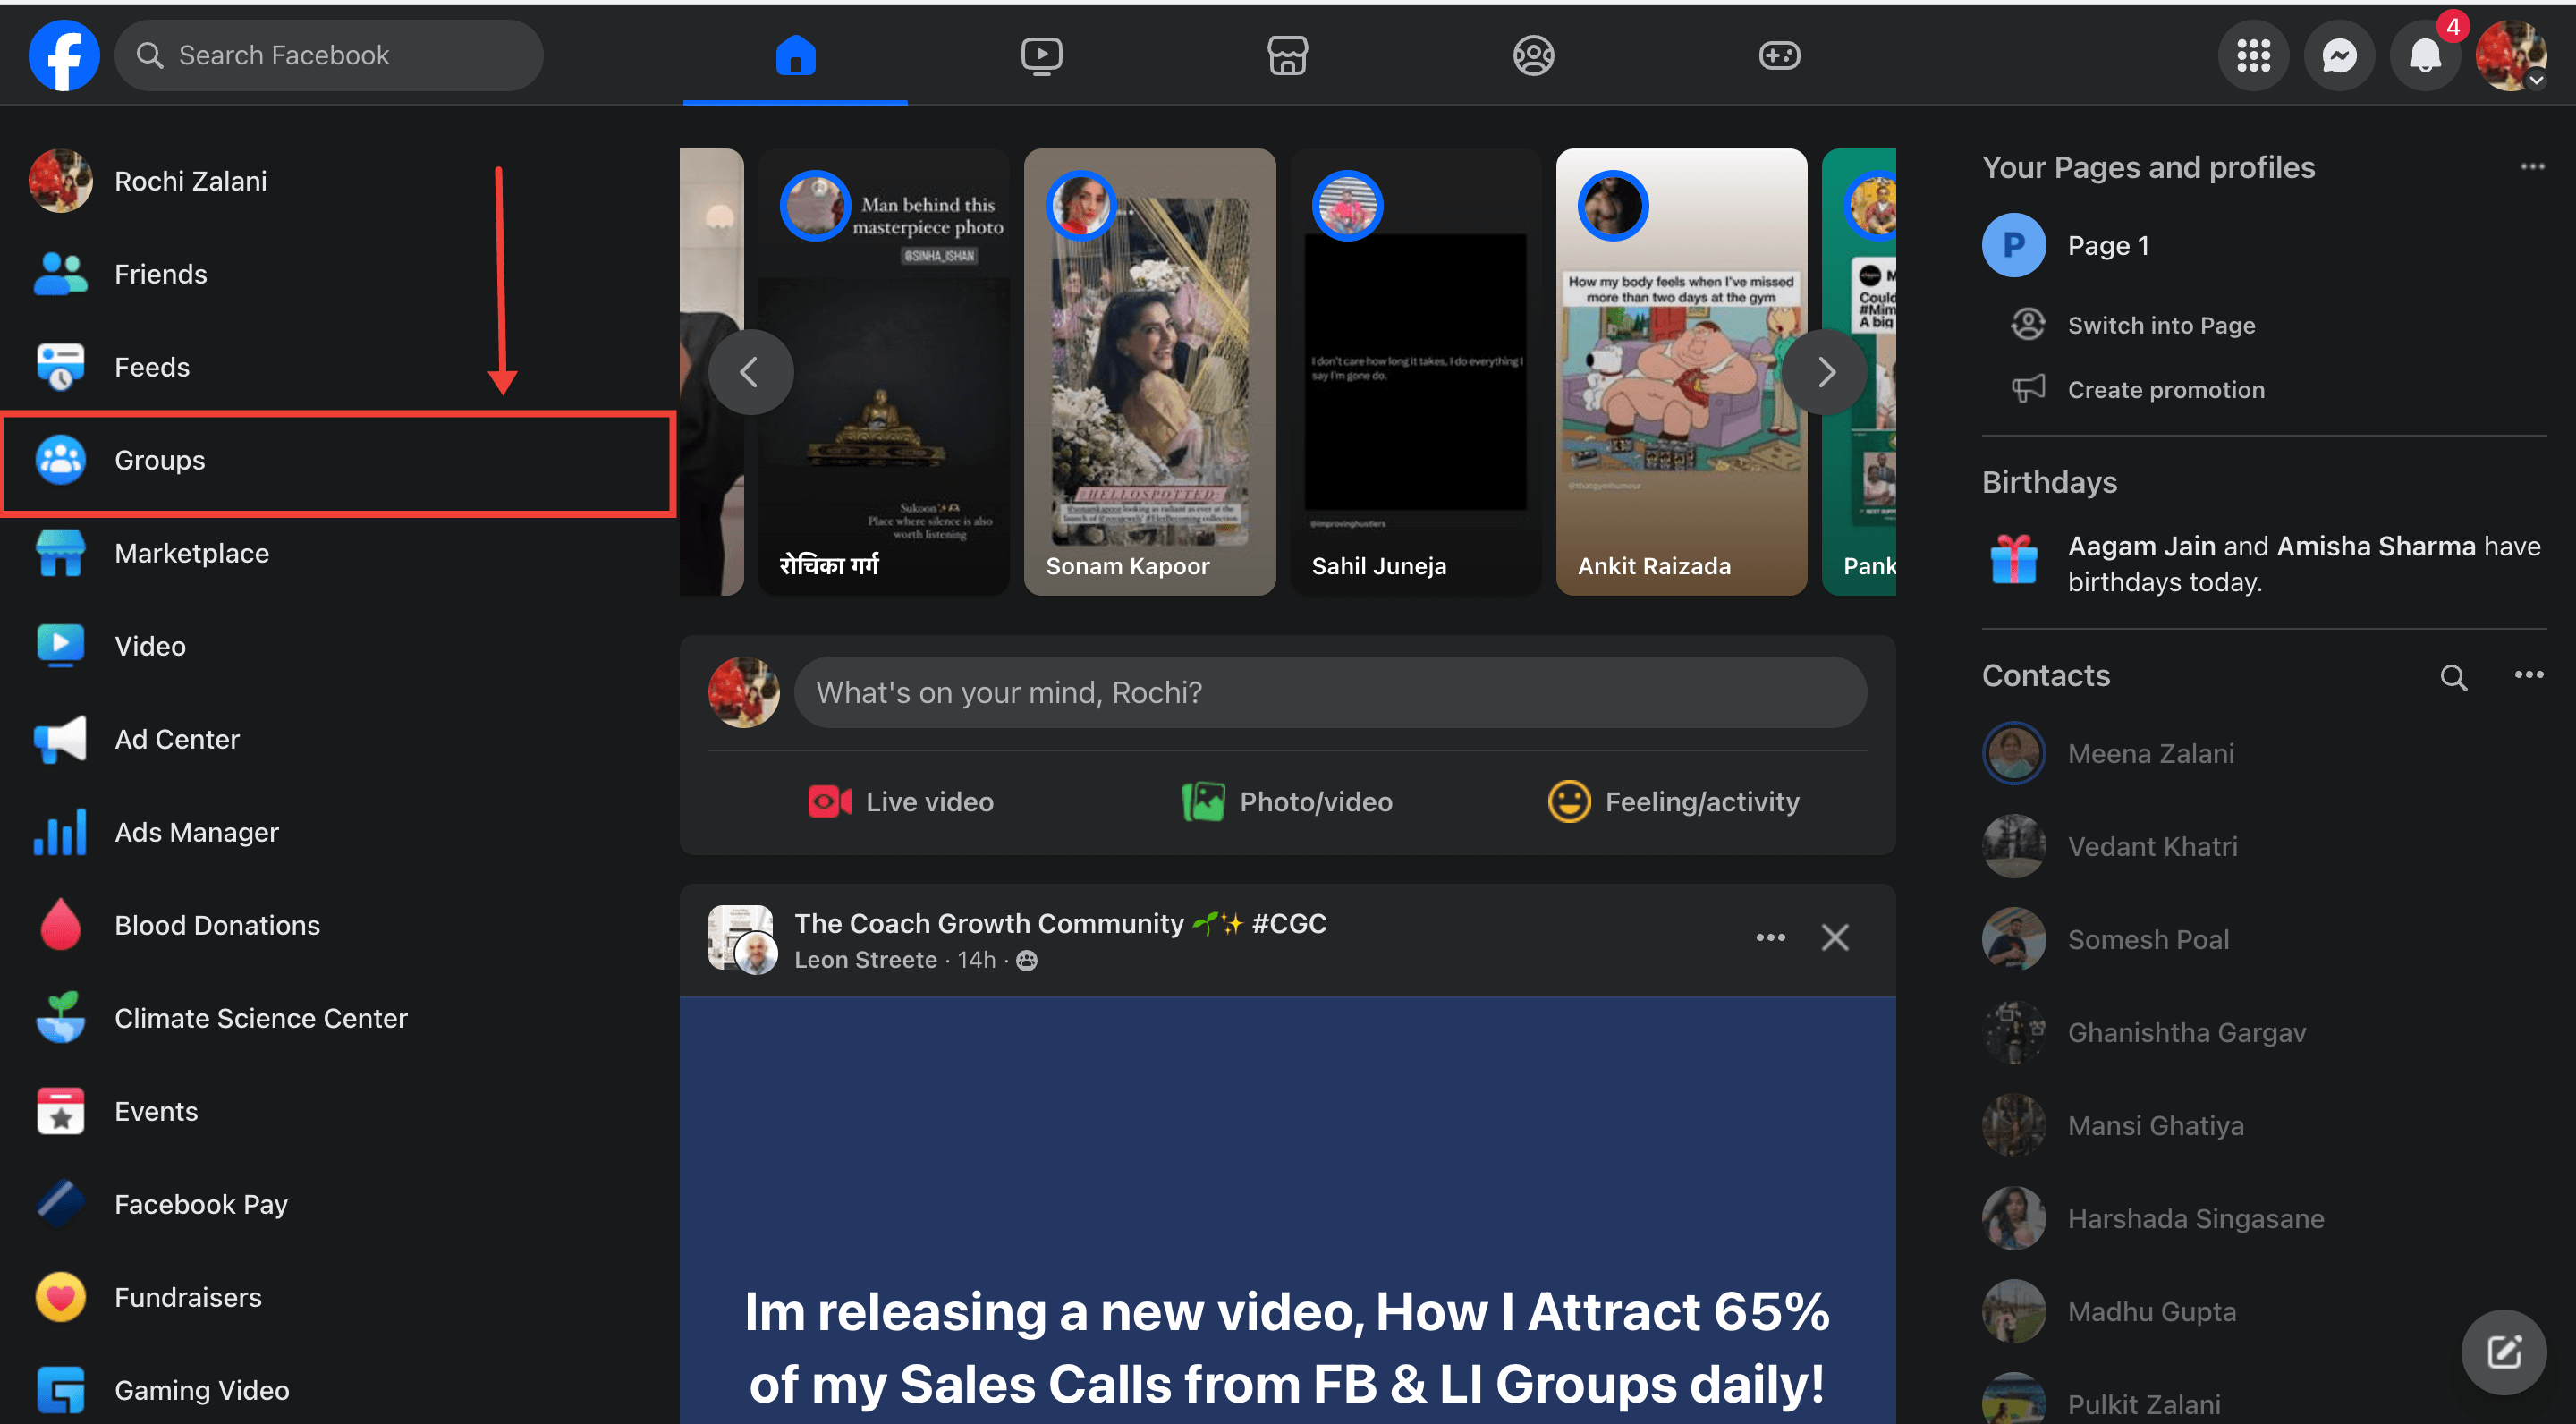
Step 1: Log in to your Facebook account and click on “Groups” on the left-hand column
As soon as you log in to your Facebook account, you’ll see the “Groups” option on the top left side.
If you don’t have a Facebook account, sign up for one. Facebook profiles are a prerequisite to creating and joining a Facebook Group.
You can also follow the same step to create a new group from your Facebook Page. When you do so, your page will be your Facebook Group’s admin by default.
⚠️ Note: If you link your Facebook Group to your Facebook Page later, modify your settings to accept Facebook Pages as members of your Group.
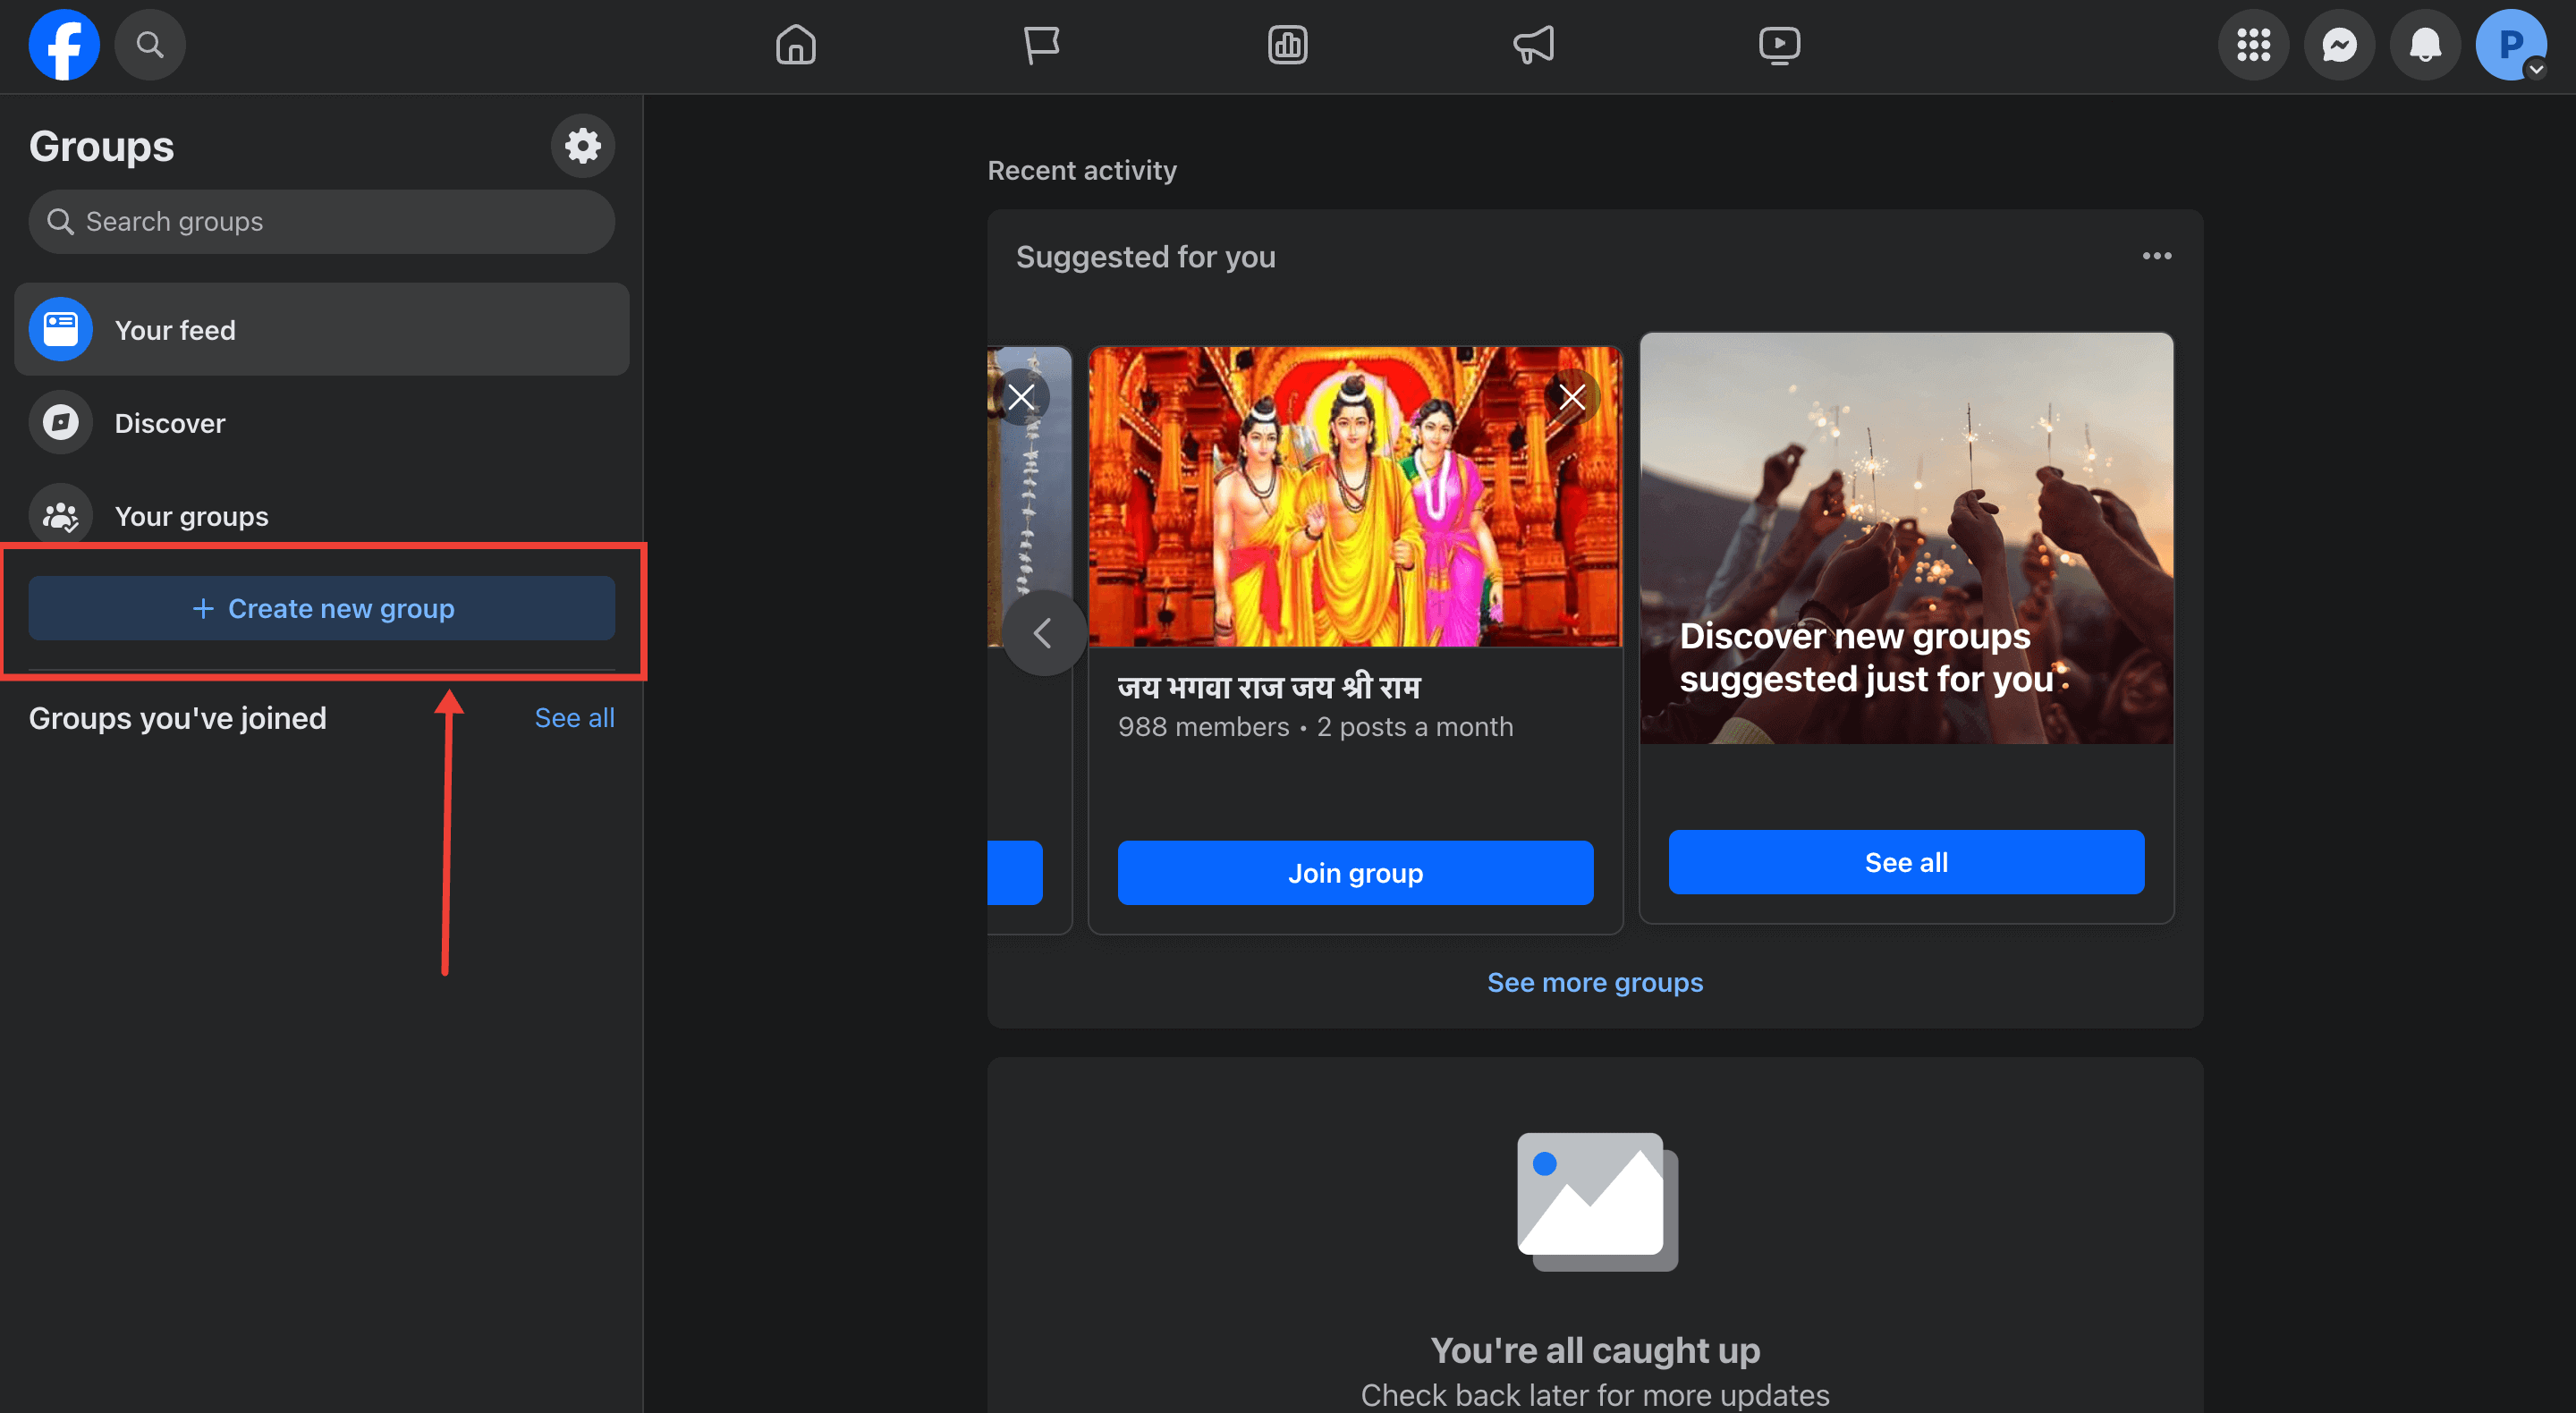
Step 2: Select “Create new group”
Once you tap “Groups” in the first step, a Group Feed page will appear. Here, Facebook will show all the groups you’ve joined and the posts from it. The left side will show the Groups you manage and are a part of.
To create a new Facebook Group, tap “Create new group” on the left side.
Step 3: Give your Facebook Group a name and choose your privacy settings
Once you click “Create new group,” you’ll be asked to give your Facebook community a name and decide on your Group’s privacy settings.
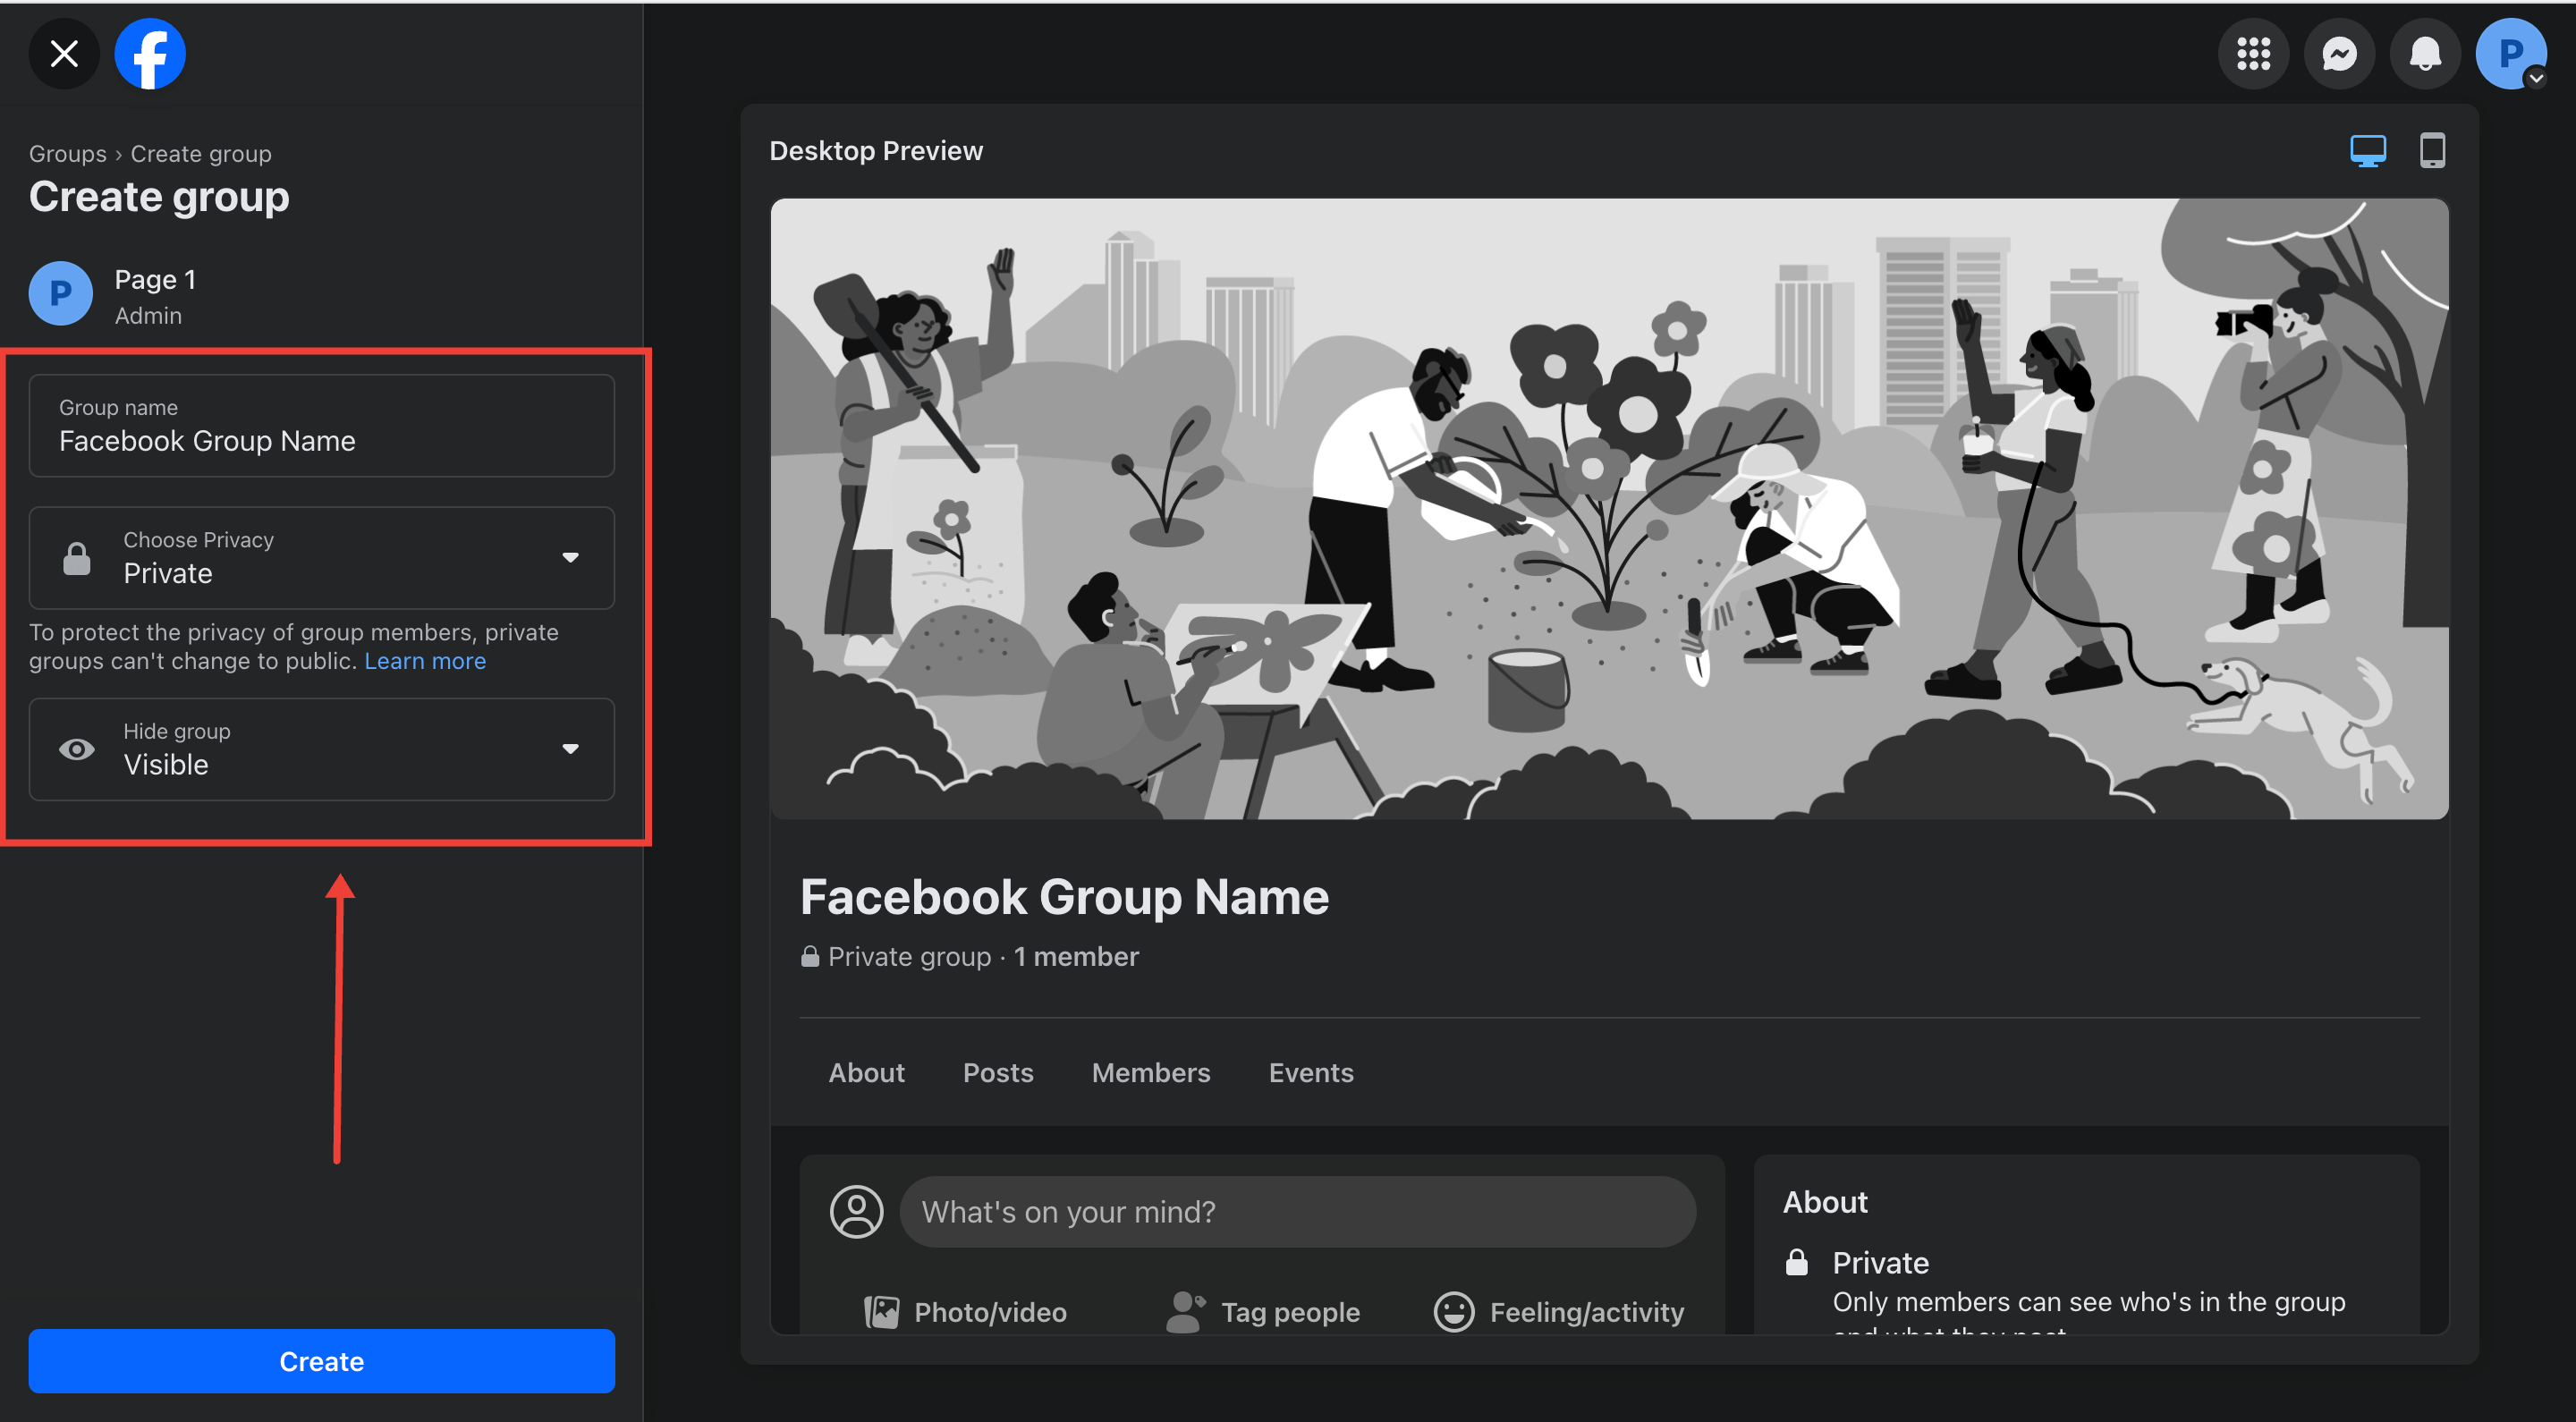
What group name should you give your Facebook Group?
- If you’re a small business, you can keep it simple and name it “[Brand Name] Community” like Gymshark Community.
- If you’re a creator, you can either form a Facebook Group under your name or call it something along your community’s shared interest, like Dyson Airwrap Community.
What privacy settings should you choose for your Facebook Group?
- Choose “Public” if you want anyone to be able to discover your Group, see members’ posts, and interact with them.
- Choose “Private” and “Visible” if you want your Facebook Group to be discoverable in search but don’t want anyone to see what your members are saying unless they join the group.
- Choose “Private” and “Hidden” if you want members’ posts and your Facebook Group to remain hidden. No one can see your Facebook Group via searching (unless they’re already a member) and can join it only by invitation.
⚠️ Note: You can’t make your Facebook Group public if you initially made it private. If you’re on the fence, create a public Facebook Group that you can turn into a private group later.
I’d recommend keeping your Facebook Group private and visible because people often join groups to get access to an exclusive stream of content and like-minded members. Don’t keep your Group “Hidden” if you want more and more of your audience to join the group.
Although keeping your group private and hidden is suitable if you plan on discussing sensitive topics and want your Facebook community to feel like a safe space for your members.
You also avoid spam by creating a private group since you can vet membership requests and set Group Rules (more on that in the next section).
And voila! You’ve created a Facebook Group. Next, let’s learn how to use the features on Facebook to avoid spammers and make your Group more inviting.
How to manage your Facebook Group using these 5 features
Creating a Facebook Group is the easy bit. Maintaining it can be challenging. Luckily, Facebook has five features to help you evaluate potential members and be more vigilant of spammers.
1: Screen potential members through a questionnaire to avoid spammers
Facebook allows you to ask people up to three questions when they request to join your group. These questions can act as a filter to weed out spammers and people who aren’t genuinely interested in joining your community.
To set up a questionnaire, follow these two steps:
Step 1: Go to your Facebook Group’s “Manage” tab and tap “Membership Questions.”
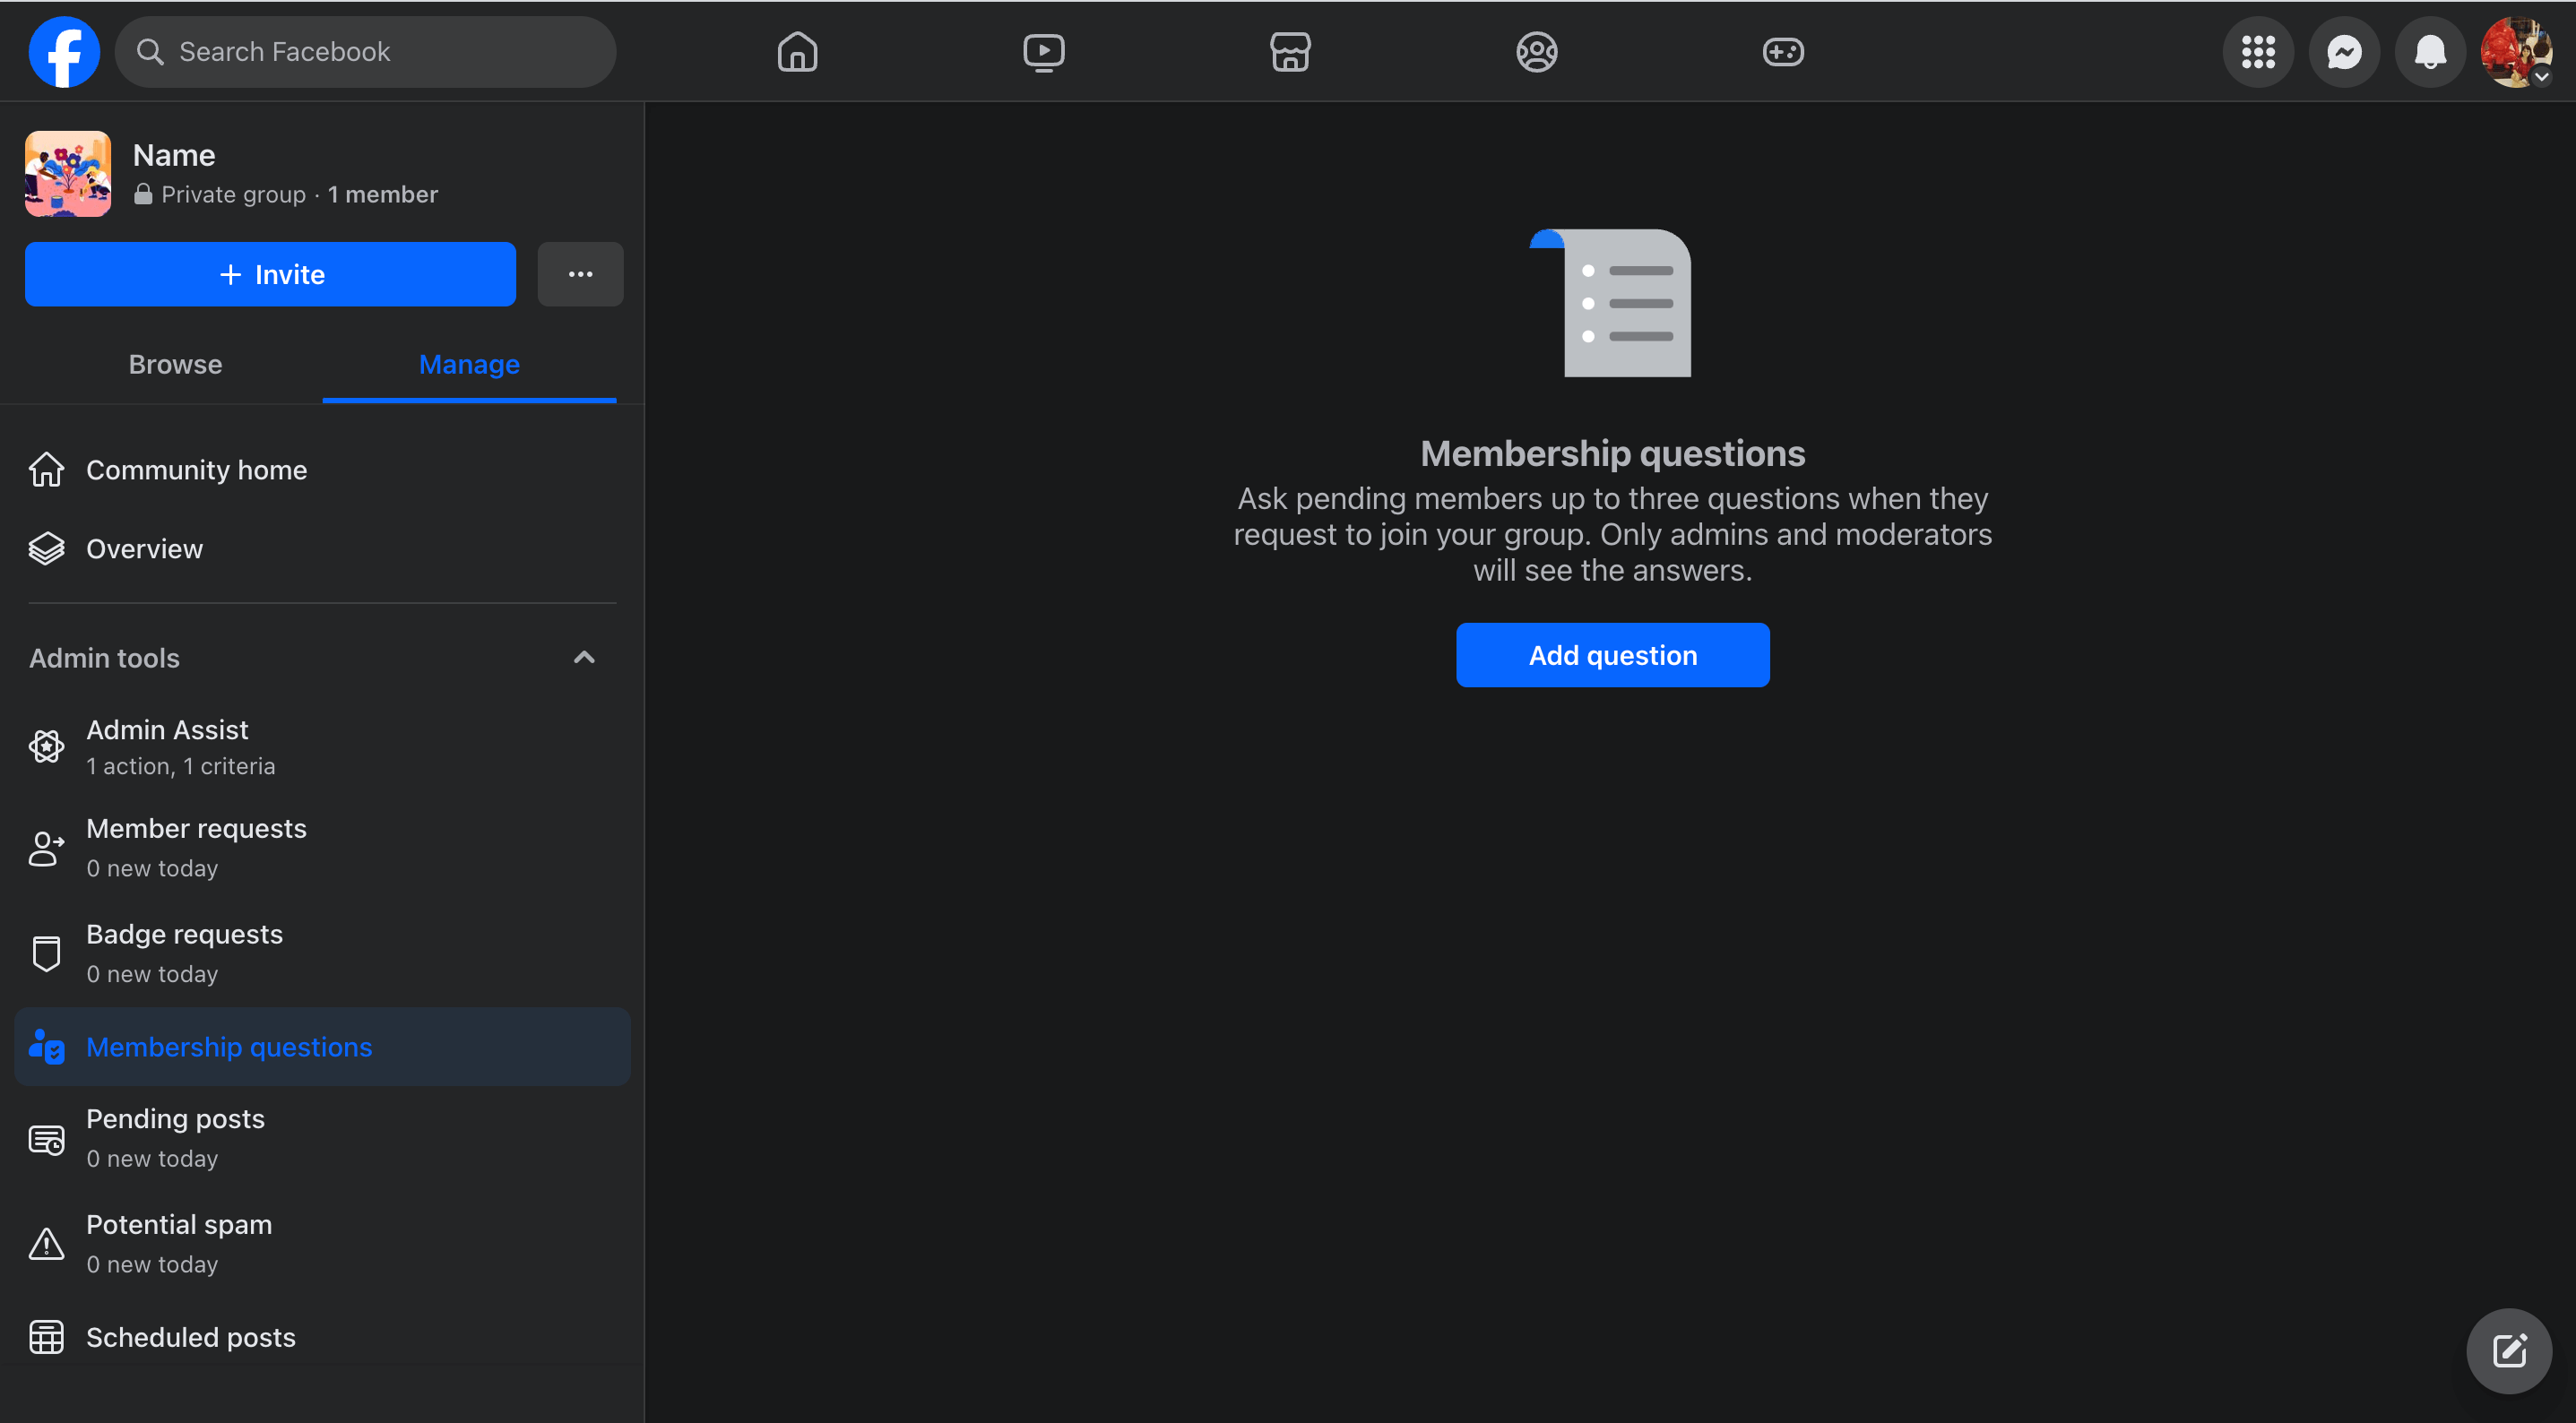
Step 2: Create your questions. There are options to create multiple choice questions, questions requiring a written answer, or questions requiring potential members to choose one correct answer.
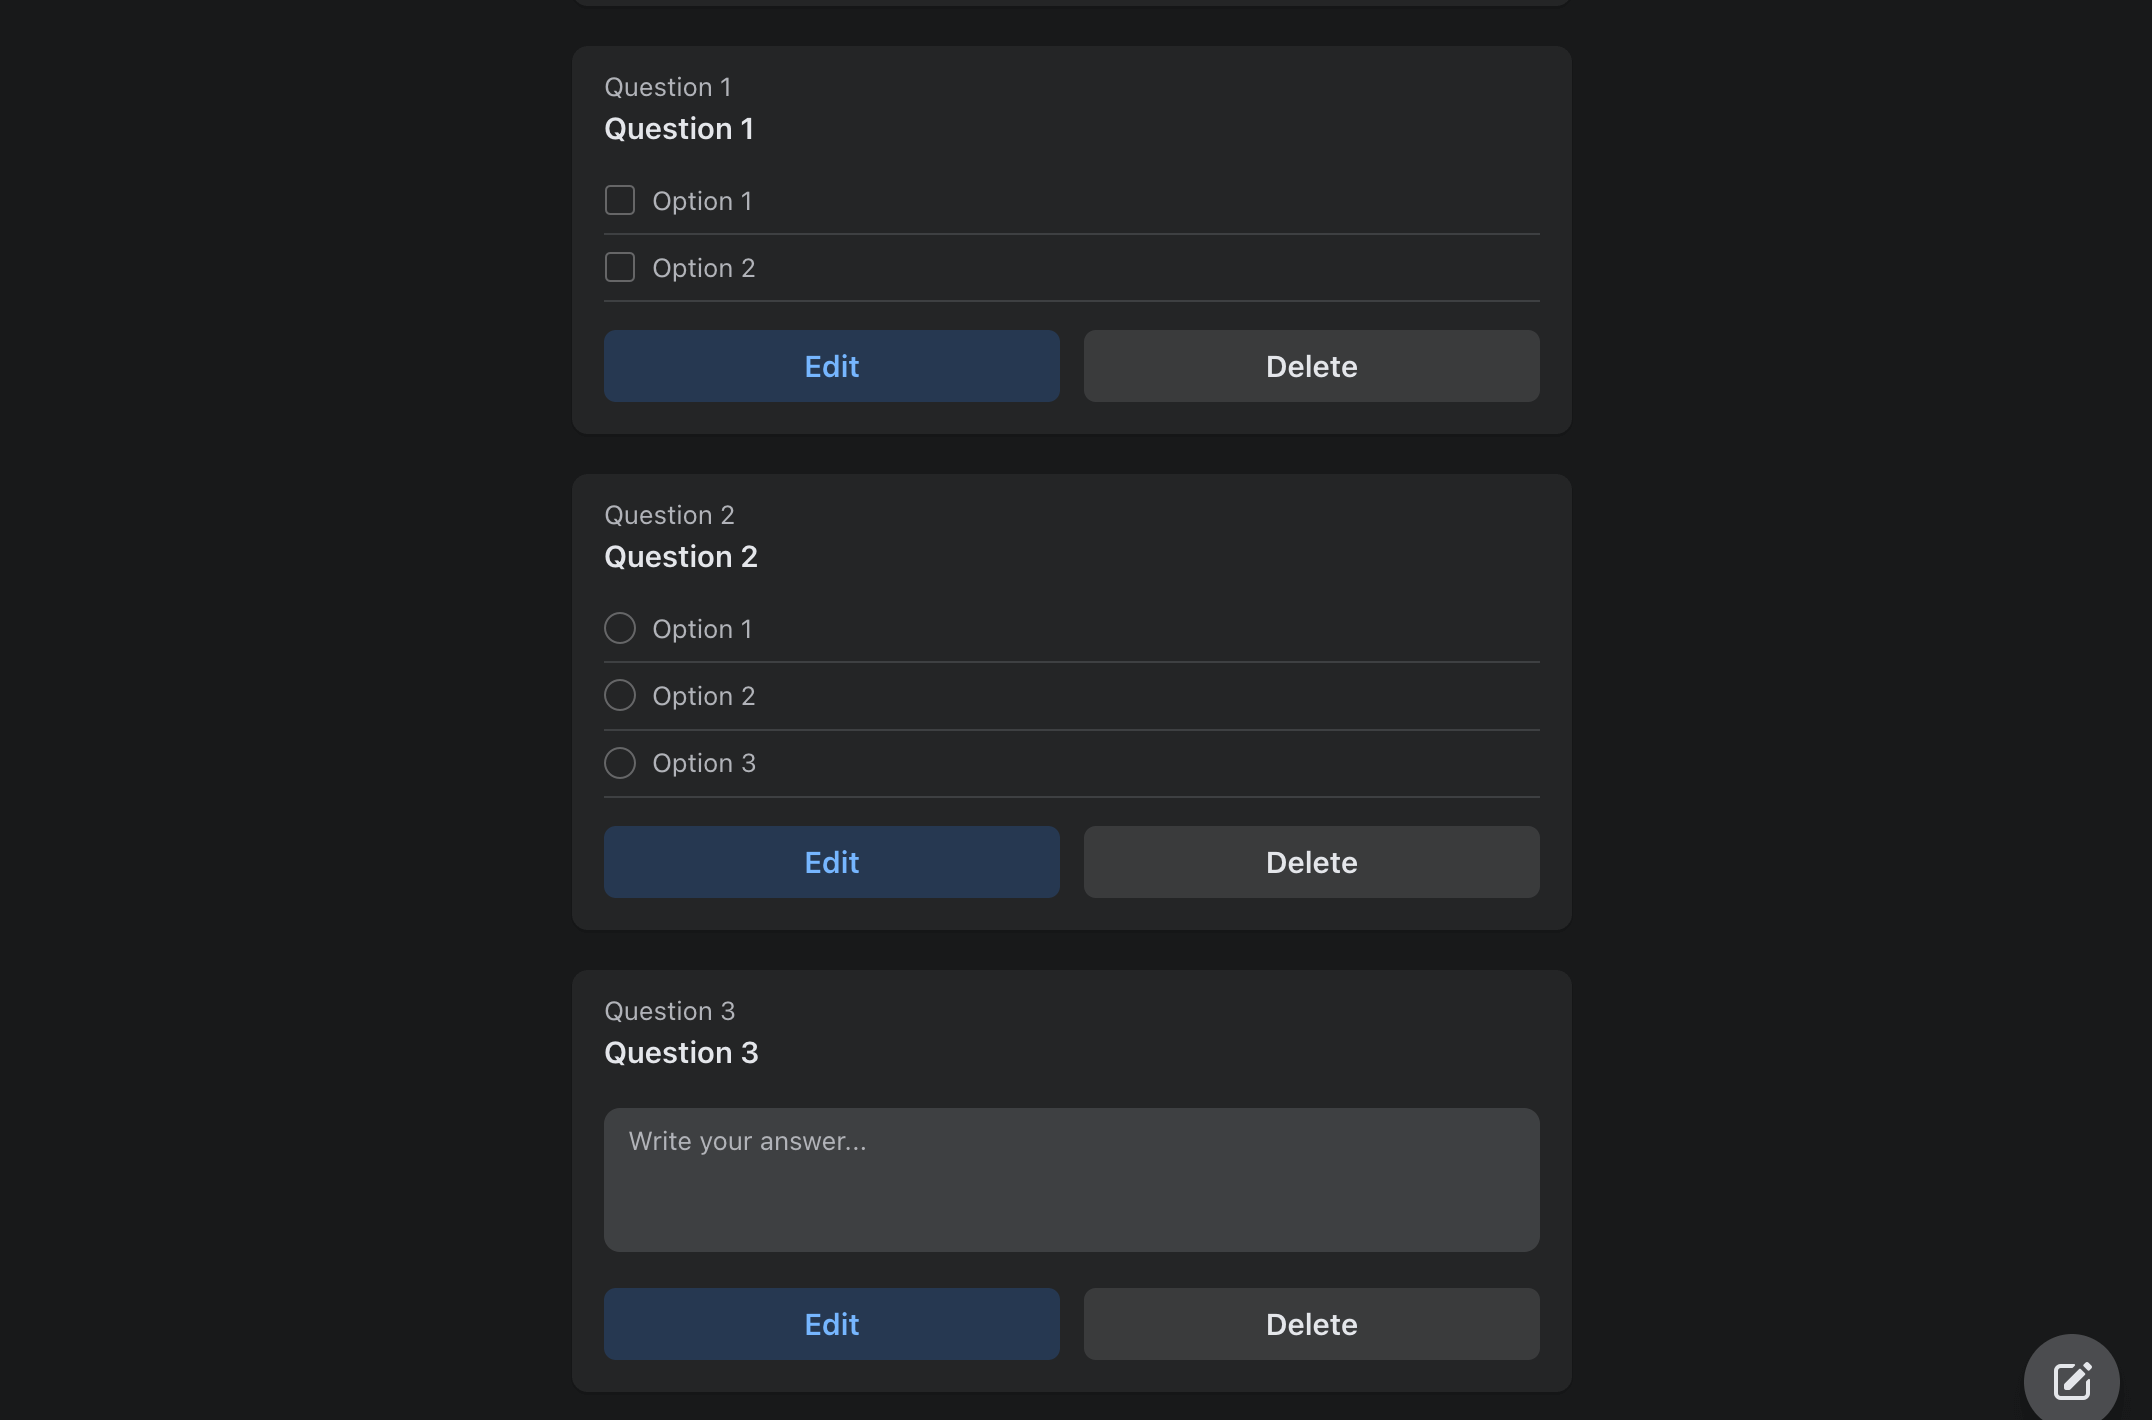
Your questionnaire is now live!
Once set up, potential members must answer all three questions to submit their request. You can choose whether or not to approve someone’s request based on their response.
What questions should your questionnaire contain?
Include questions that help you understand why someone wants to join your Facebook Group. If you’re a brand, you can also include questions about your product to screen spammers.
For example, Bubble Tea Club is a Facebook Group that asks for a member’s favorite bubble tea. This is an easy way to ensure people requesting to join their Facebook Group are already aware of their product.

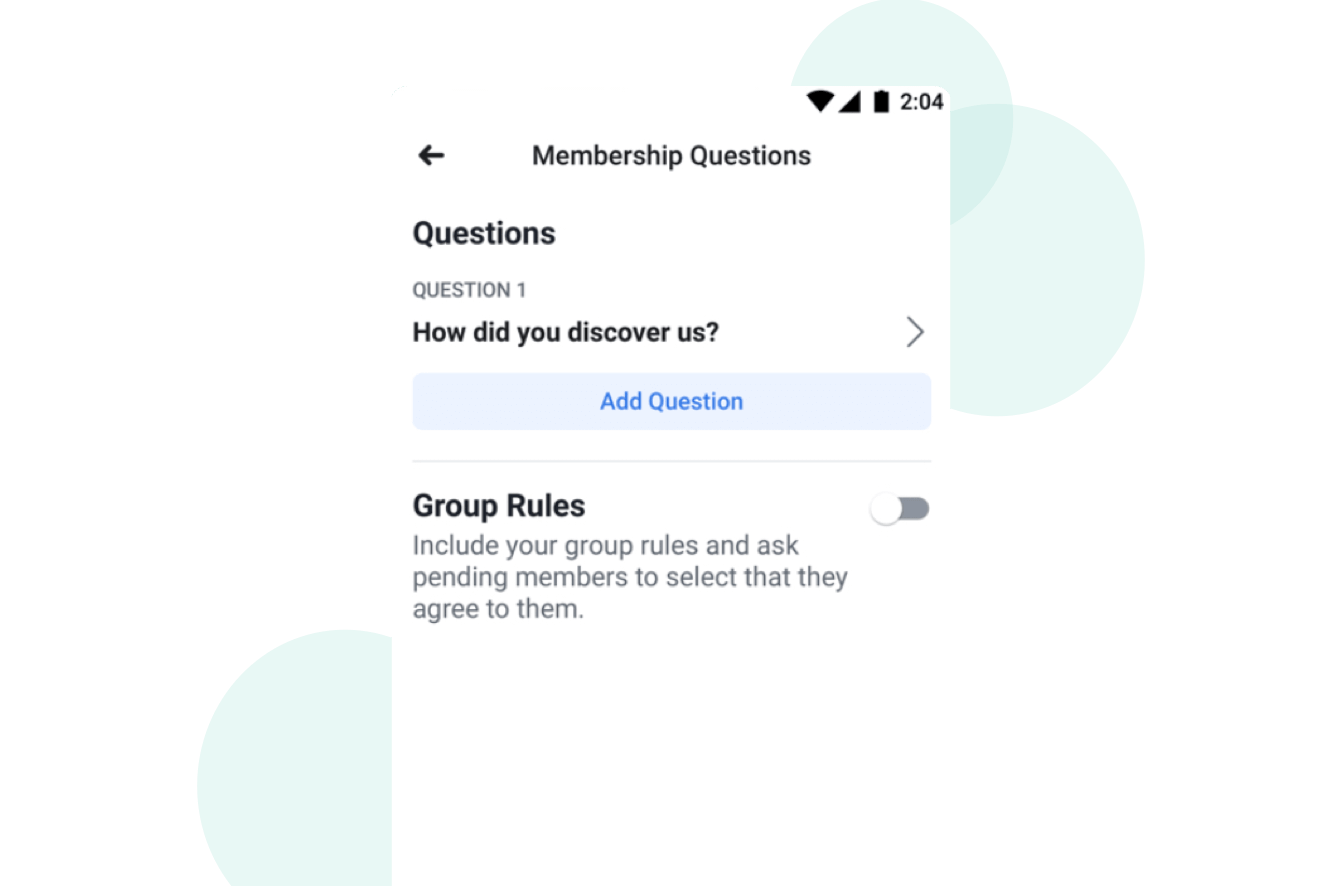
⚡ Pro-tip: I’d also recommend turning on “Group rules” in membership questions. You’ll find the option to toggle it on under the “Membership questions” section itself.
Why? This way, those who want to join your Facebook Group not only read the rules of getting an entry, they also agree to oblige them before submitting their membership request. If a spammer posts inappropriate content in the future, you can reference their agreement to the Group Rules as grounds for terminating them.
Michelle Tresemer, a Marketing Strategist at Foundations First Marketing, said Women in Marketing is one of her favorite Facebook Groups because toxic members are promptly removed.
“The topics are relevant; the community is incredibly helpful and kind, and the toxic members leave quickly.”
What if you want to pre-approve some incoming members?
Let’s say your customers or influencer partners are eager to join your Facebook Group. Or this is your second Facebook Group, and members from the first one are also eager to join the new one. You wouldn’t want these people to waste their time answering membership questions. How do you get them to skip the queue?
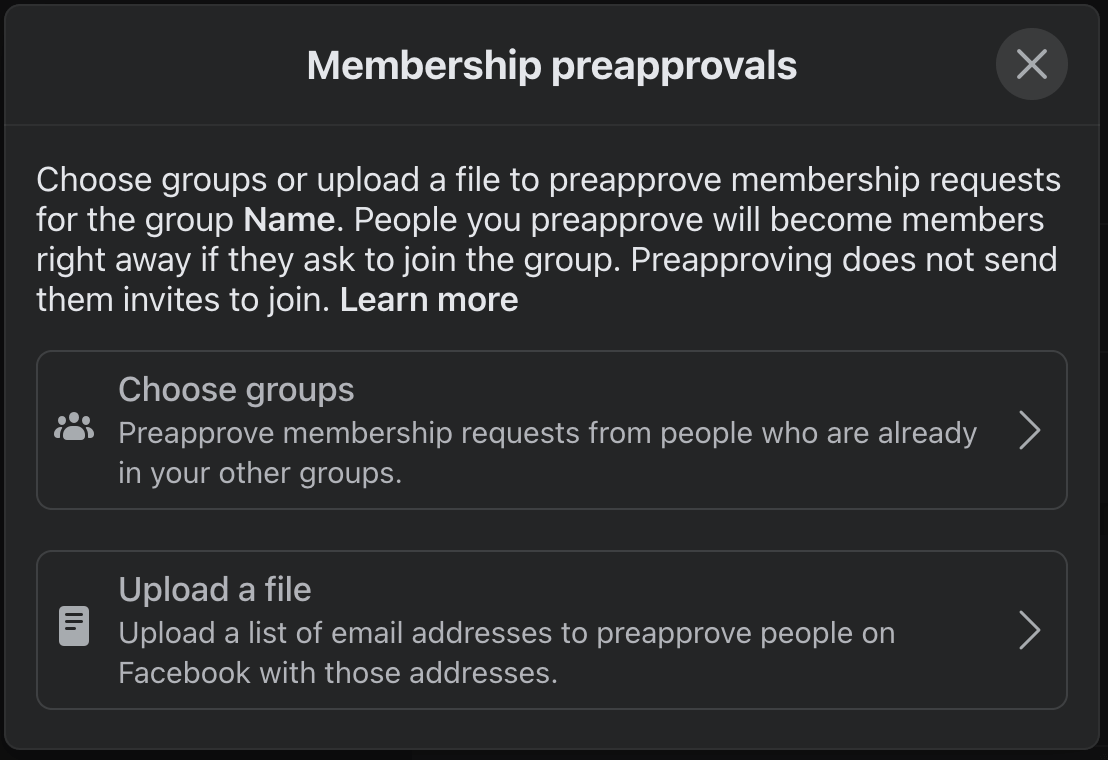
Go to “Group Settings” under the “Manage” tab. In the “Manage membership” section, you’ll see an option of “Who’s approved to join.”
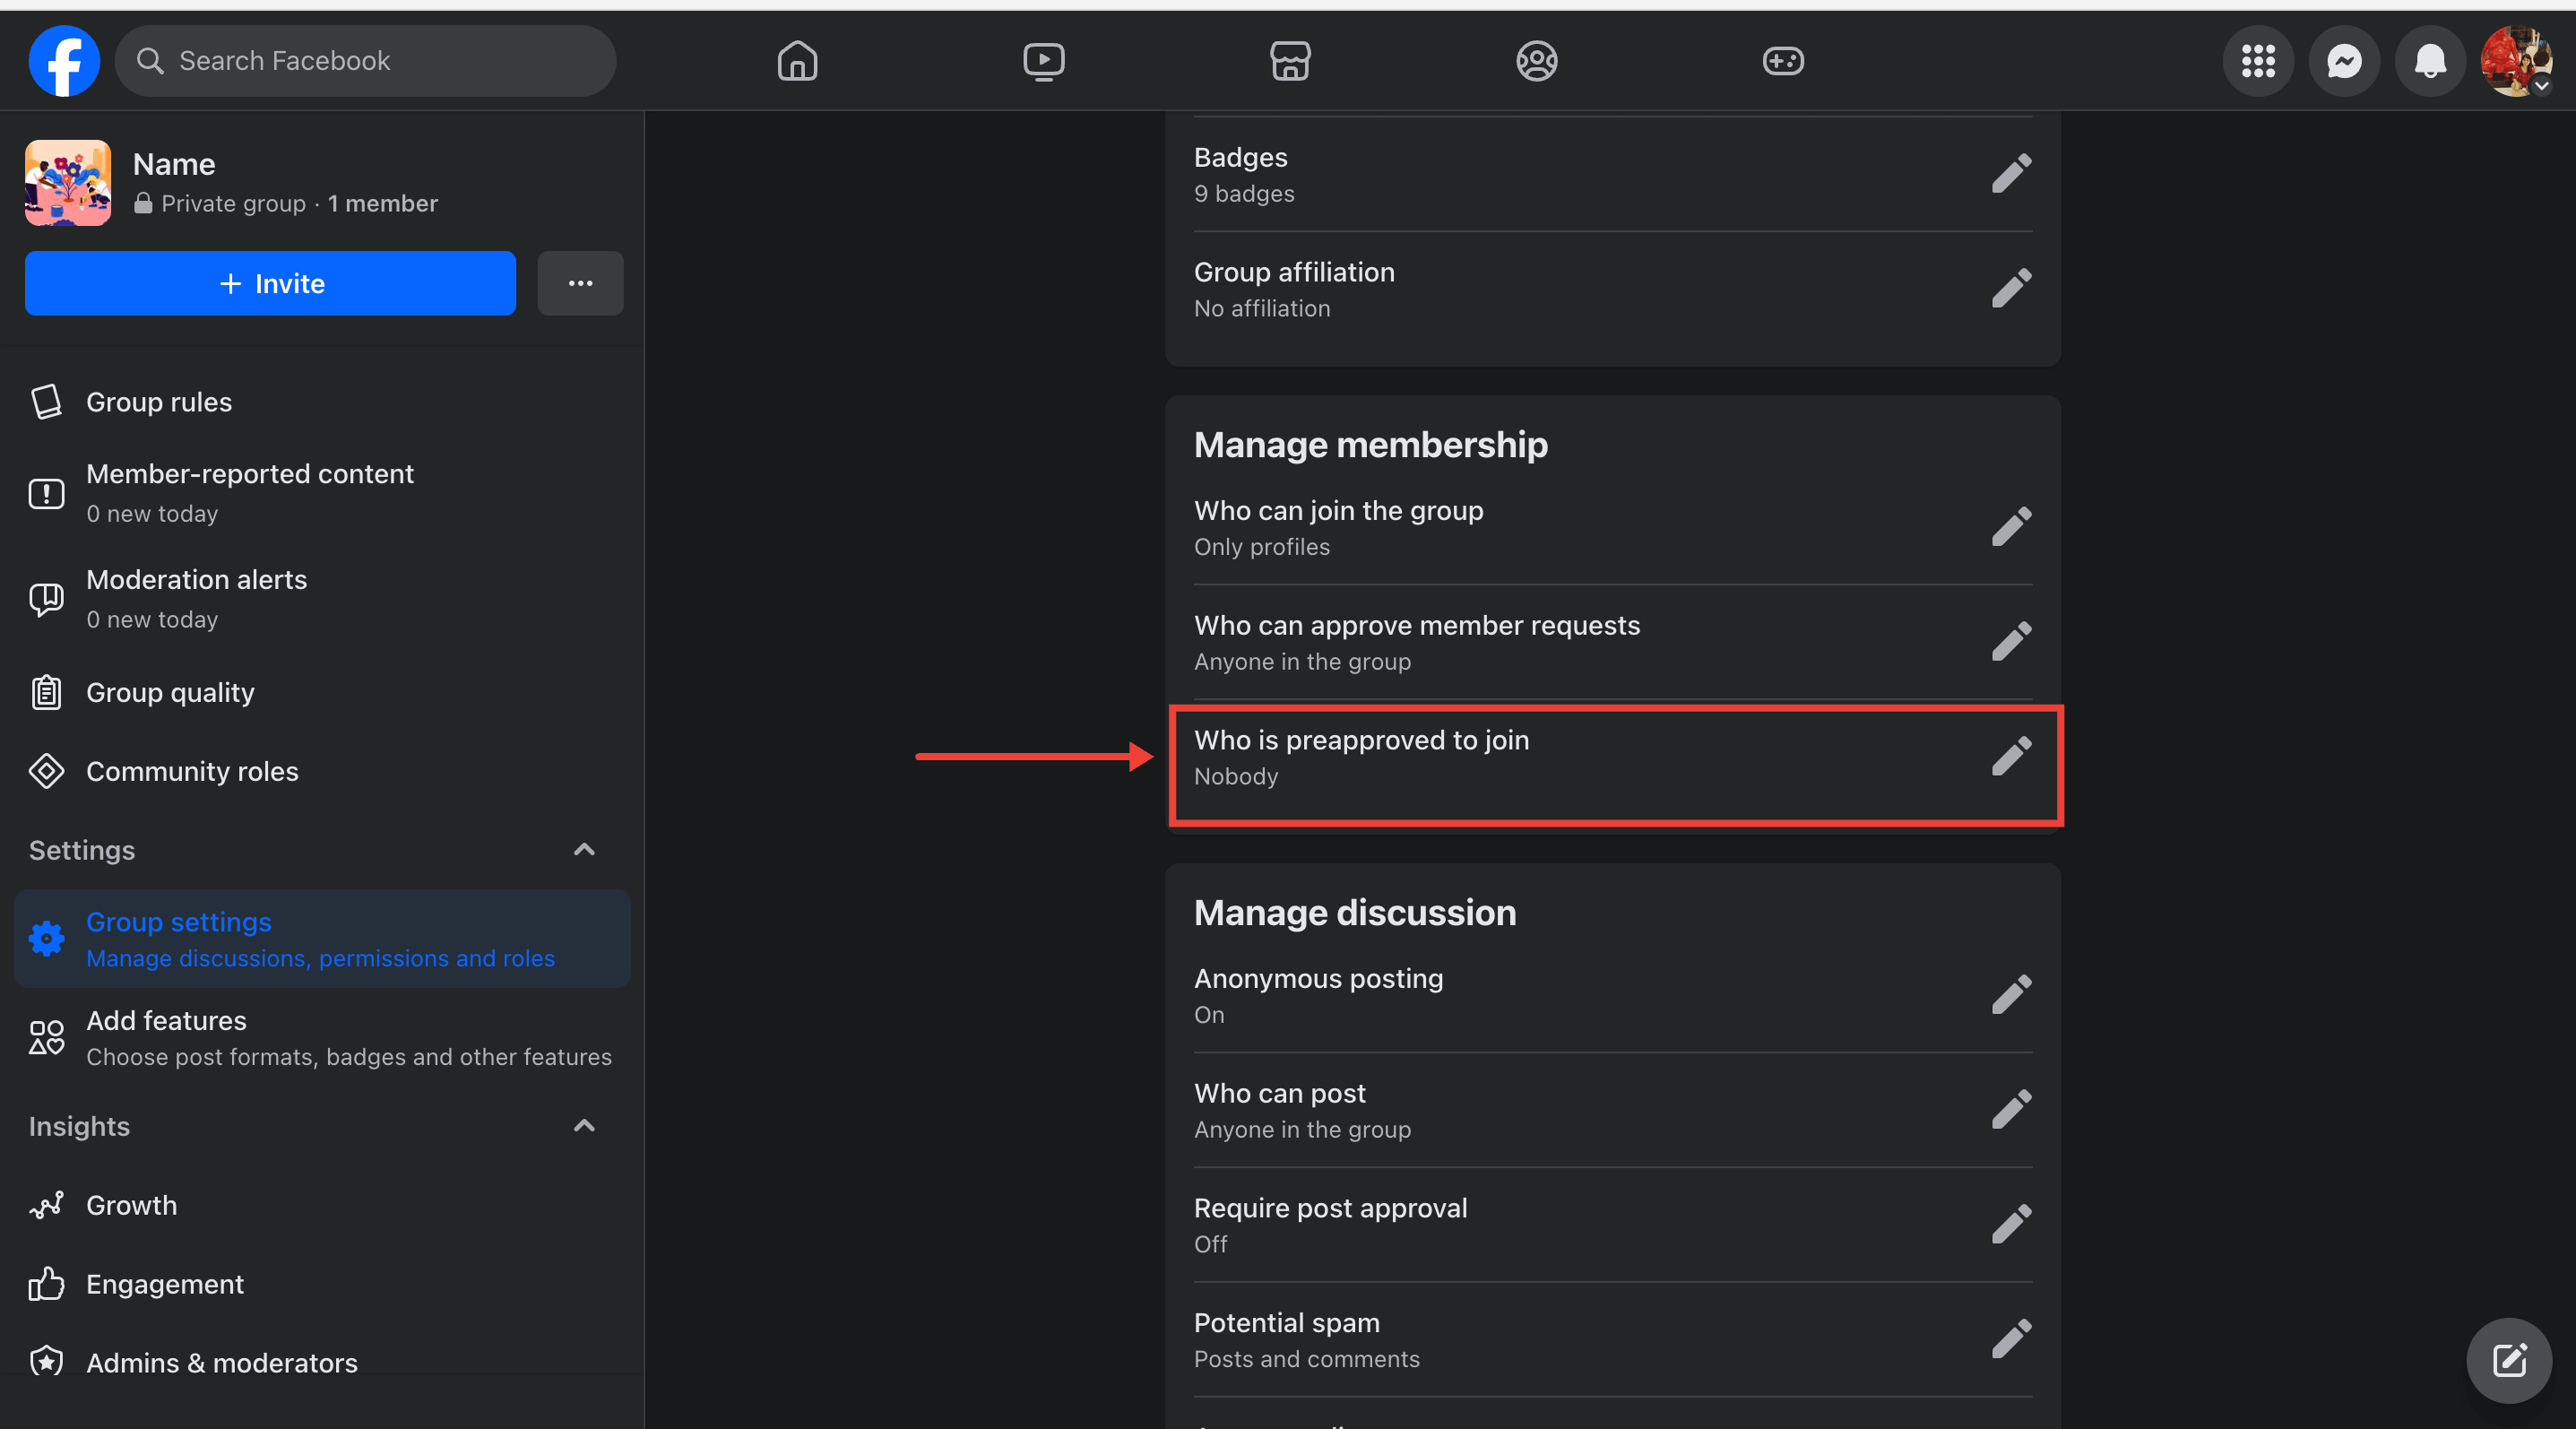
When you click on it, you’ll get the option to pre-approve membership requests from people who are already in your other Facebook Groups or upload a file of the email addresses (connected to Facebook) you’d like to pre-approve.
⚠️ Note: People with pre-approved email addresses must request a membership in your Facebook Group within 90 days to skip the questions. After 90 days, they’ll either have to answer the membership questions, or you’ll have to re-upload an updated list containing their emails.
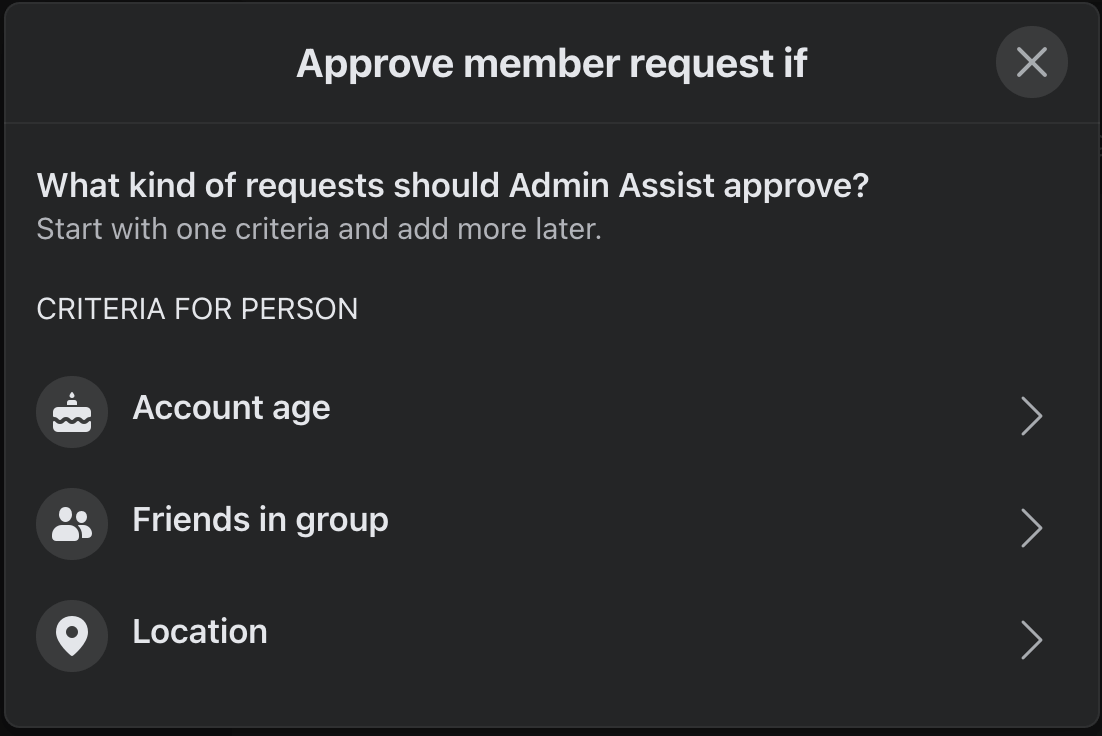
In the “Admin Assist” tab, you can also auto-approve membership requests based on certain criteria. Suppose you're a local New York Group and want to approve requests of anyone in the city automatically. In that case, you can set a location criteria to auto-approve requests from people living in NYC.
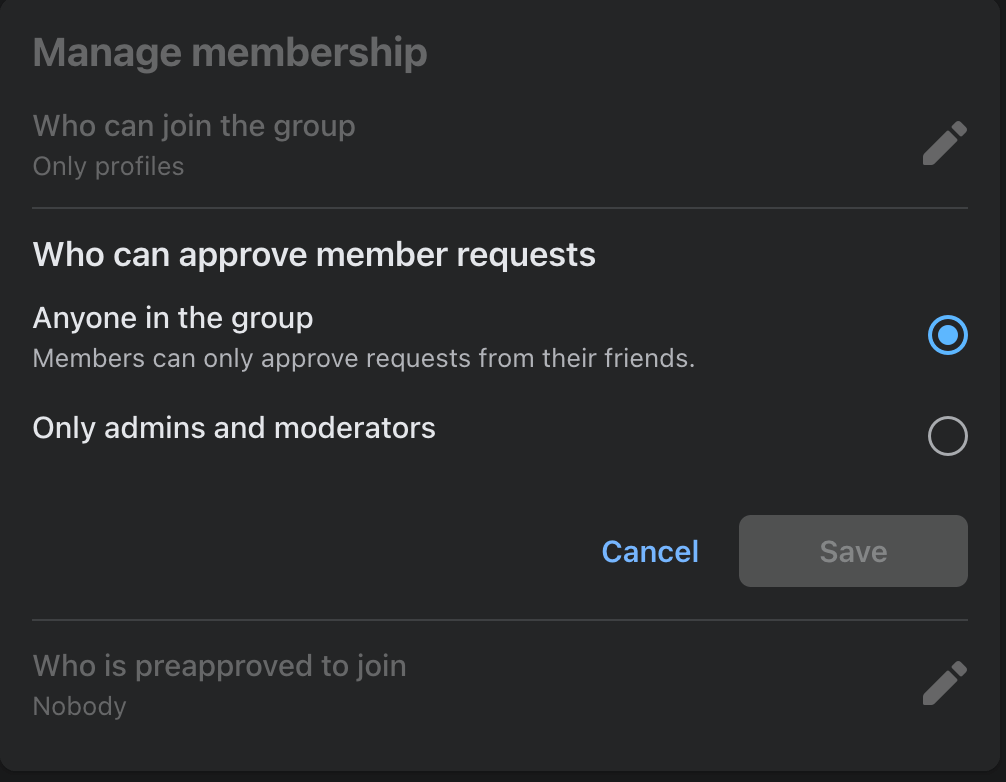
While you’re at it, ensure only group admins and moderators can approve membership requests (instead of any member of the Group) in the “Manage memberships” tab.
Membership questions are the gold standard to avoid spammers and inauthentic people. Only let people in who will be serious about contributing to your community alongside deriving benefits from it.
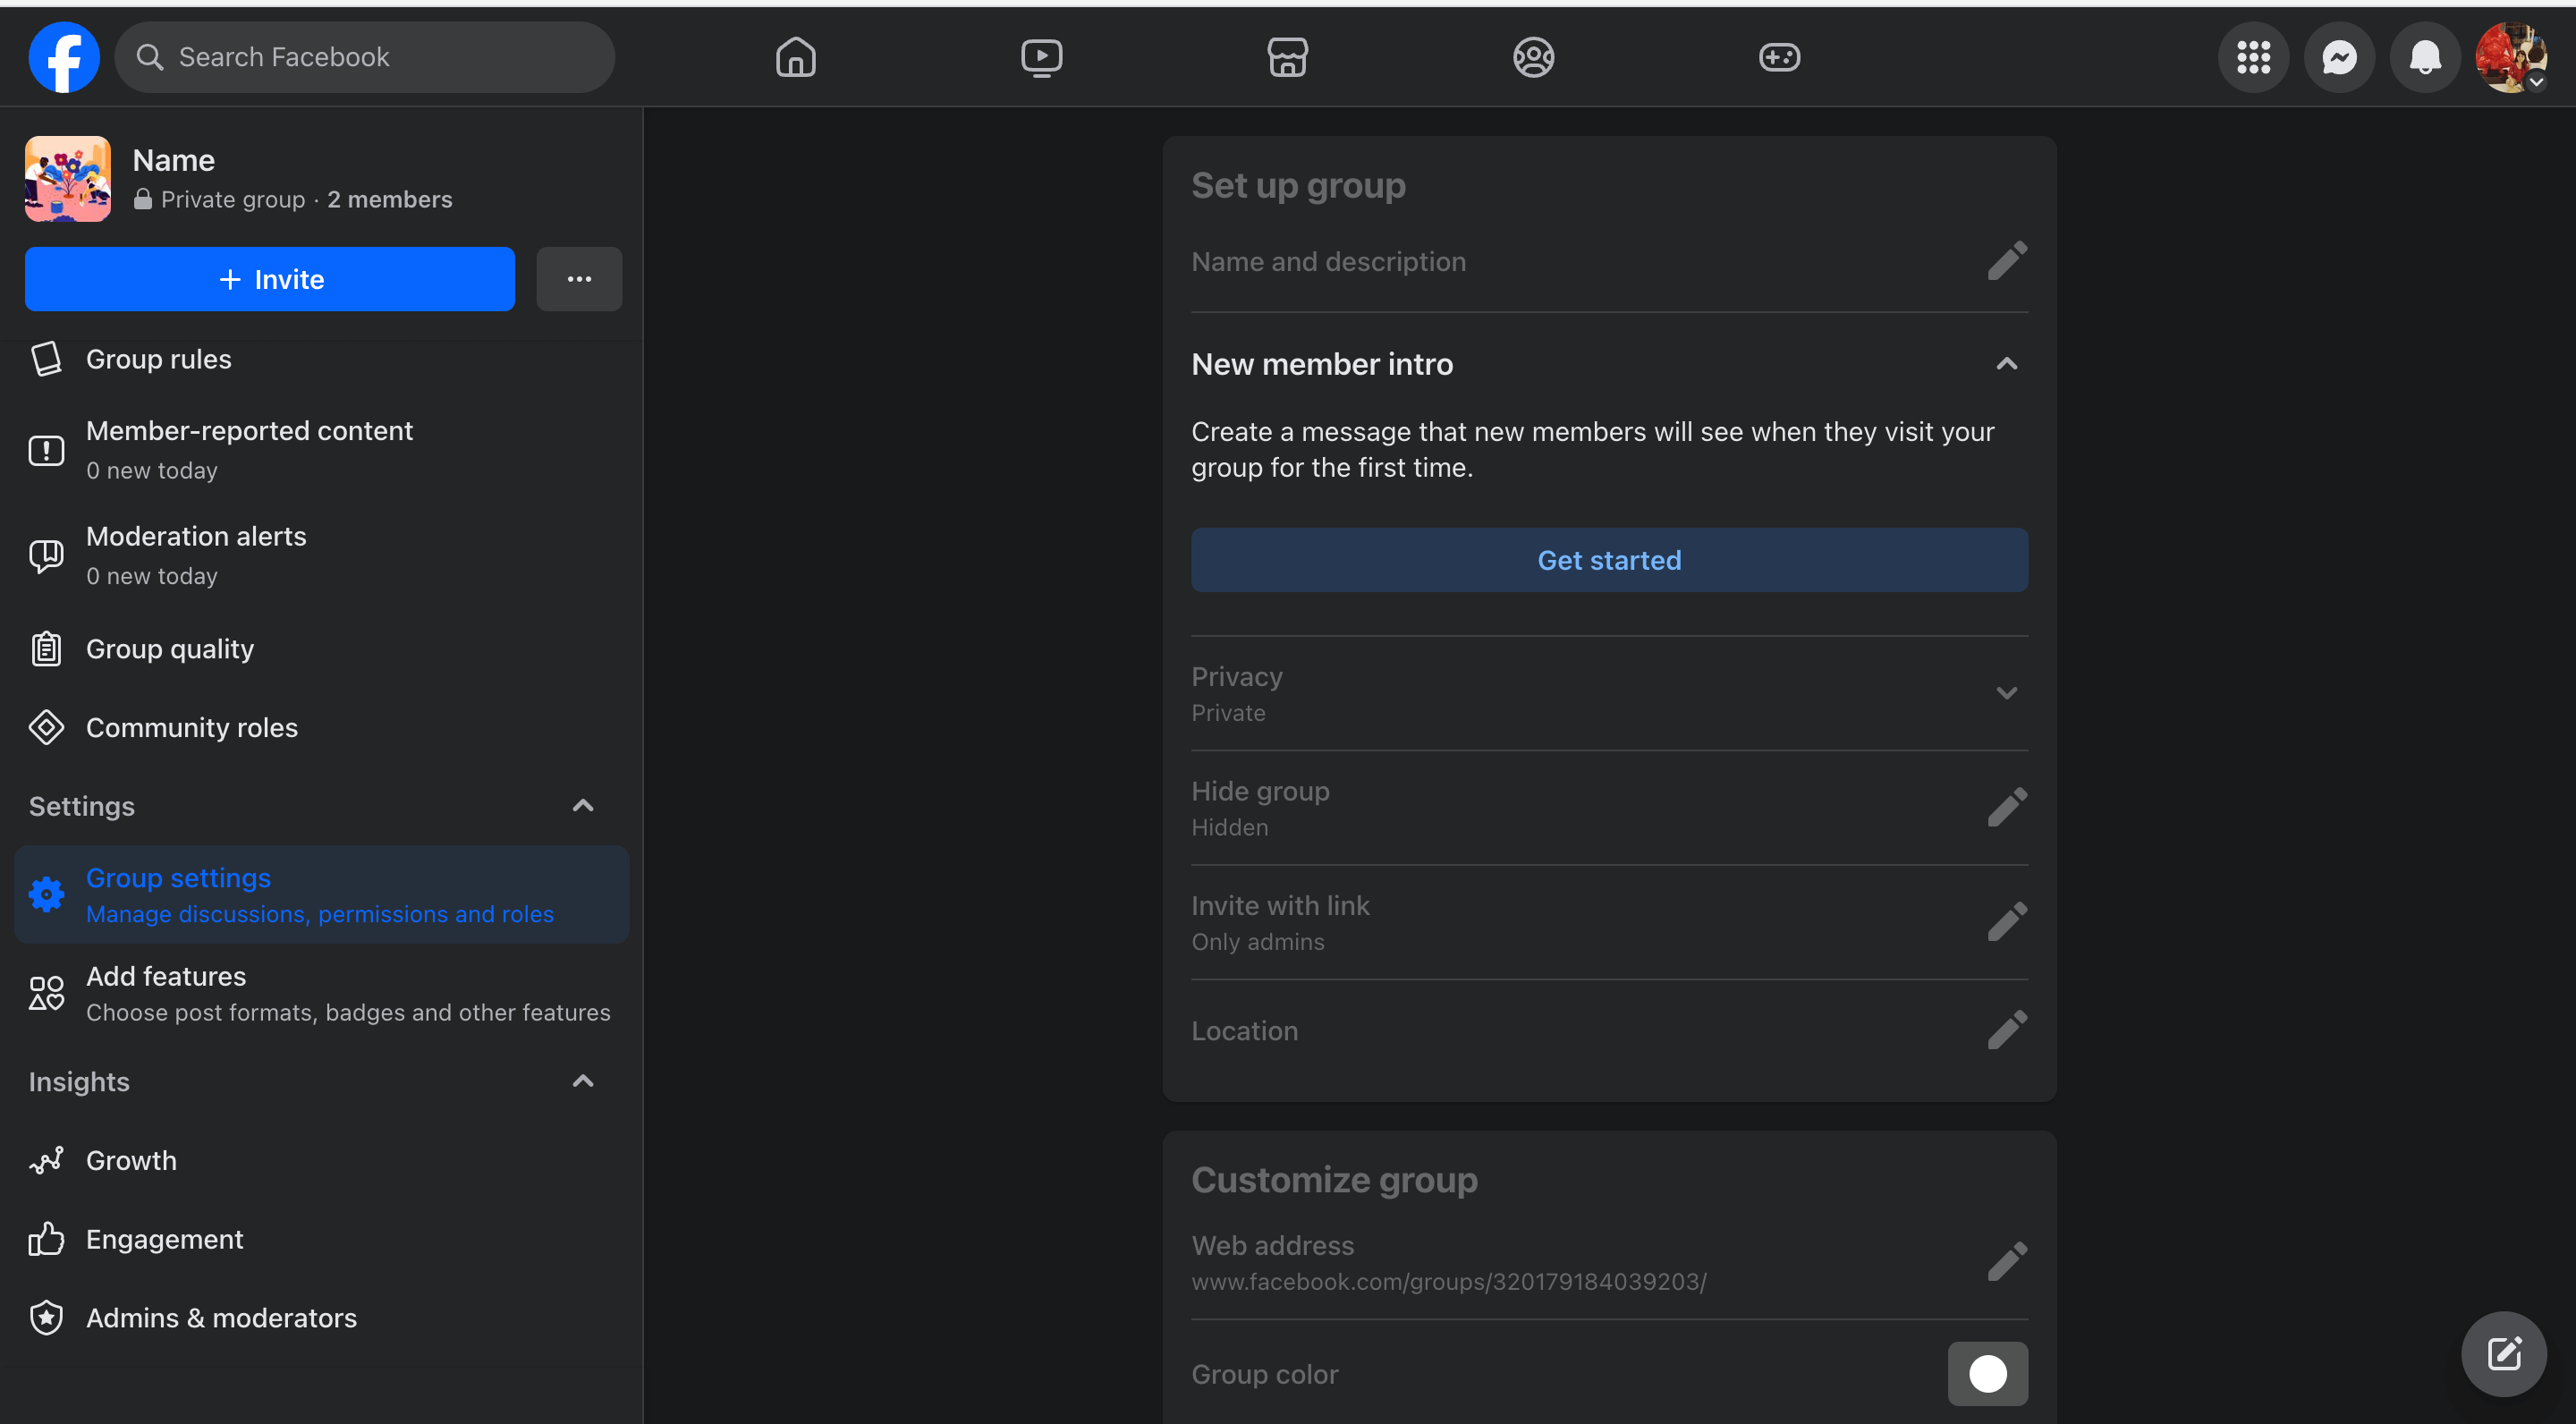
2: Add group admins and moderators to monitor Group activity
You can only do so much alone. As your Facebook Group grows, you’ll need more hands on deck to monitor for spam and conflict.
Facebook Groups allow you to add admins and moderators to help you manage your Facebook Group.
Here’s how to add admins and moderators to your Facebook Group in three steps:
Step 1: Invite the potential admins and moderators to join your Facebook Group. Someone outside the Group can’t be an admin or moderator.
Step 2. On your Facebook page, click on “Members.”
Step 3. Scroll down to find your potential admin or moderator. Click on the three dots next to their name. You’ll find the option to invite them as admin or moderator.
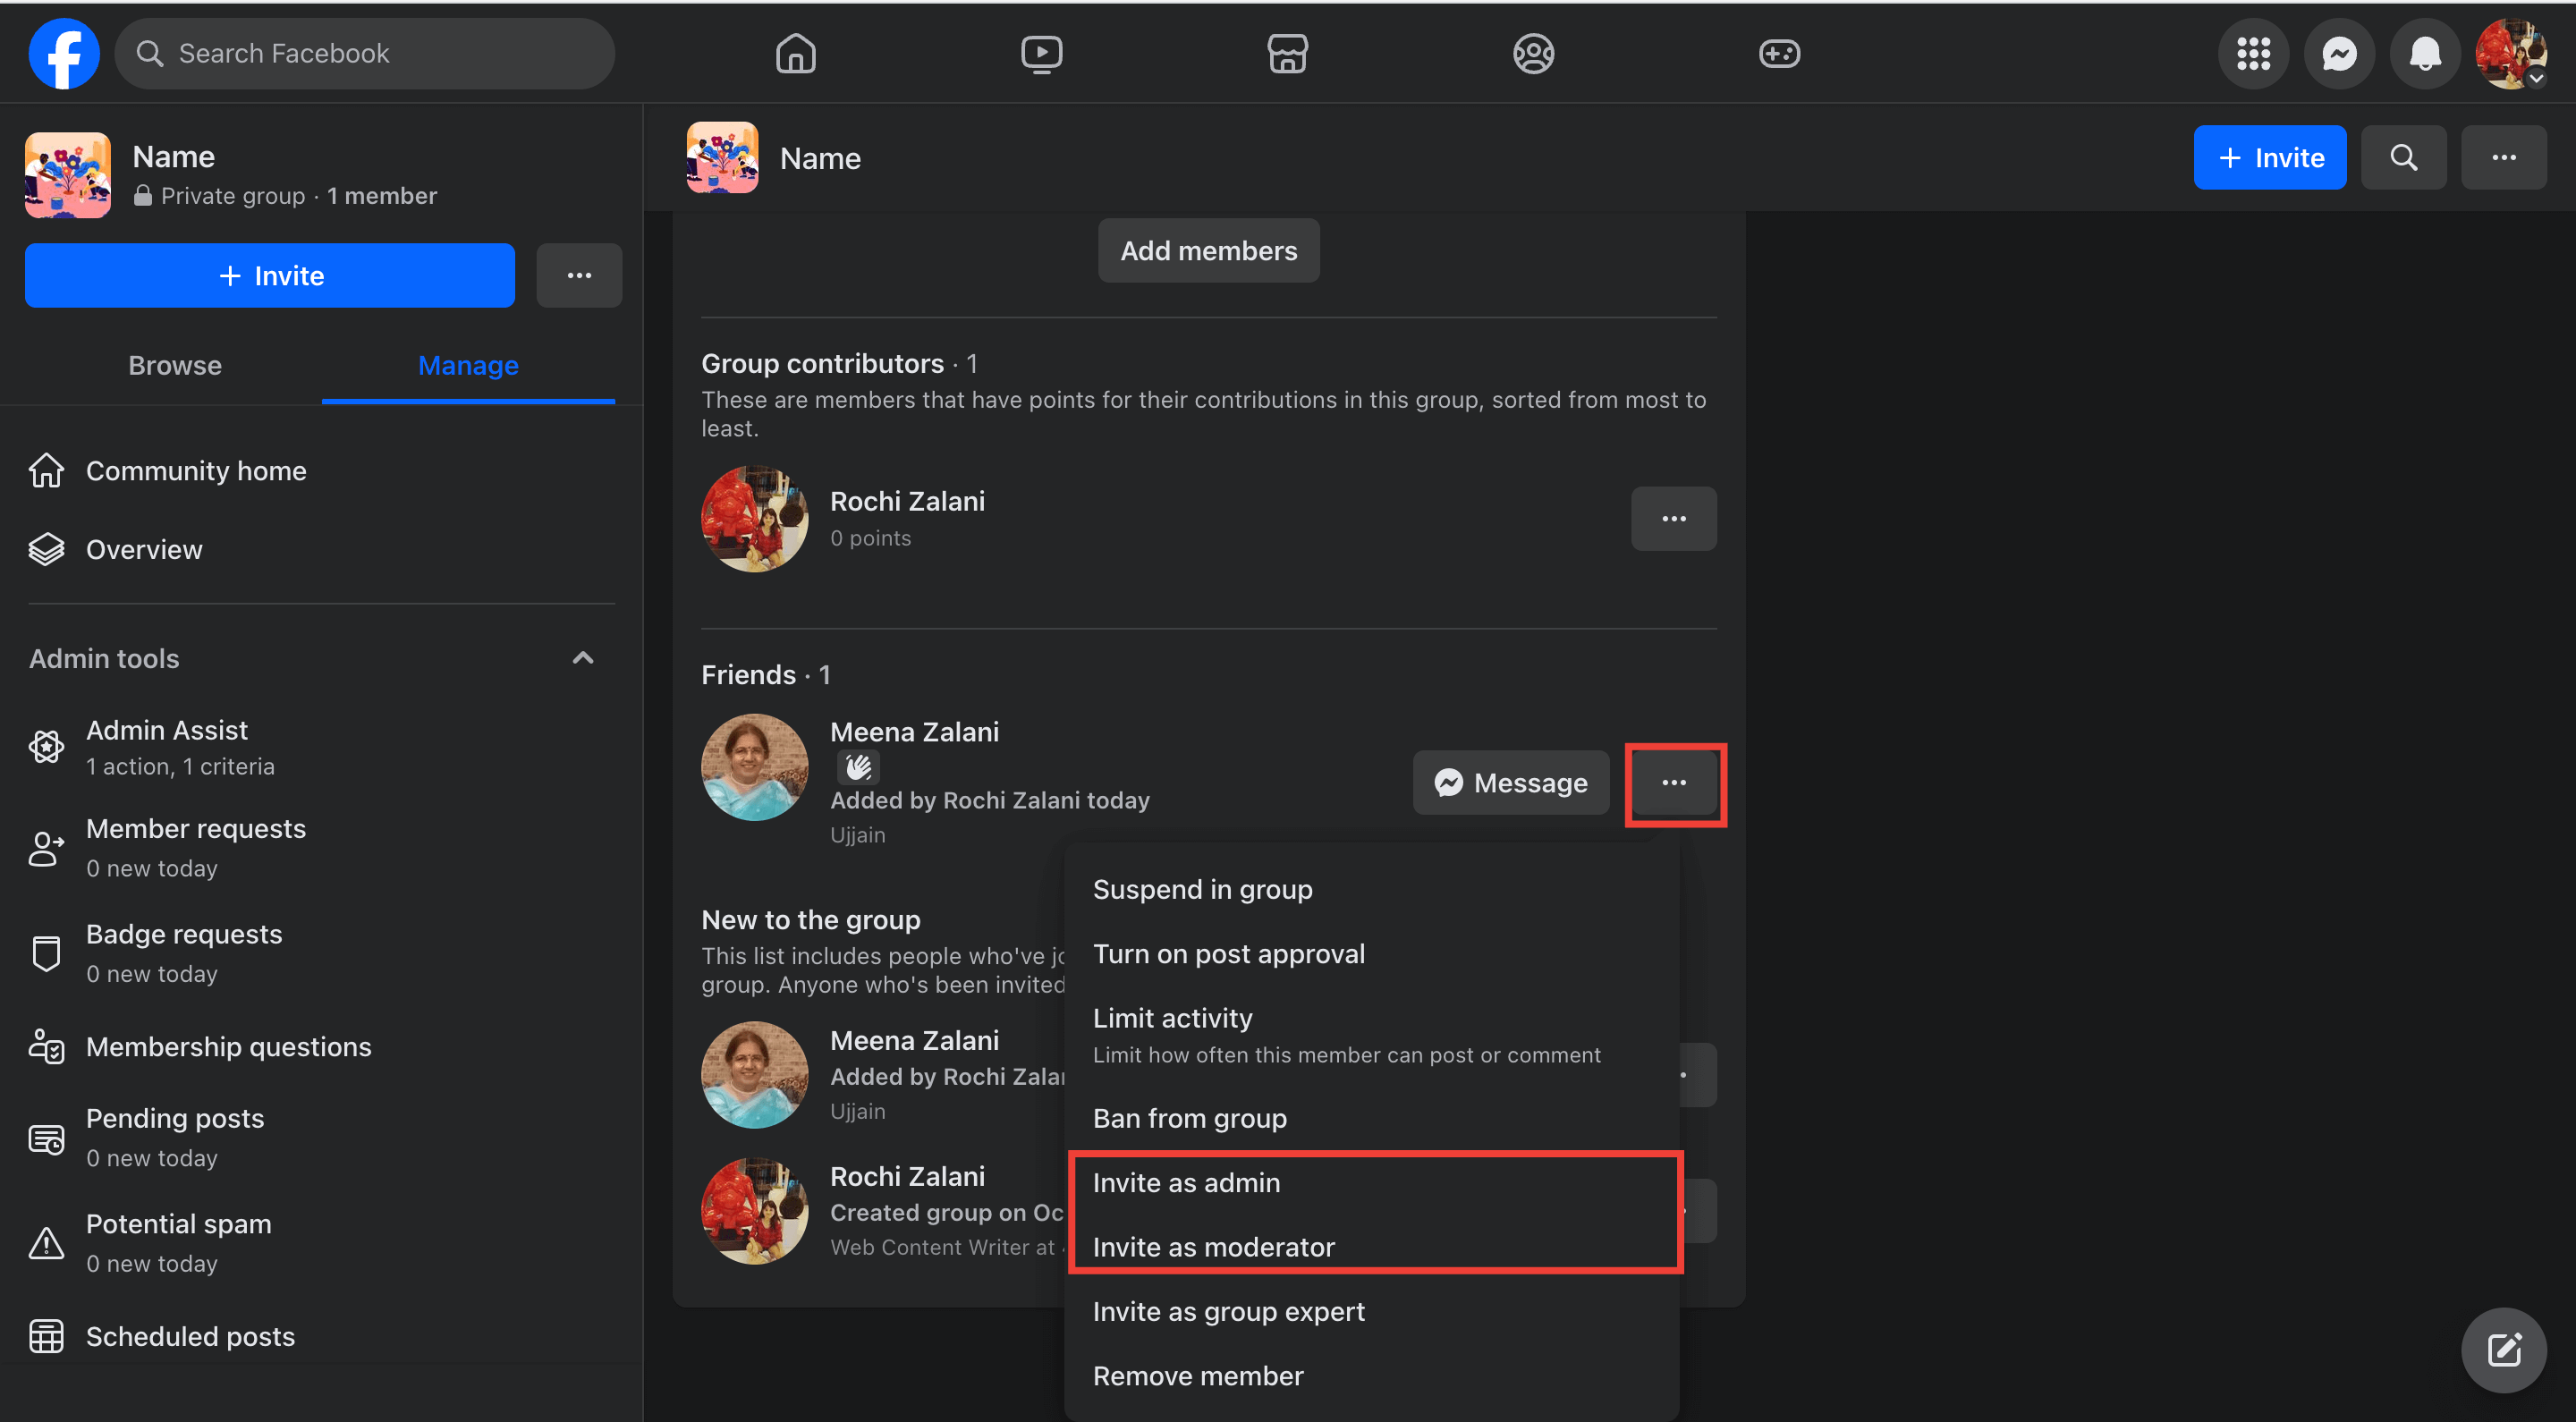
Once they accept your invite, they’ll be granted access to their admin or moderator powers.
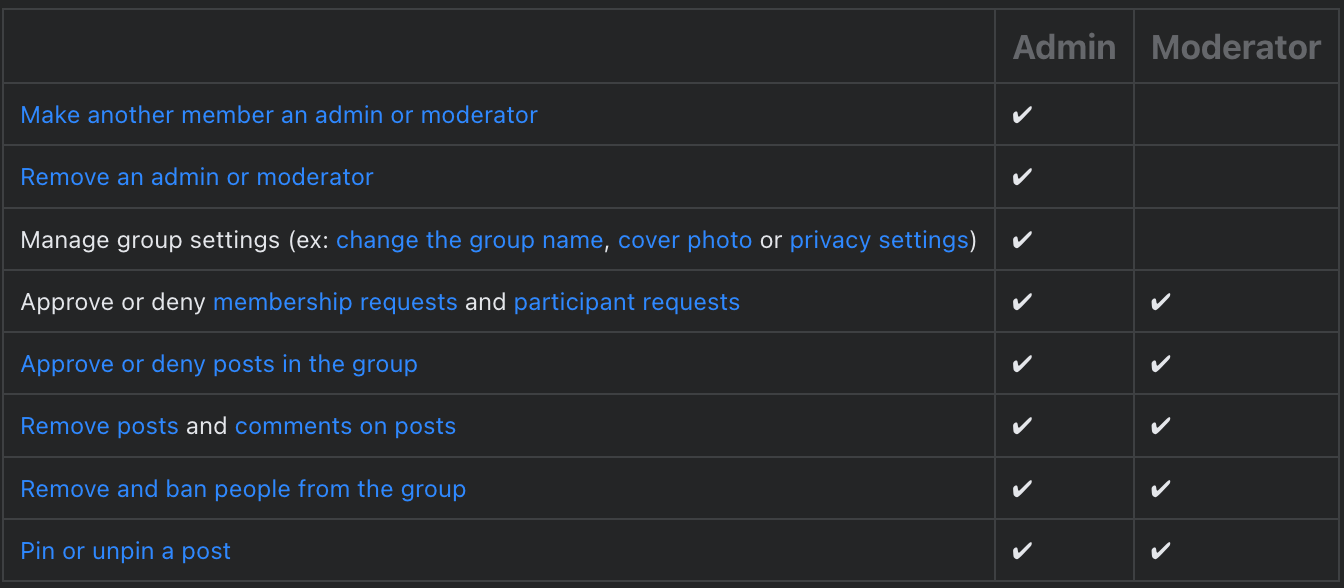
What is the difference between an admin and a moderator?
An admin has full access to your Facebook Group. They can do everything you can, including removing other admins from your Facebook Group.
A moderator can do everything except remove members, change your Group’s cover photo, or alter someone else’s admin or moderator status.
If you’re interested in a detailed breakdown of what an admin can do vs. what a moderator can do, Facebook has shared this helpful chart:
Having admins and moderators helps you outsource the responsibility of managing your Facebook Group to some extent. For example, one admin can be in charge of managing membership requests, and another moderator can be accountable for reporting spam content.
3: Create rules for your Facebook Group to encourage desirable behavior
Rules lay the groundwork for helping your audience understand what kind of behavior you encourage and condone. Facebook lets you add up to ten rules with a heading and brief written explanation. You can add them in your “About” section as a group description, too, but it’s better to utilize the specific Rules feature provided by Meta.
Here’s how to set up rules for your Facebook Group in three steps:
Step 1. Go to the “Manage” tab of your Facebook Group and click on “Group rules.”
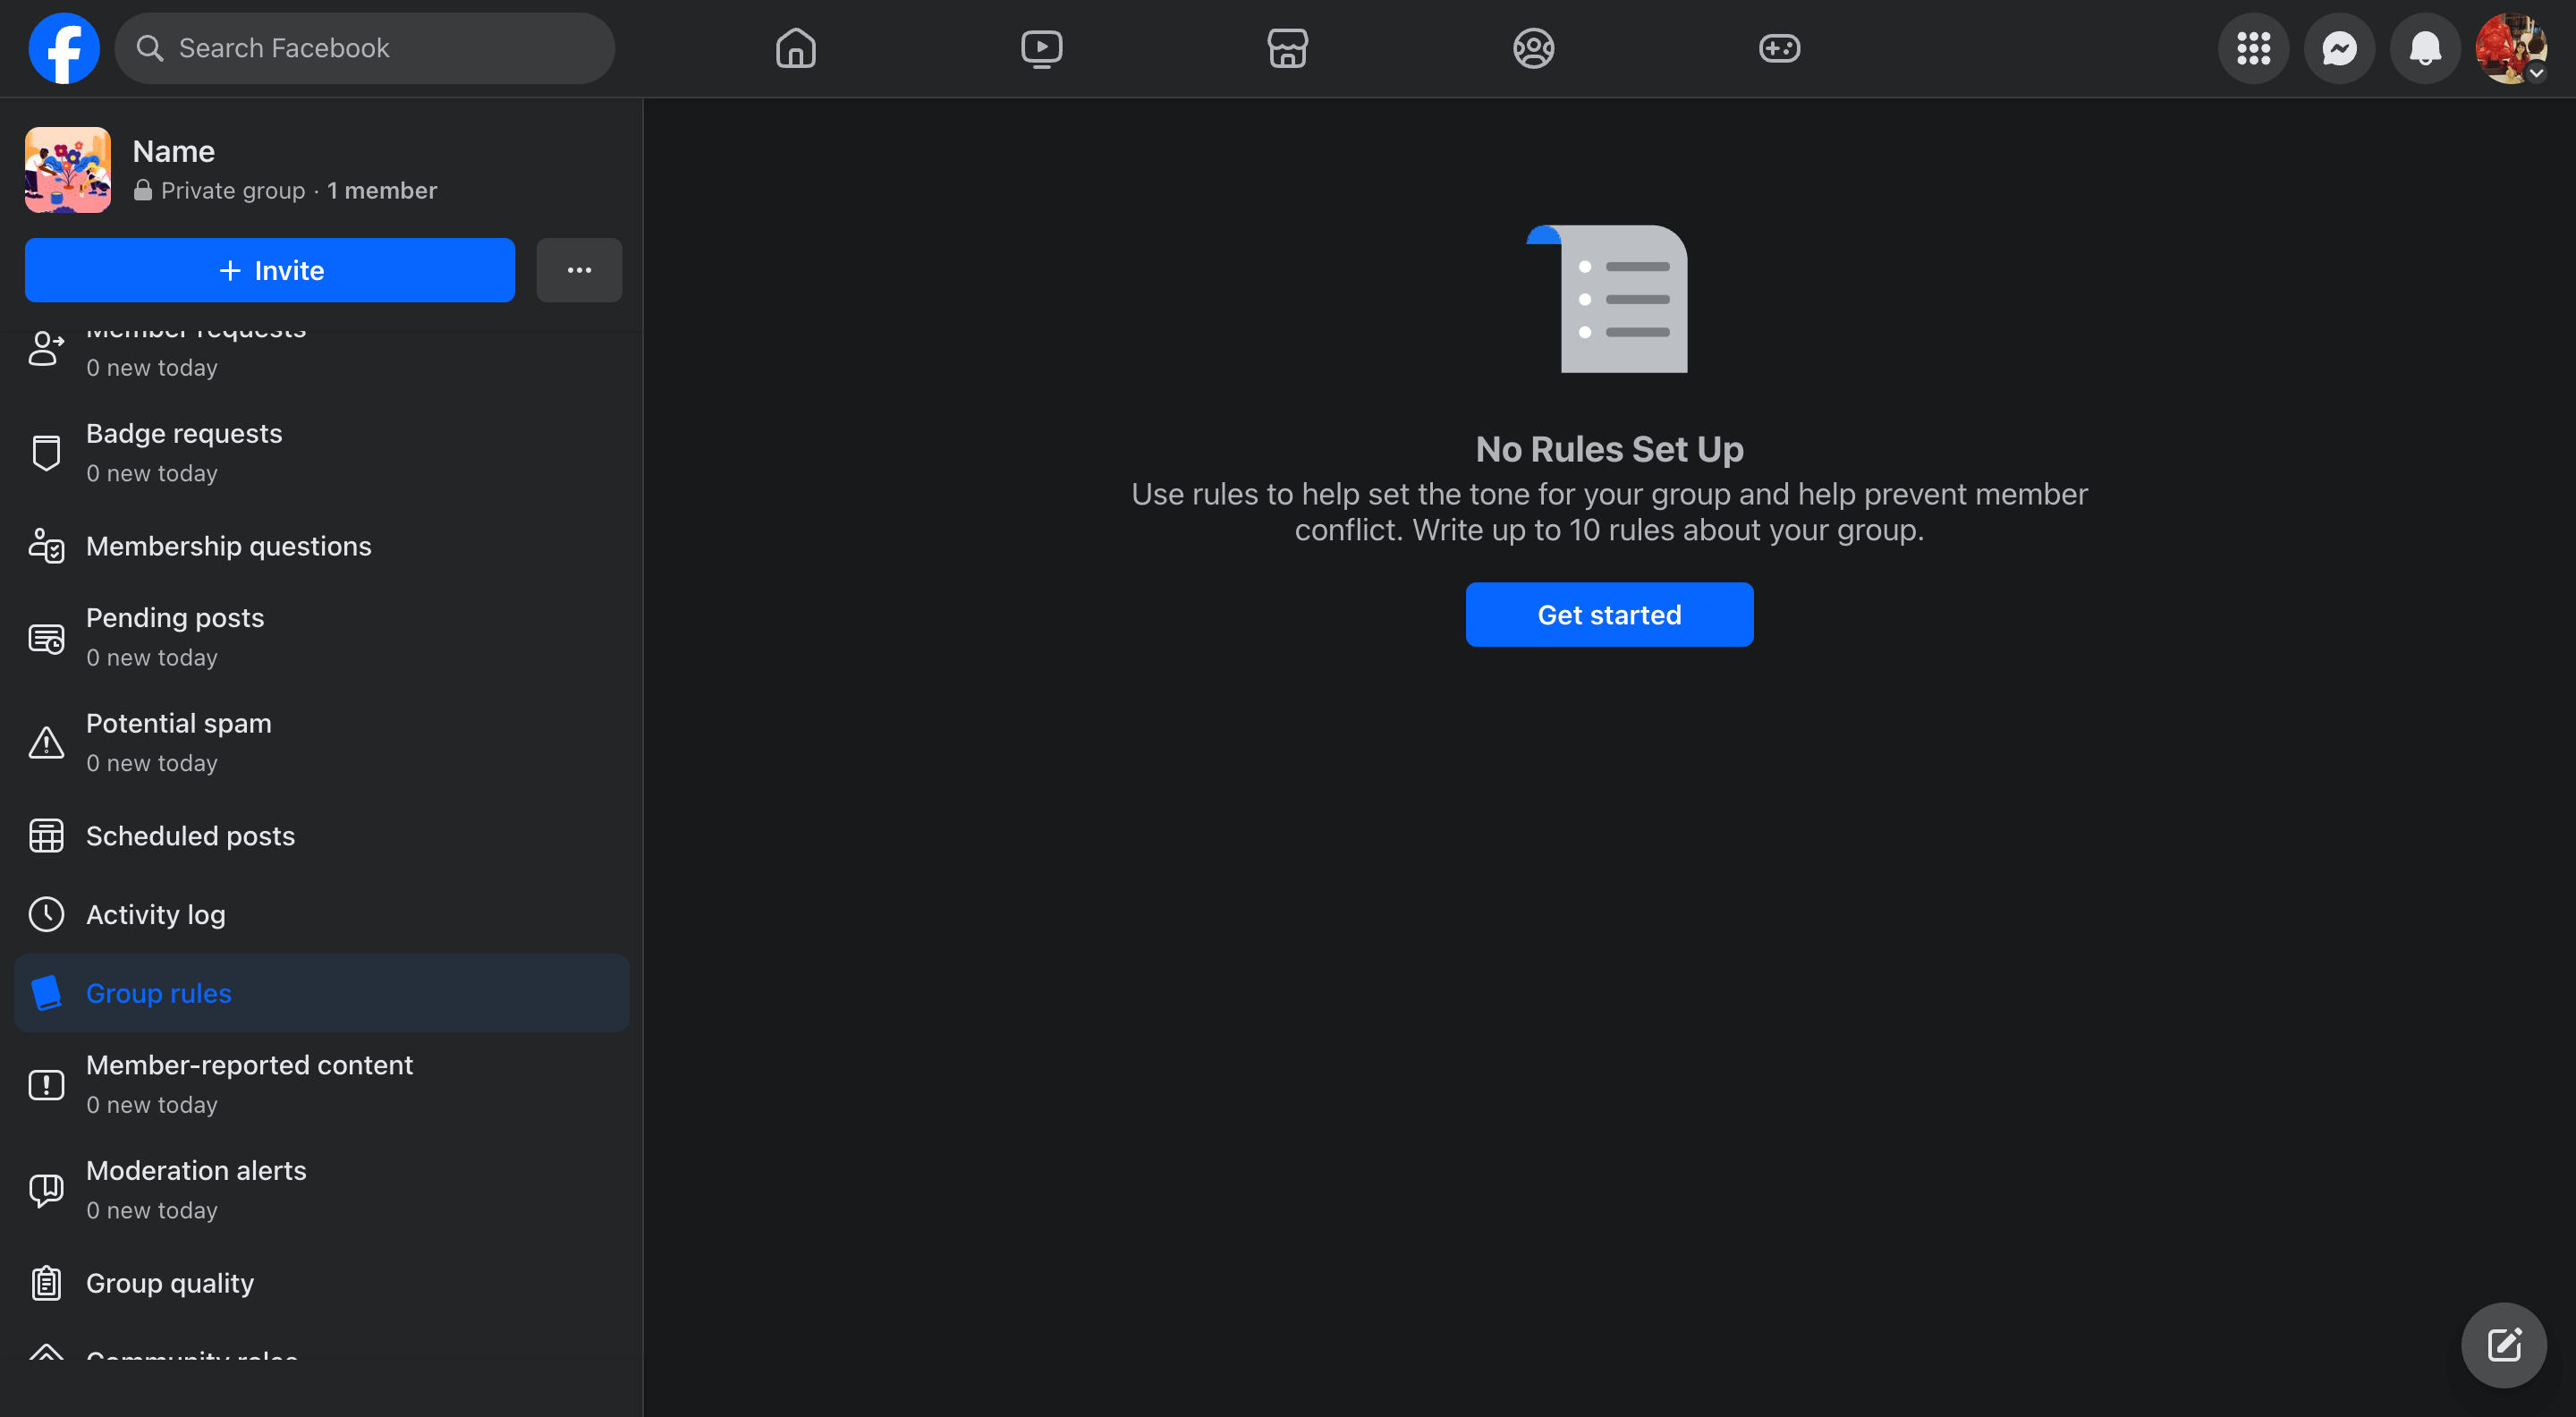
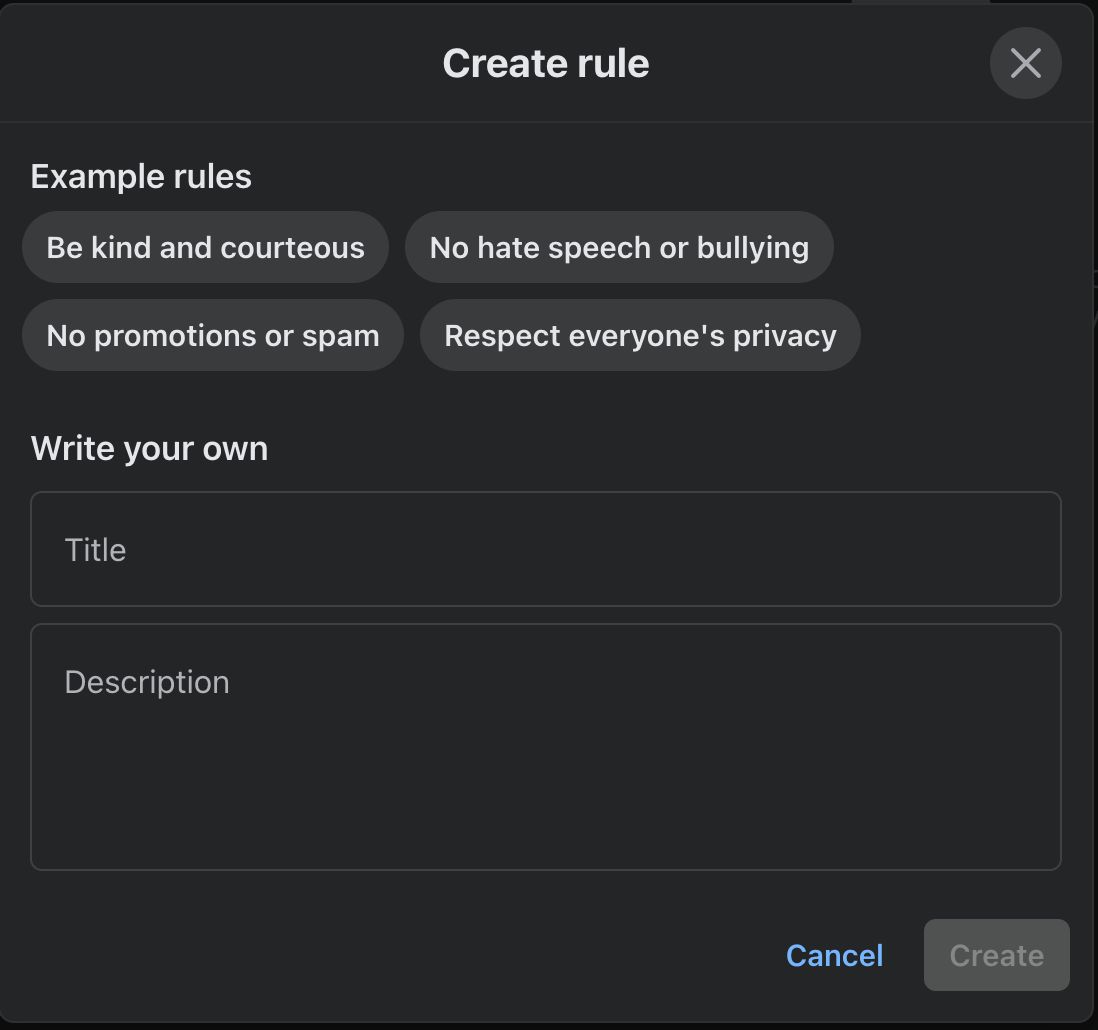
Step 2. Click on “Get started” and start writing your rules.
What should your Group rules be?
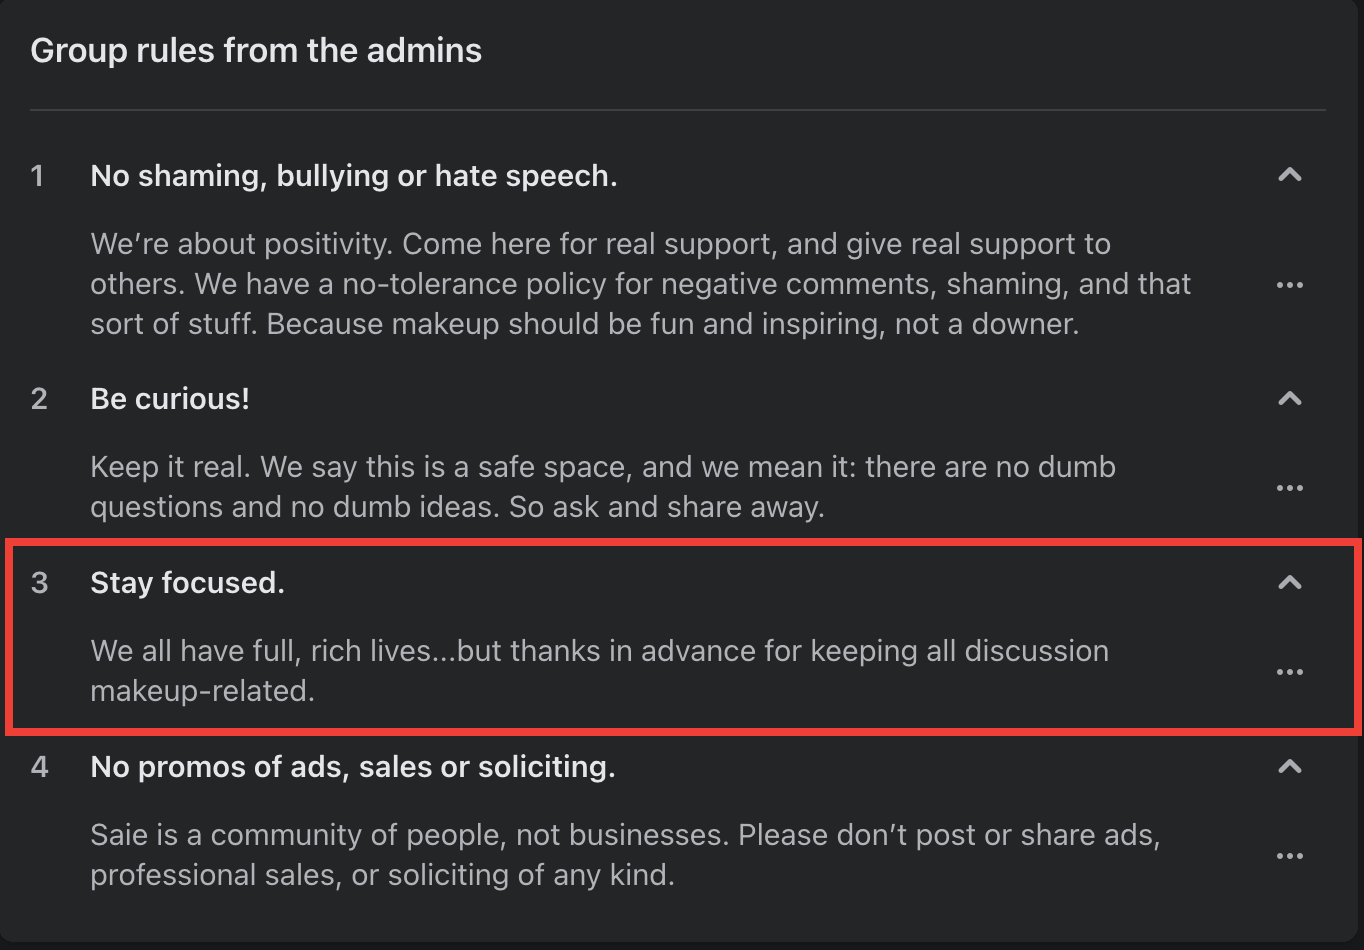
Your Group rules should be a mix of basic guidelines — like being kind, avoiding offensive language, and respecting other members’ privacy. But you can also take it a step further and incorporate specific rules like only keeping conversations around a specific topic.
For example, Saie’s Facebook Group, Clean Beauty Crew, has a clear rule to keep all conversations focused on clean makeup.
Enforce these rules during membership questions and during an onboarding message to remind potential and new members of their content. You (or other admins) can also resurface them every now and then through a post on your Facebook Group.
These Group rules are an armor against spammers and inauthentic people. They are guidelines for how to behave in your community and can be fair grounds for removing someone from the Group upon violation.
4: Set up moderation alerts for sensitive keywords to stay proactive
Facebook has a functionality to set up moderation alerts for certain keywords and engagement. You will receive a notification whenever a group member triggers the alert.
This feature can be beneficial for being on top of sensitive posts and managing spam when you’re a one-person team (or even a large team with thousands of members).
Here’s how to set up moderation alerts on your Facebook Group in two steps:
Step 1. Go to the “Manage” tab and click “Moderation alerts.”
Step 2. Click “Edit alerts” and add sensitive keywords or engagement criteria. For example, you can set up alerts to get notified every time:
- someone mentions “COVID” in your Facebook Group’s post
- a post gets 200+ reactions within an hour
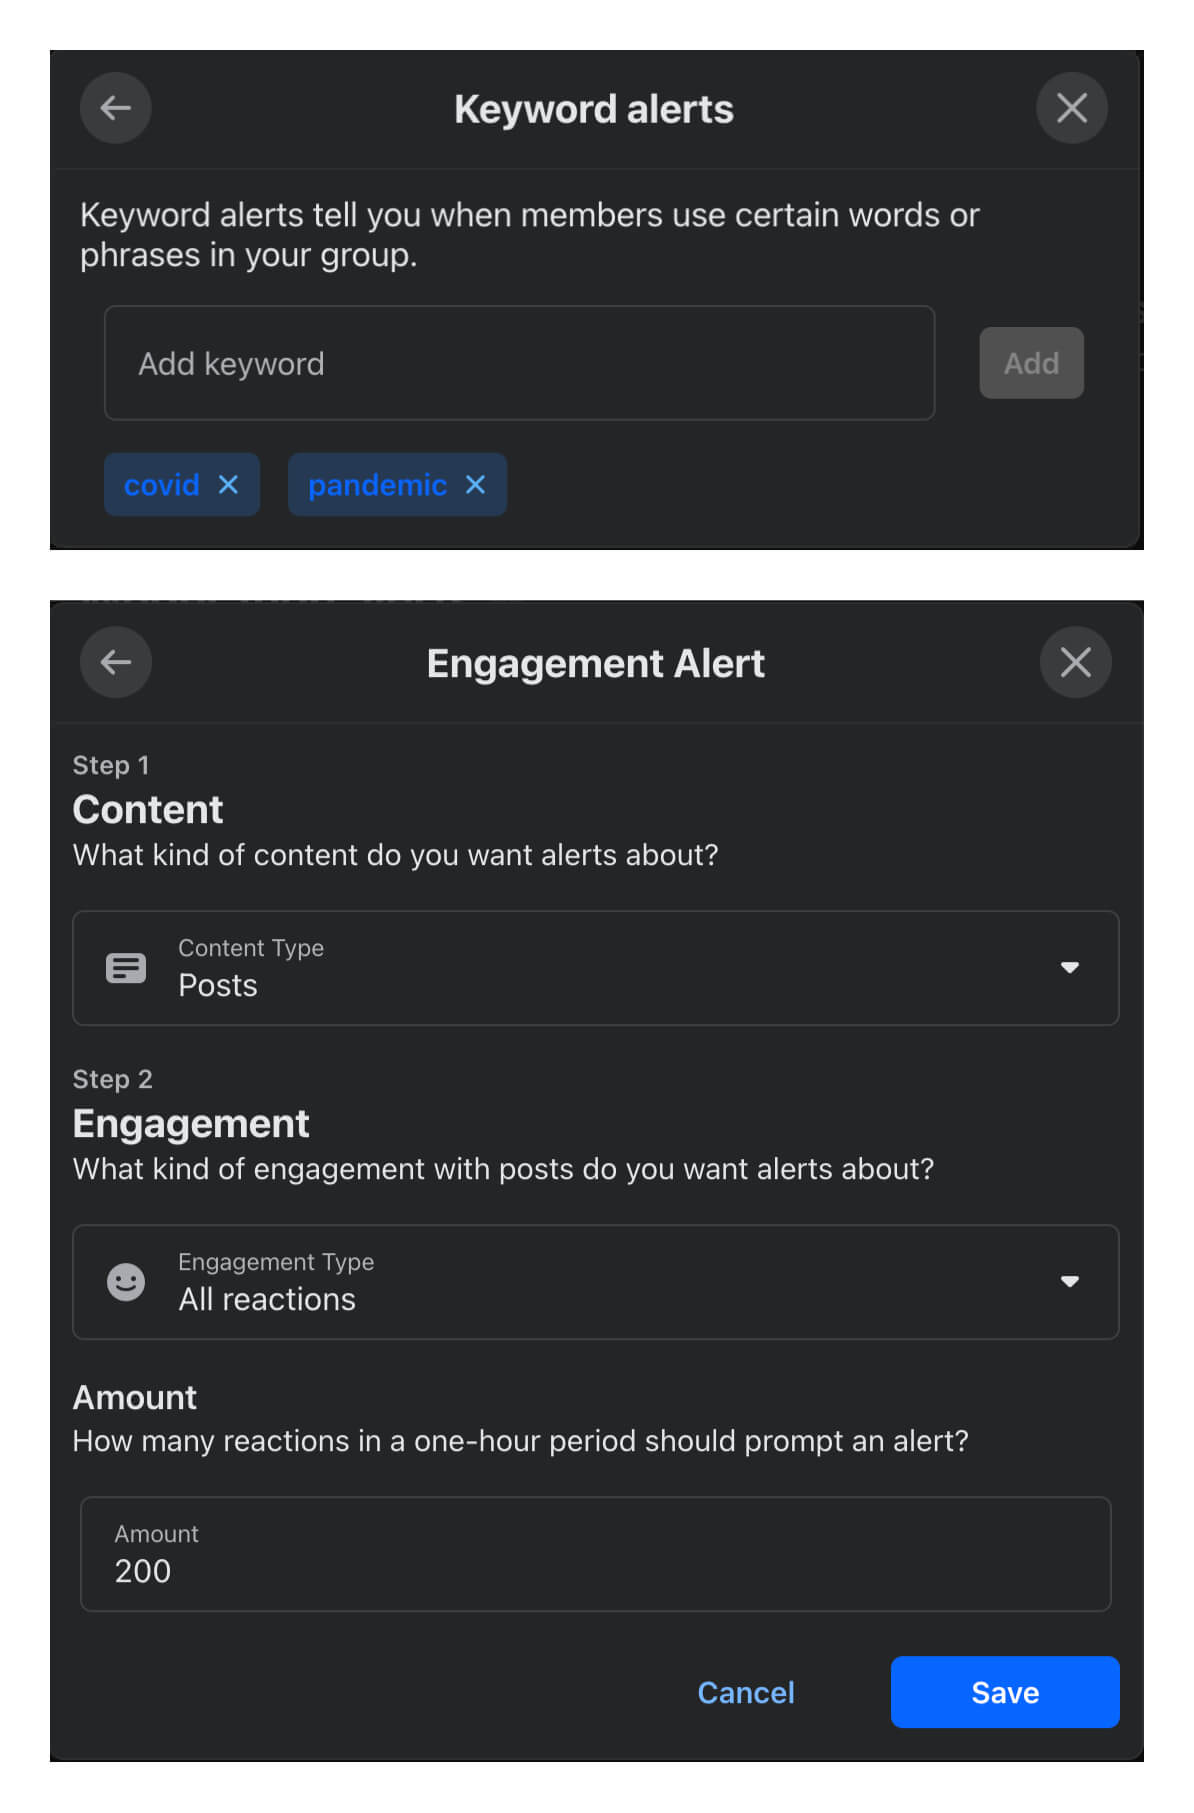
Once you set up moderation alerts, you’re proactively managing potentially negative posts or spam content. You can also set up moderation alerts for offensive language, posts mentioning competitors, or content using your product name.
If you run a Facebook Group with a global audience or a community with high chances of frequent conflict, you can automate some actions.
For example, let’s say you want to remove a published post automatically if three or more group members have reported against it. In Admin Assist, you’ll find the option to “Manage posts” and set up certain conditions to decline an incoming post, remove a published post, turn off commenting, move a post to review, or decline commenting.
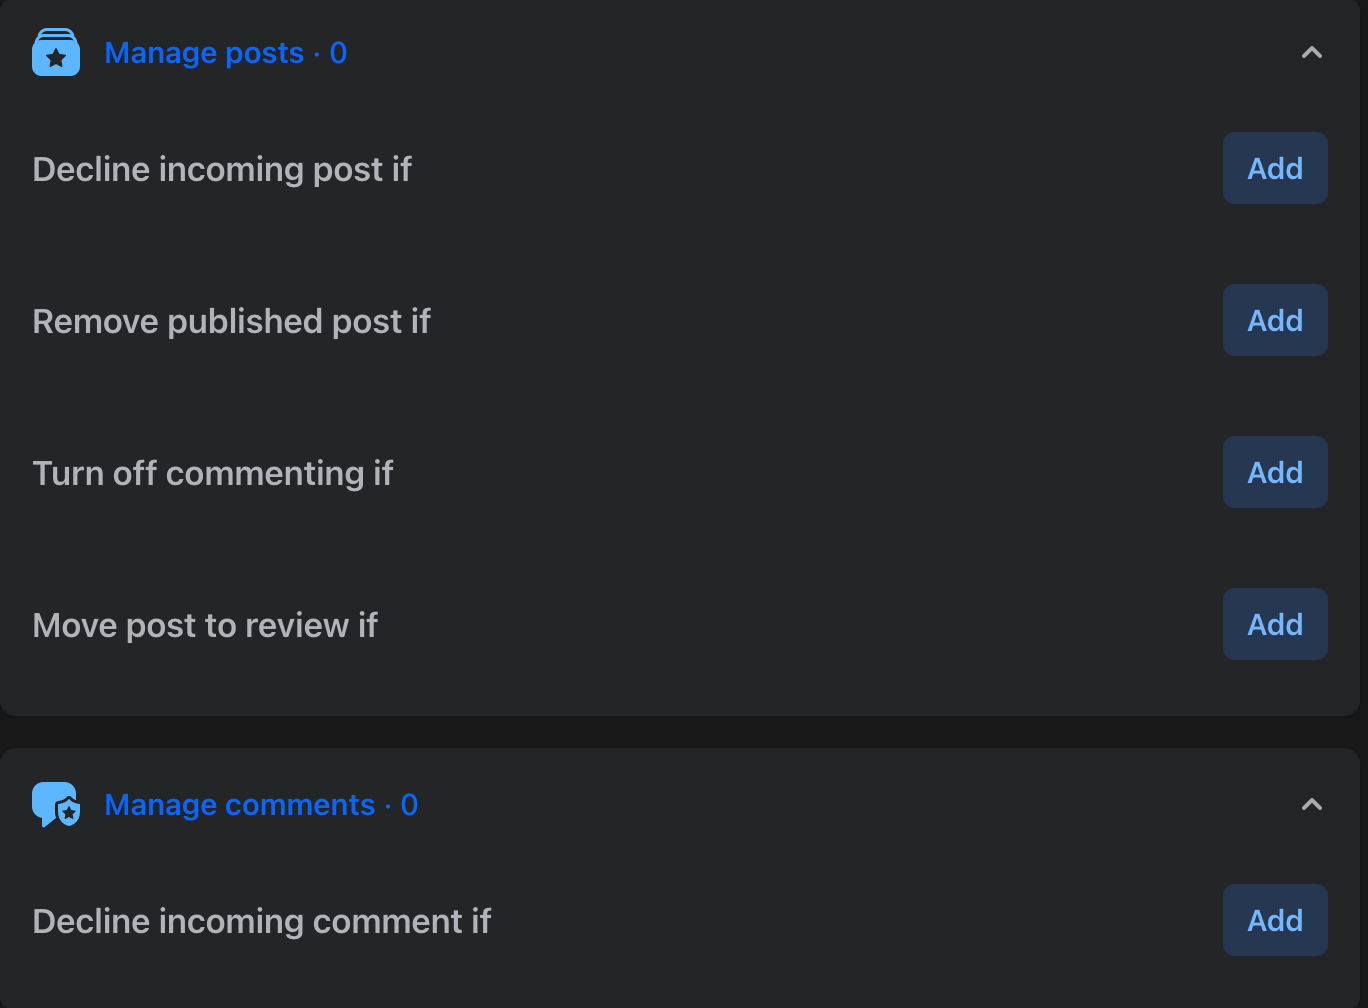
These features can help you control your Group without micromanaging it and stay on top of all potentially harmful or spammy content without reviewing every single post.
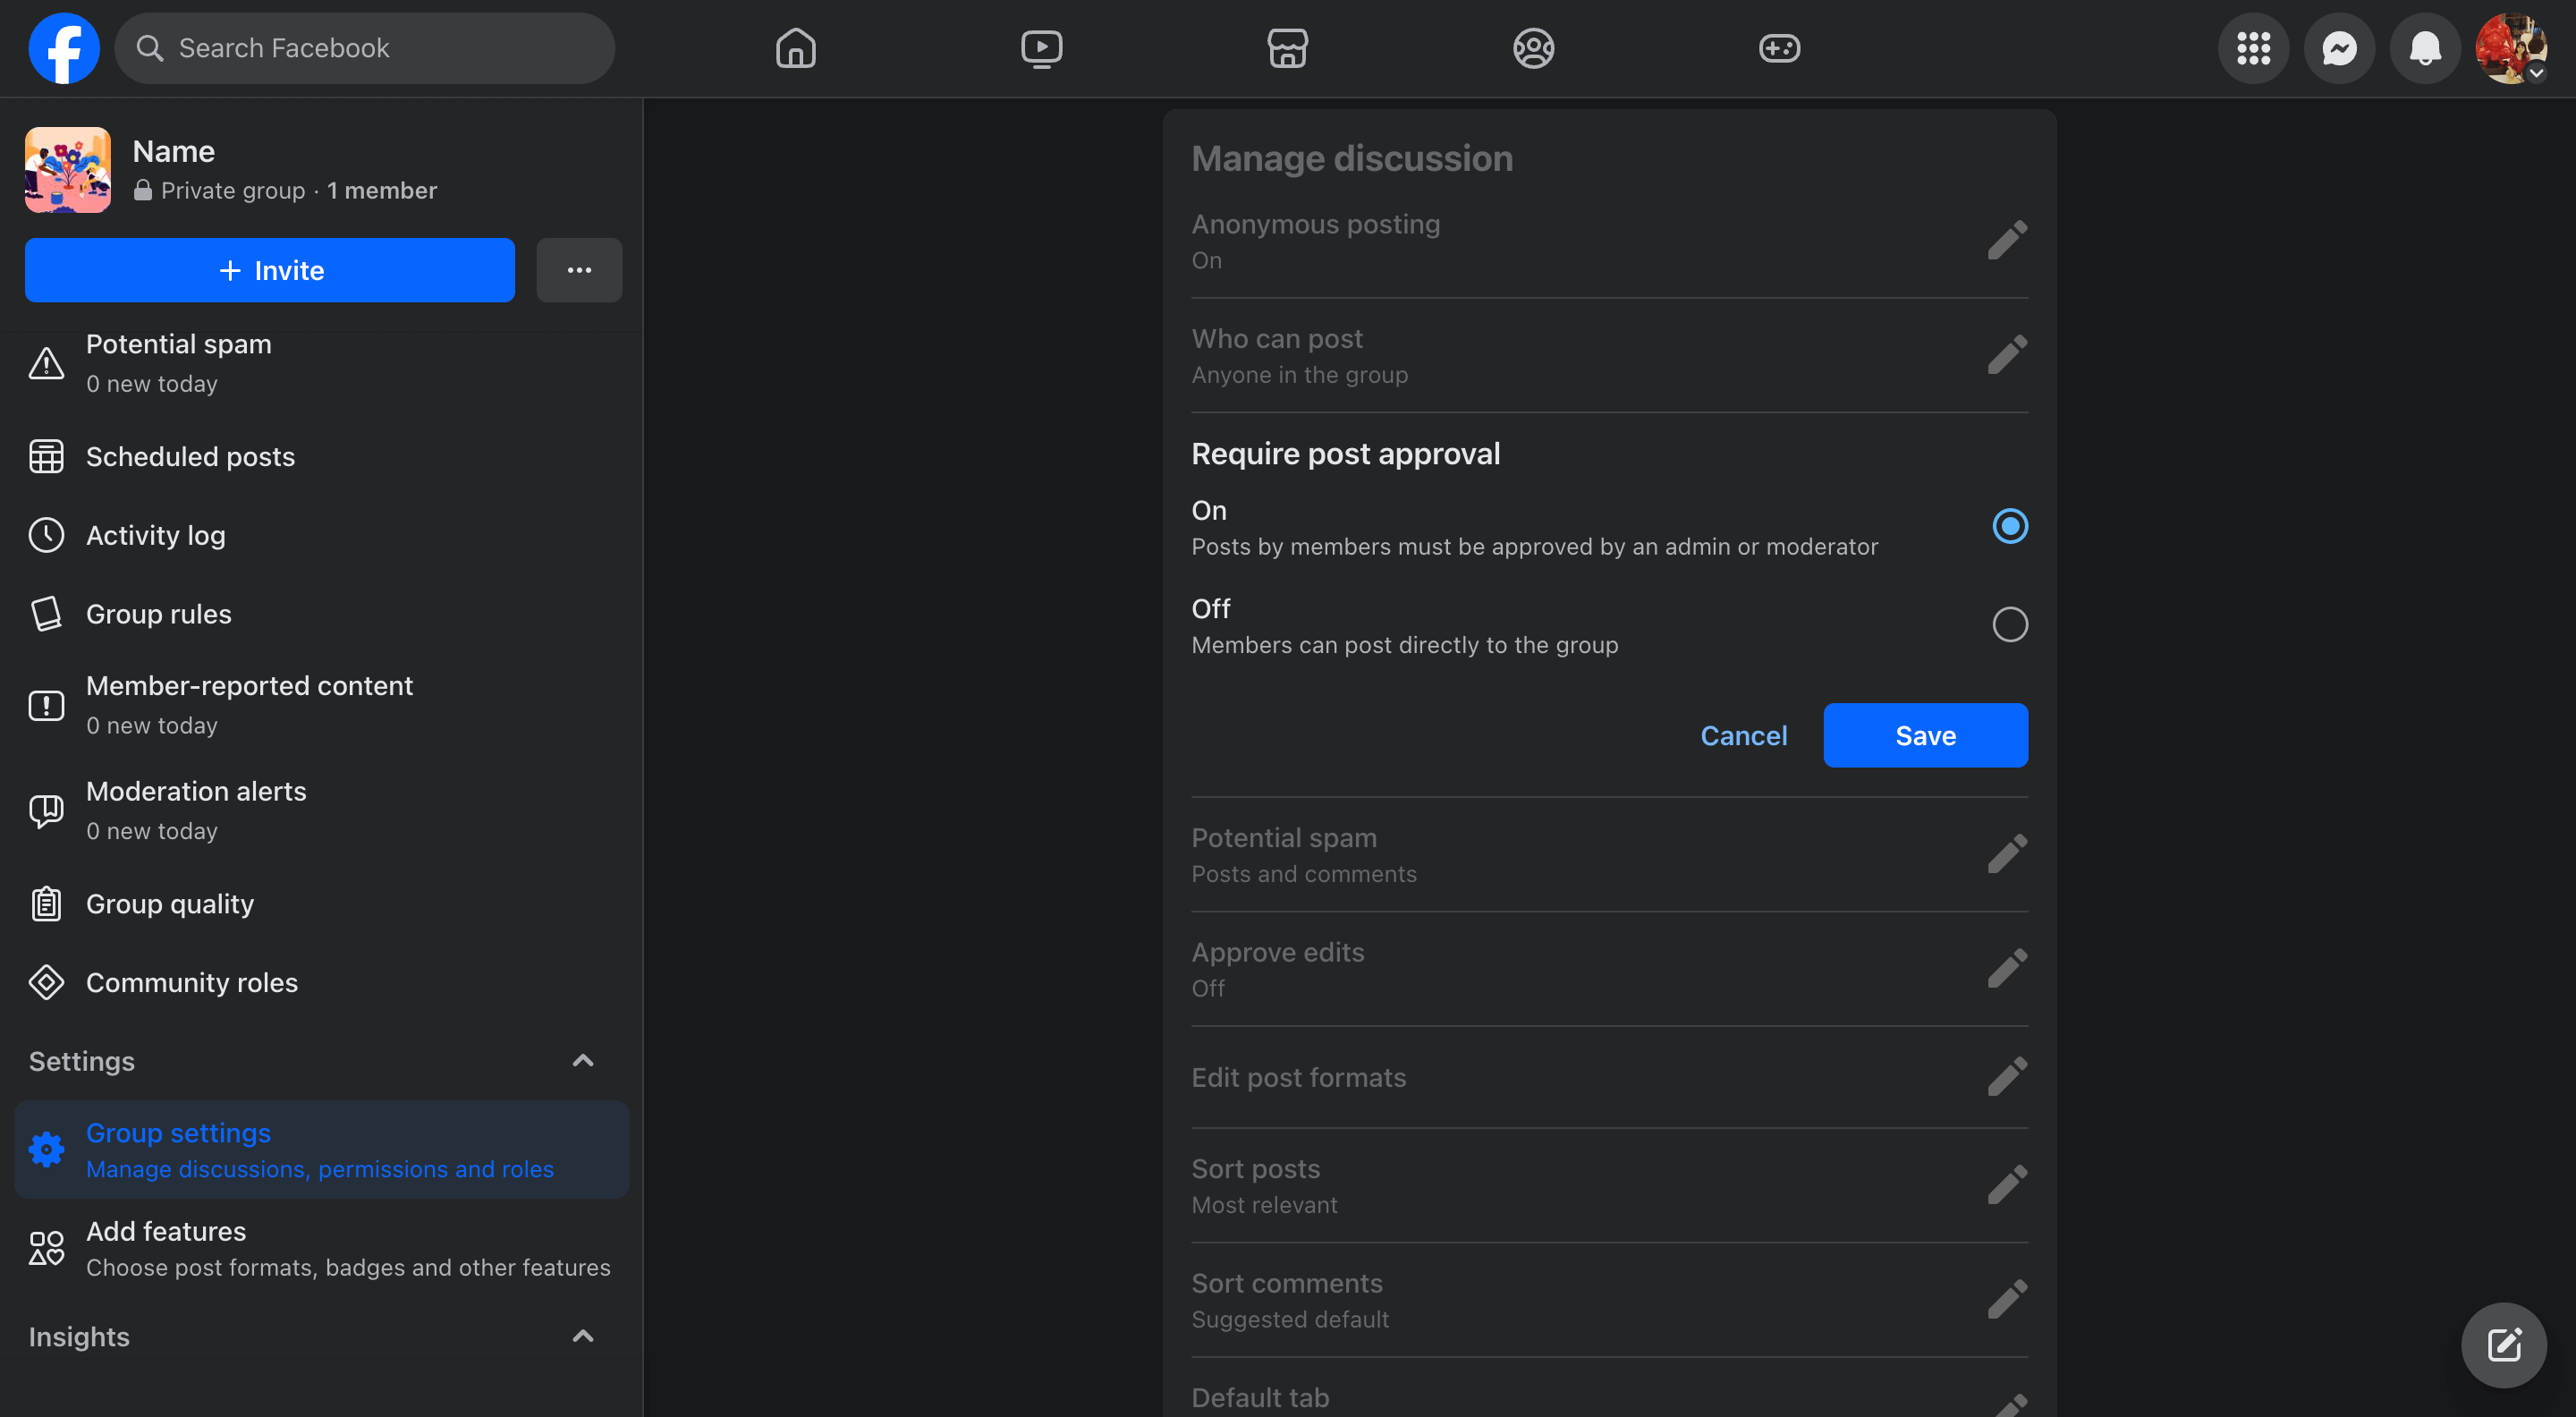
However, if you want every post to be run by you (or other admins and moderators), you can do so in “Group settings.” Under “Manage discussions,” you can toggle on “Require post approval” to ensure no post by any member goes live unless an admin or moderator approves it.
Every Facebook Group will have different needs on how much they need to control member content via moderation alerts and Admin Assist.
If your group is small but about a sensitive topic, approving every post before publishing is better. But if your group is large and on a general topic, you only need to set up moderation alerts. You can always modify these settings depending on the activity you’re seeing in the Group.
5: Encourage group members to report spammy content
Your most loyal members can be your best filters. Ask your community for help by encouraging them to report any content that doesn’t belong in the Group. For example, members can report posts that violate the rules, contain offensive language, or stir controversy.
If you have set up conditions in Admin Assist, certain actions will automatically get triggered if enough members report on a post. But even if you don’t set up Admin Assist, Facebook shows member-reported content under the “Manage” tab.
Facebook also proactively flags content according to its Community Guidelines. Review this thoroughly because Meta can accidentally flag well-intended posts too.
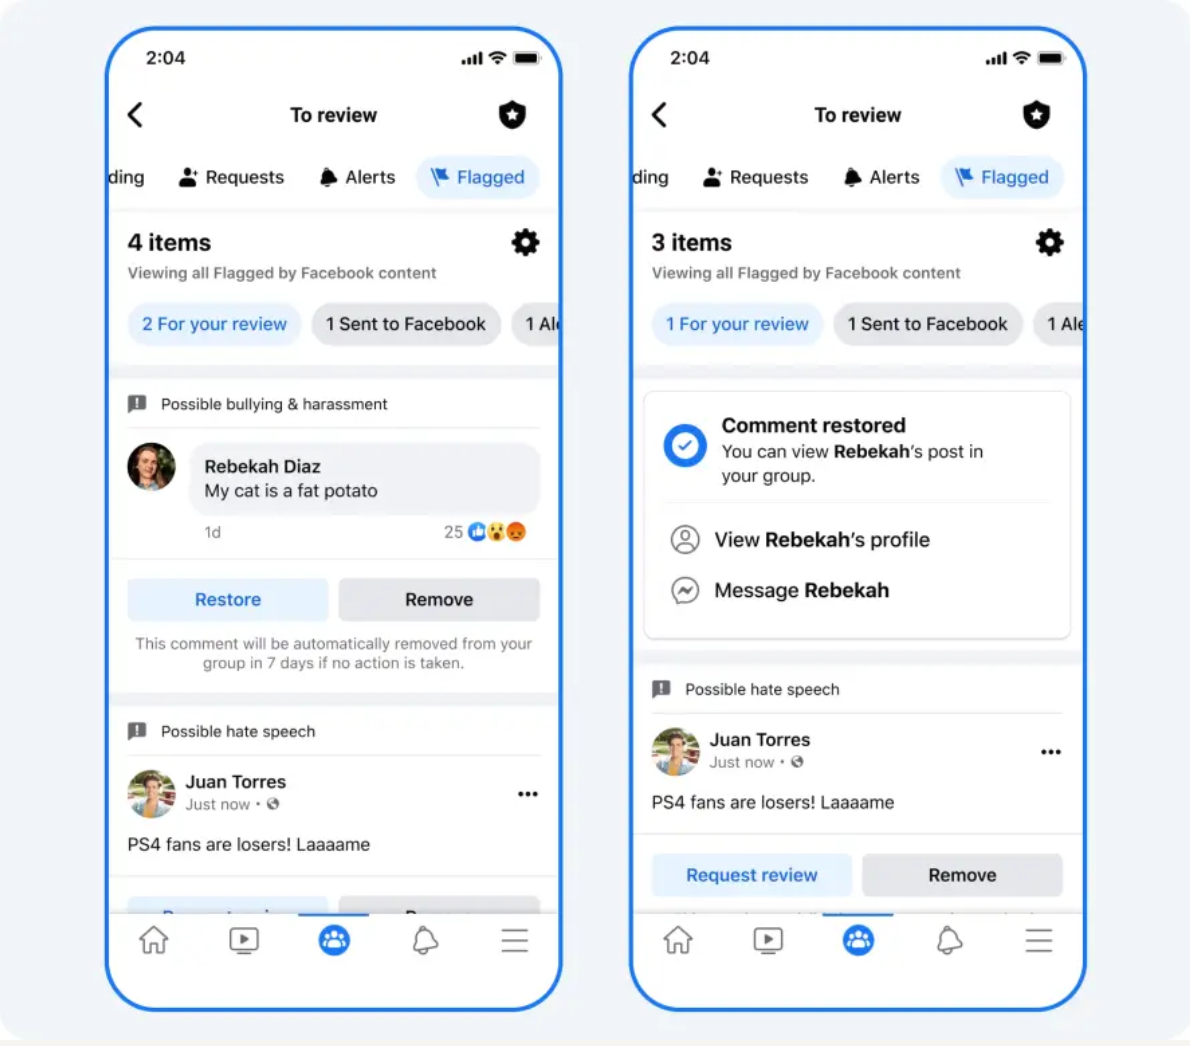
In the “Flagged” section, you can see all the posts your community members (or Meta) have reported. You can decide on one of the following actions:
- Remove the post
- Suspend the member
- Turn on post approval for the member
- Remove or ban the member who created the post
Acting on member-reported content can also reinforce positive feelings in your community because they feel safe and heard.
How to foster engagement in your Facebook Group in 5 ways
Having a fence against spammers is only half the battle of managing a Facebook Group. The other aspect is nurturing connections. It’s only when your members feel like they’re part of a vibrant community of like-minded people that they keep coming back for more. Here are five ways to increase engagement in your Facebook Group.
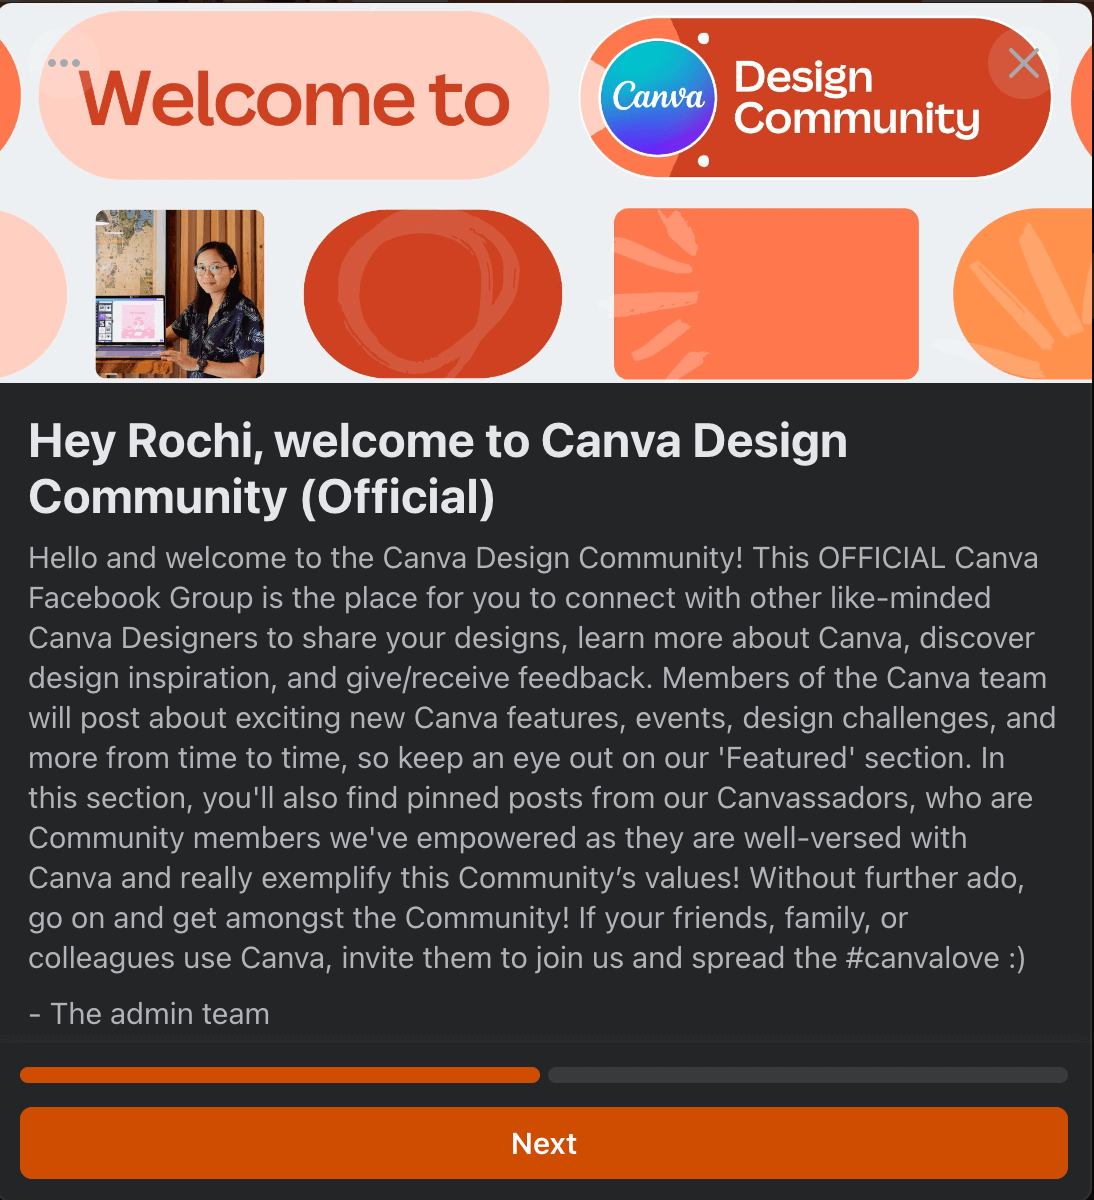
1: Onboard your new members to help them navigate your Facebook Group
What happens after a member joins your Group? Instead of dropping them right into the discussions, onboard them properly using a welcome message and introducing them to other group members in the community.
To set up an automated welcome message to every new member:
- Go to “Group Settings” and tap “New member intro.”
- Once you click on “Get started,” you can write your welcome message.
This introduction message will go out to every member once their request gets approved and they open the discussions on your Group for the first time.
Canva’s Facebook Group has an automated welcome message for new members. The first part shares what their group is about, and the second part reinforces the Group Rules.
To set up an automated welcome post to introduce new members:
Go to “Admin Assist” and click on “Add” next to “Publish a welcome post.” Now, you can craft your welcome message, add a photo, and choose the frequency of these posts.
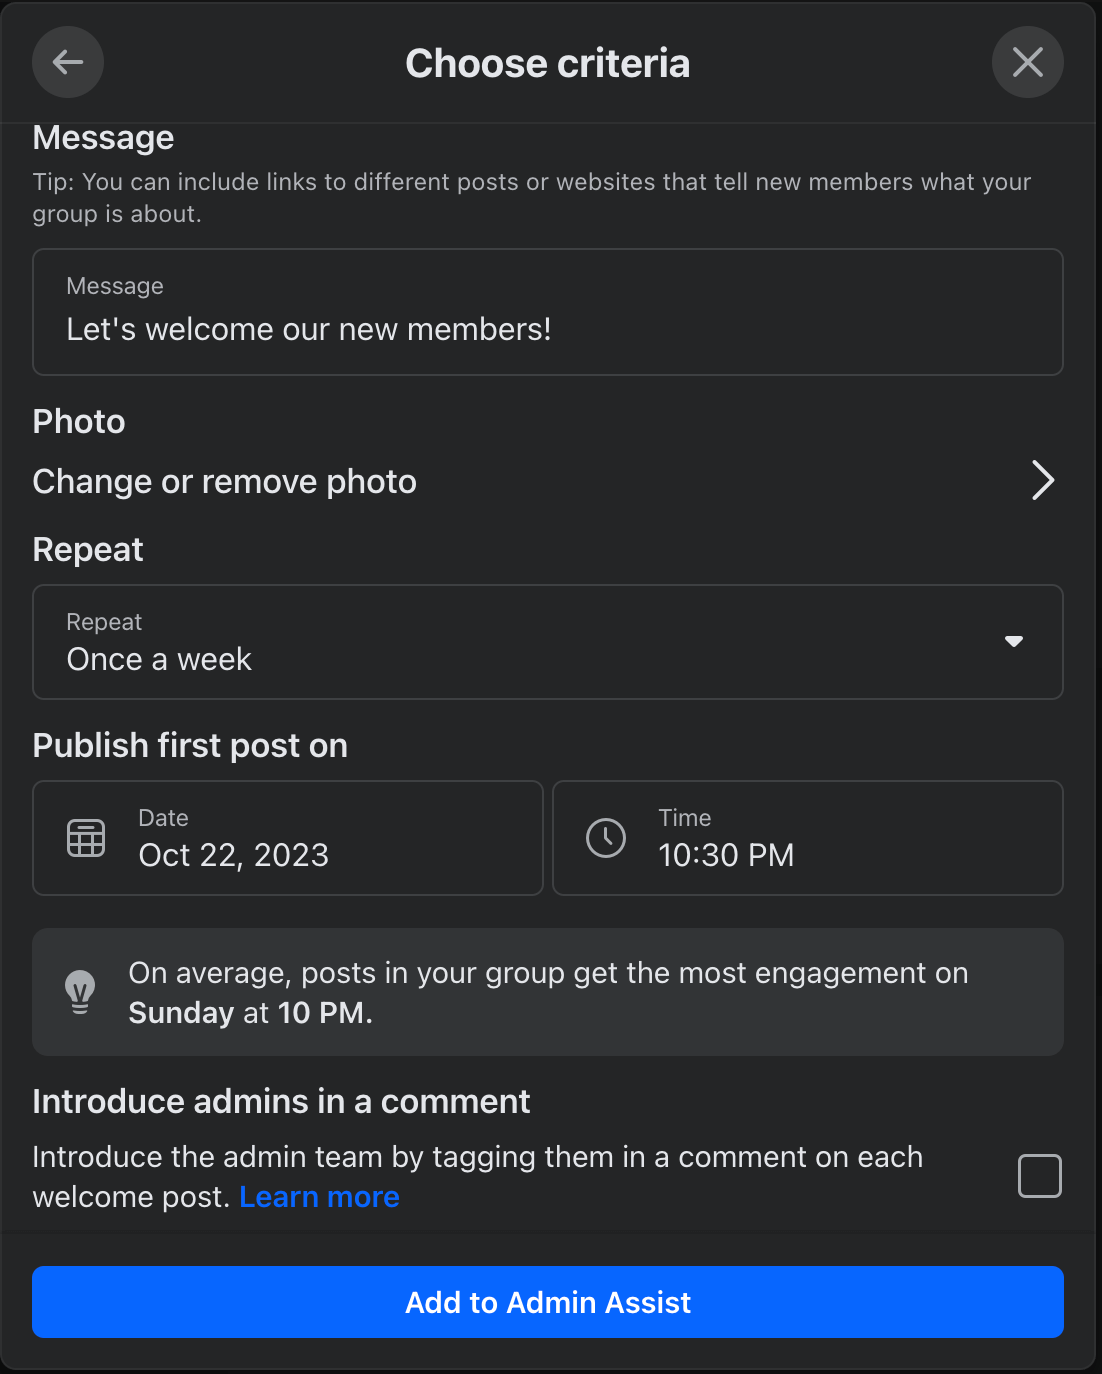
Any new members who have joined since the last welcome post will automatically get tagged in this post. You can even automatically tag admins in the first comment of this introductory post so the new members know who the admins are.
Through welcome messages, new members feel welcome and everyone else in the community gets a chance to meet them.
Onboarding your members can start off your relationship with them on the right foot and make them feel a sense of belonging from the get-go.
2: Allow for anonymous posting to make members feel more comfortable
If your Facebook Group is about a sensitive topic, consider letting members post anonymously. You would still be able to see their name on the backend, but no one who’s not an admin or moderator of the Group can make out their identity.
You can turn “Anonymous posting” on under “Group Settings.” Facebook also gives you the option to review and approve anonymous posts before they’re published.
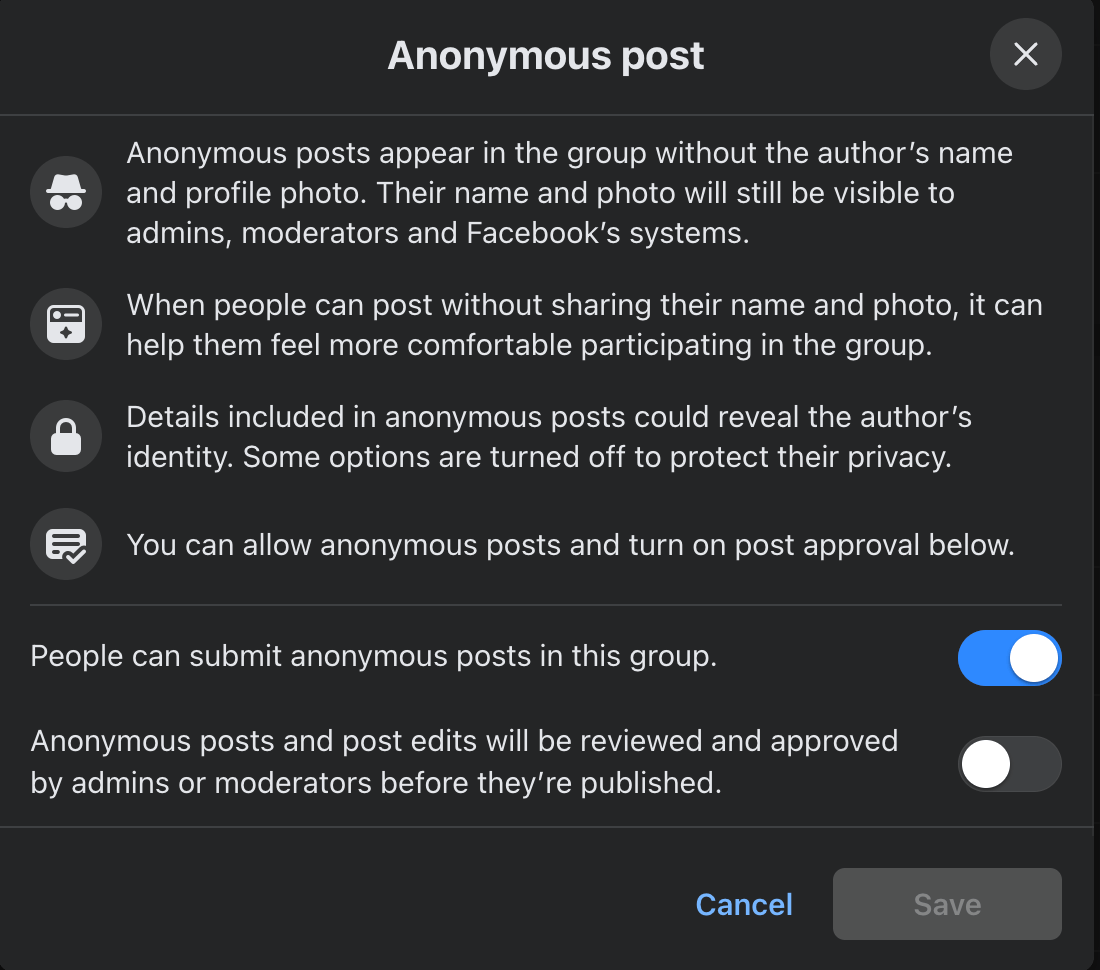
Anonymous posts can make members feel more comfortable discussing certain topics because they don’t have to reveal their names. For example, let’s say you’re running a human resources Facebook Group. A member might want to vent about their manager mistreating them in the workplace. But they can’t do so unless they are allowed to protect their identity.
It’s also applicable in some situations where posts generate a lot of engagement. For example, someone might post a job on a Group but prefer not to be bombarded with direct messages. Going anonymous can be helpful for them here.
There’s no harm in turning on anonymous posts to make your members feel more comfortable. You can always toggle on to approve the anonymous posts before they go live.
3: Use Facebook’s interactive features (like polls, live broadcasts, and community chats) to engage your audience
Meta has launched a lot of features exclusive to Facebook Groups to nurture community relationships. Here are ten things you can do on Facebook Groups to make interactions more fun with your audience:
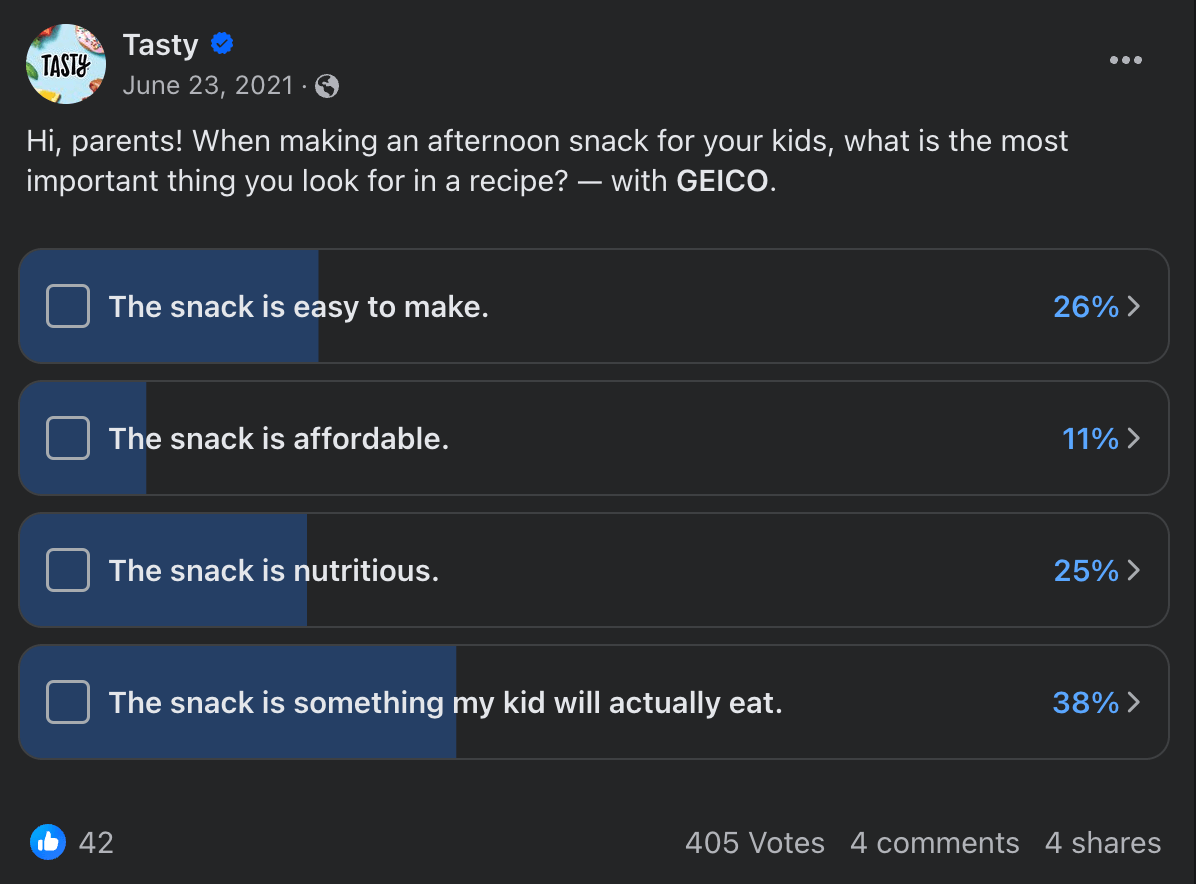
1. Polls. From Instagram Stories to Facebook Groups, Meta has launched polls everywhere. You can ask multiple choice questions to your audience using the poll feature within your Facebook Group. It’s great for understanding where the majority lies, running quizzes, and gathering community opinions.
For example, the Tasty Community on Facebook ran a poll to ask parents what’s the most important thing for them while preparing an afternoon snack for their kids.
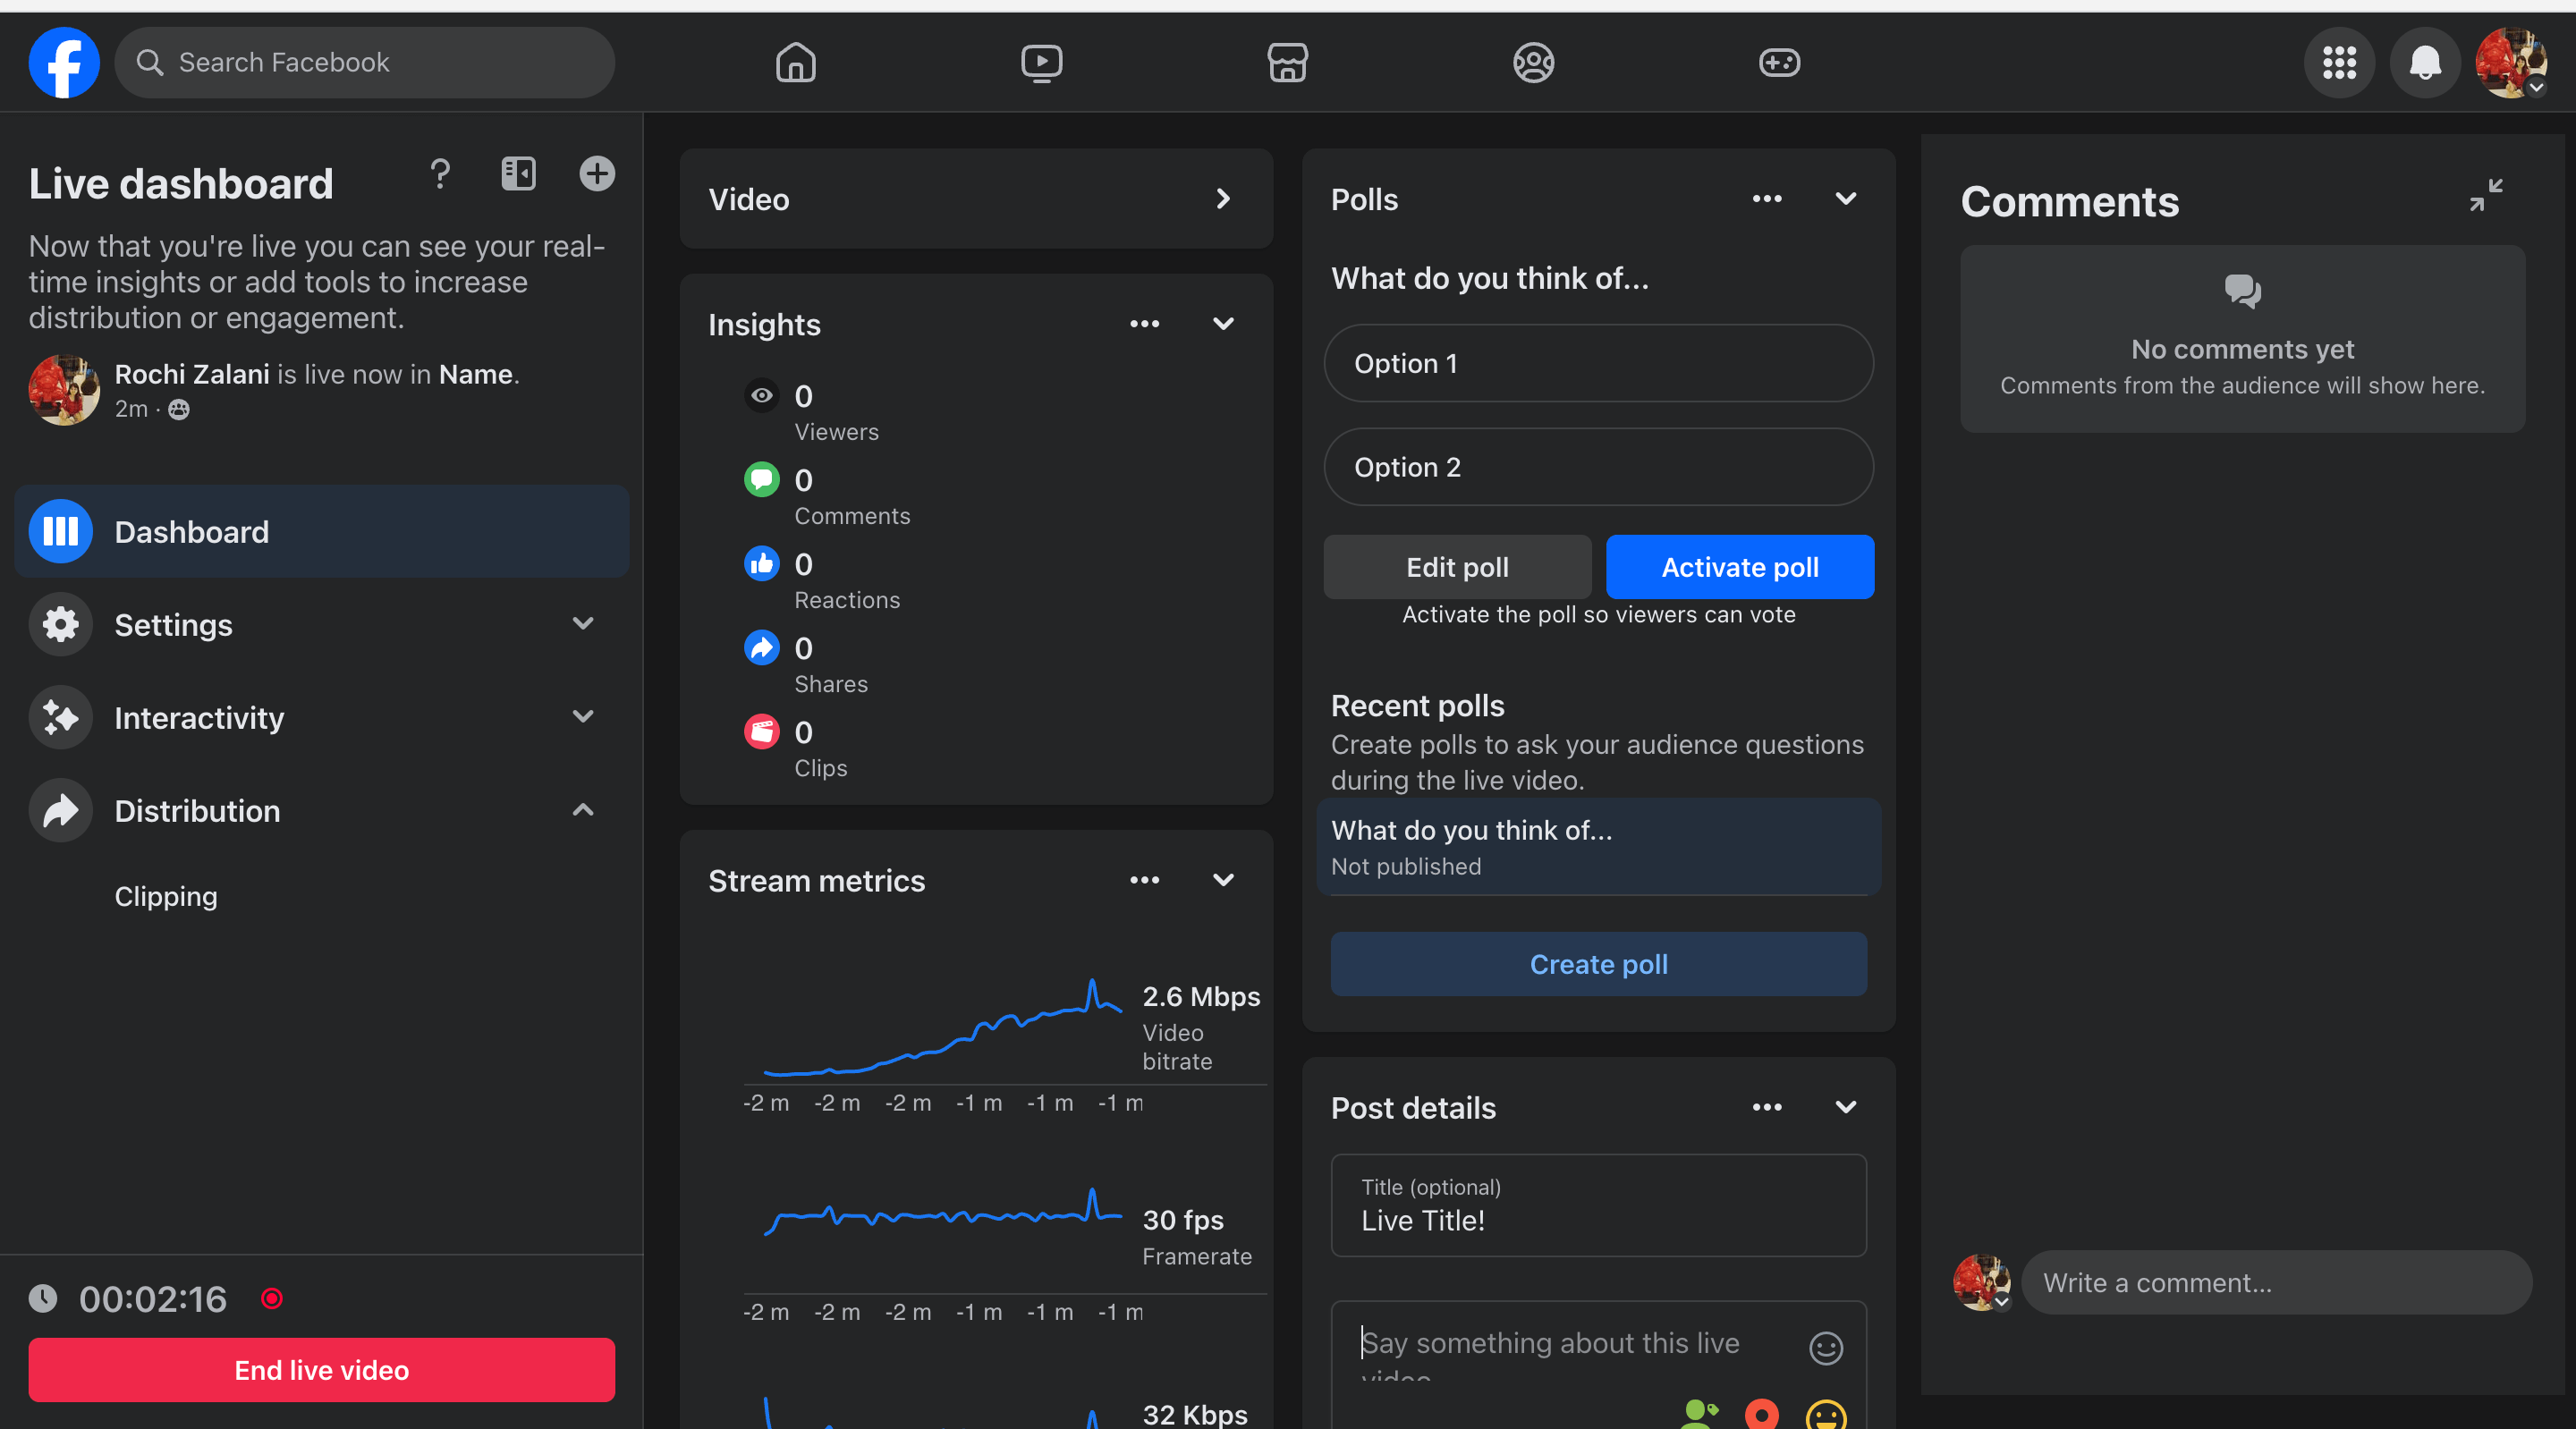
2. Live Broadcasts. You can go live on your Facebook group just as you can do a live broadcast on Instagram Live video. The difference is even members can go live on Facebook Groups. You can require approval before a member goes live or turn it off for members entirely.
A live stream on your Facebook Group can be an intimate way to connect with your community members and deepen the connection you’ve built. During a Live Broadcast, you can share your screen to run a presentation or even connect to an external streaming software. In your Live dashboard, you can ask questions, run polls, get insights into how many people are watching, and let members communicate via comments.
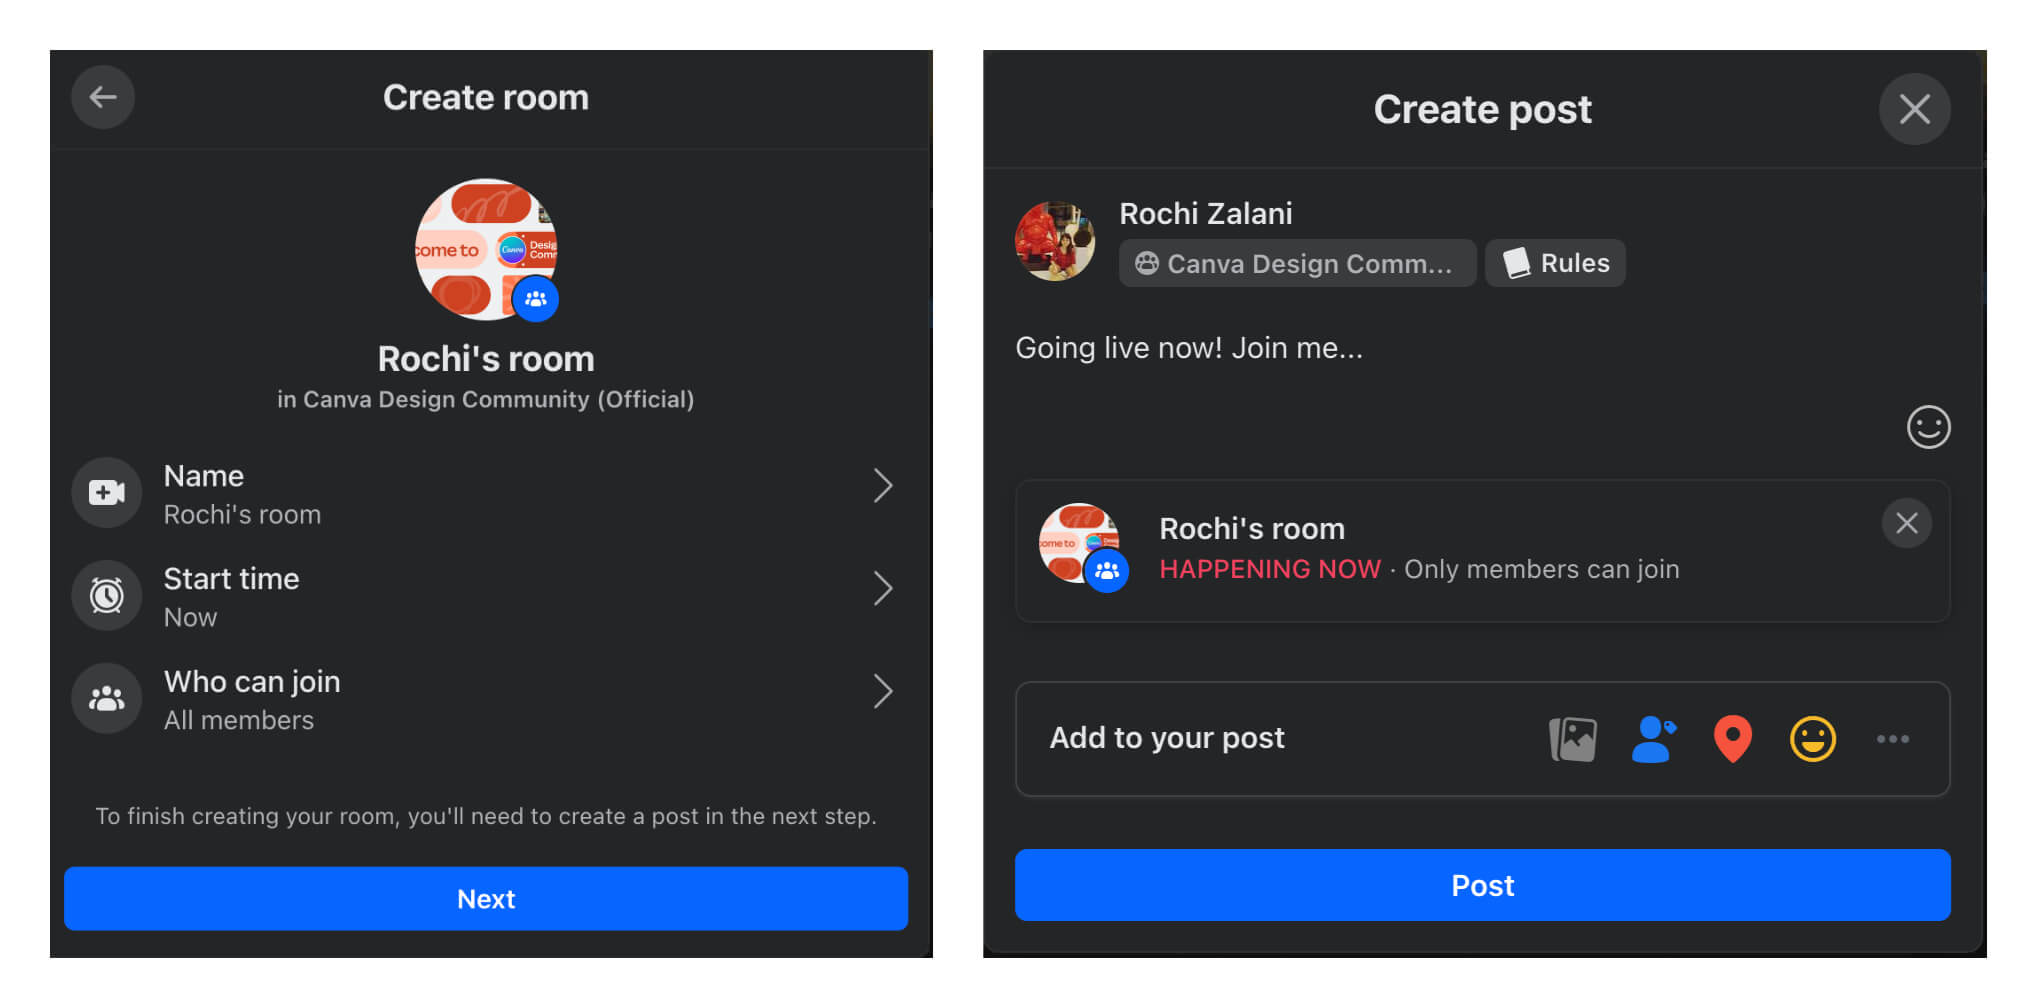
3. Live Rooms. An extension to Live Broadcasts, Live Rooms are like a video group chat. All members can create a Live Room and either invite all members or choose to invite only specific people from the Group. But you always have to post about creating a Live Room in the Facebook Group to keep other members in the loop.
Live Rooms are a great way to partner with influencers, encourage members to interact with each other, or discuss a specific topic as a community.
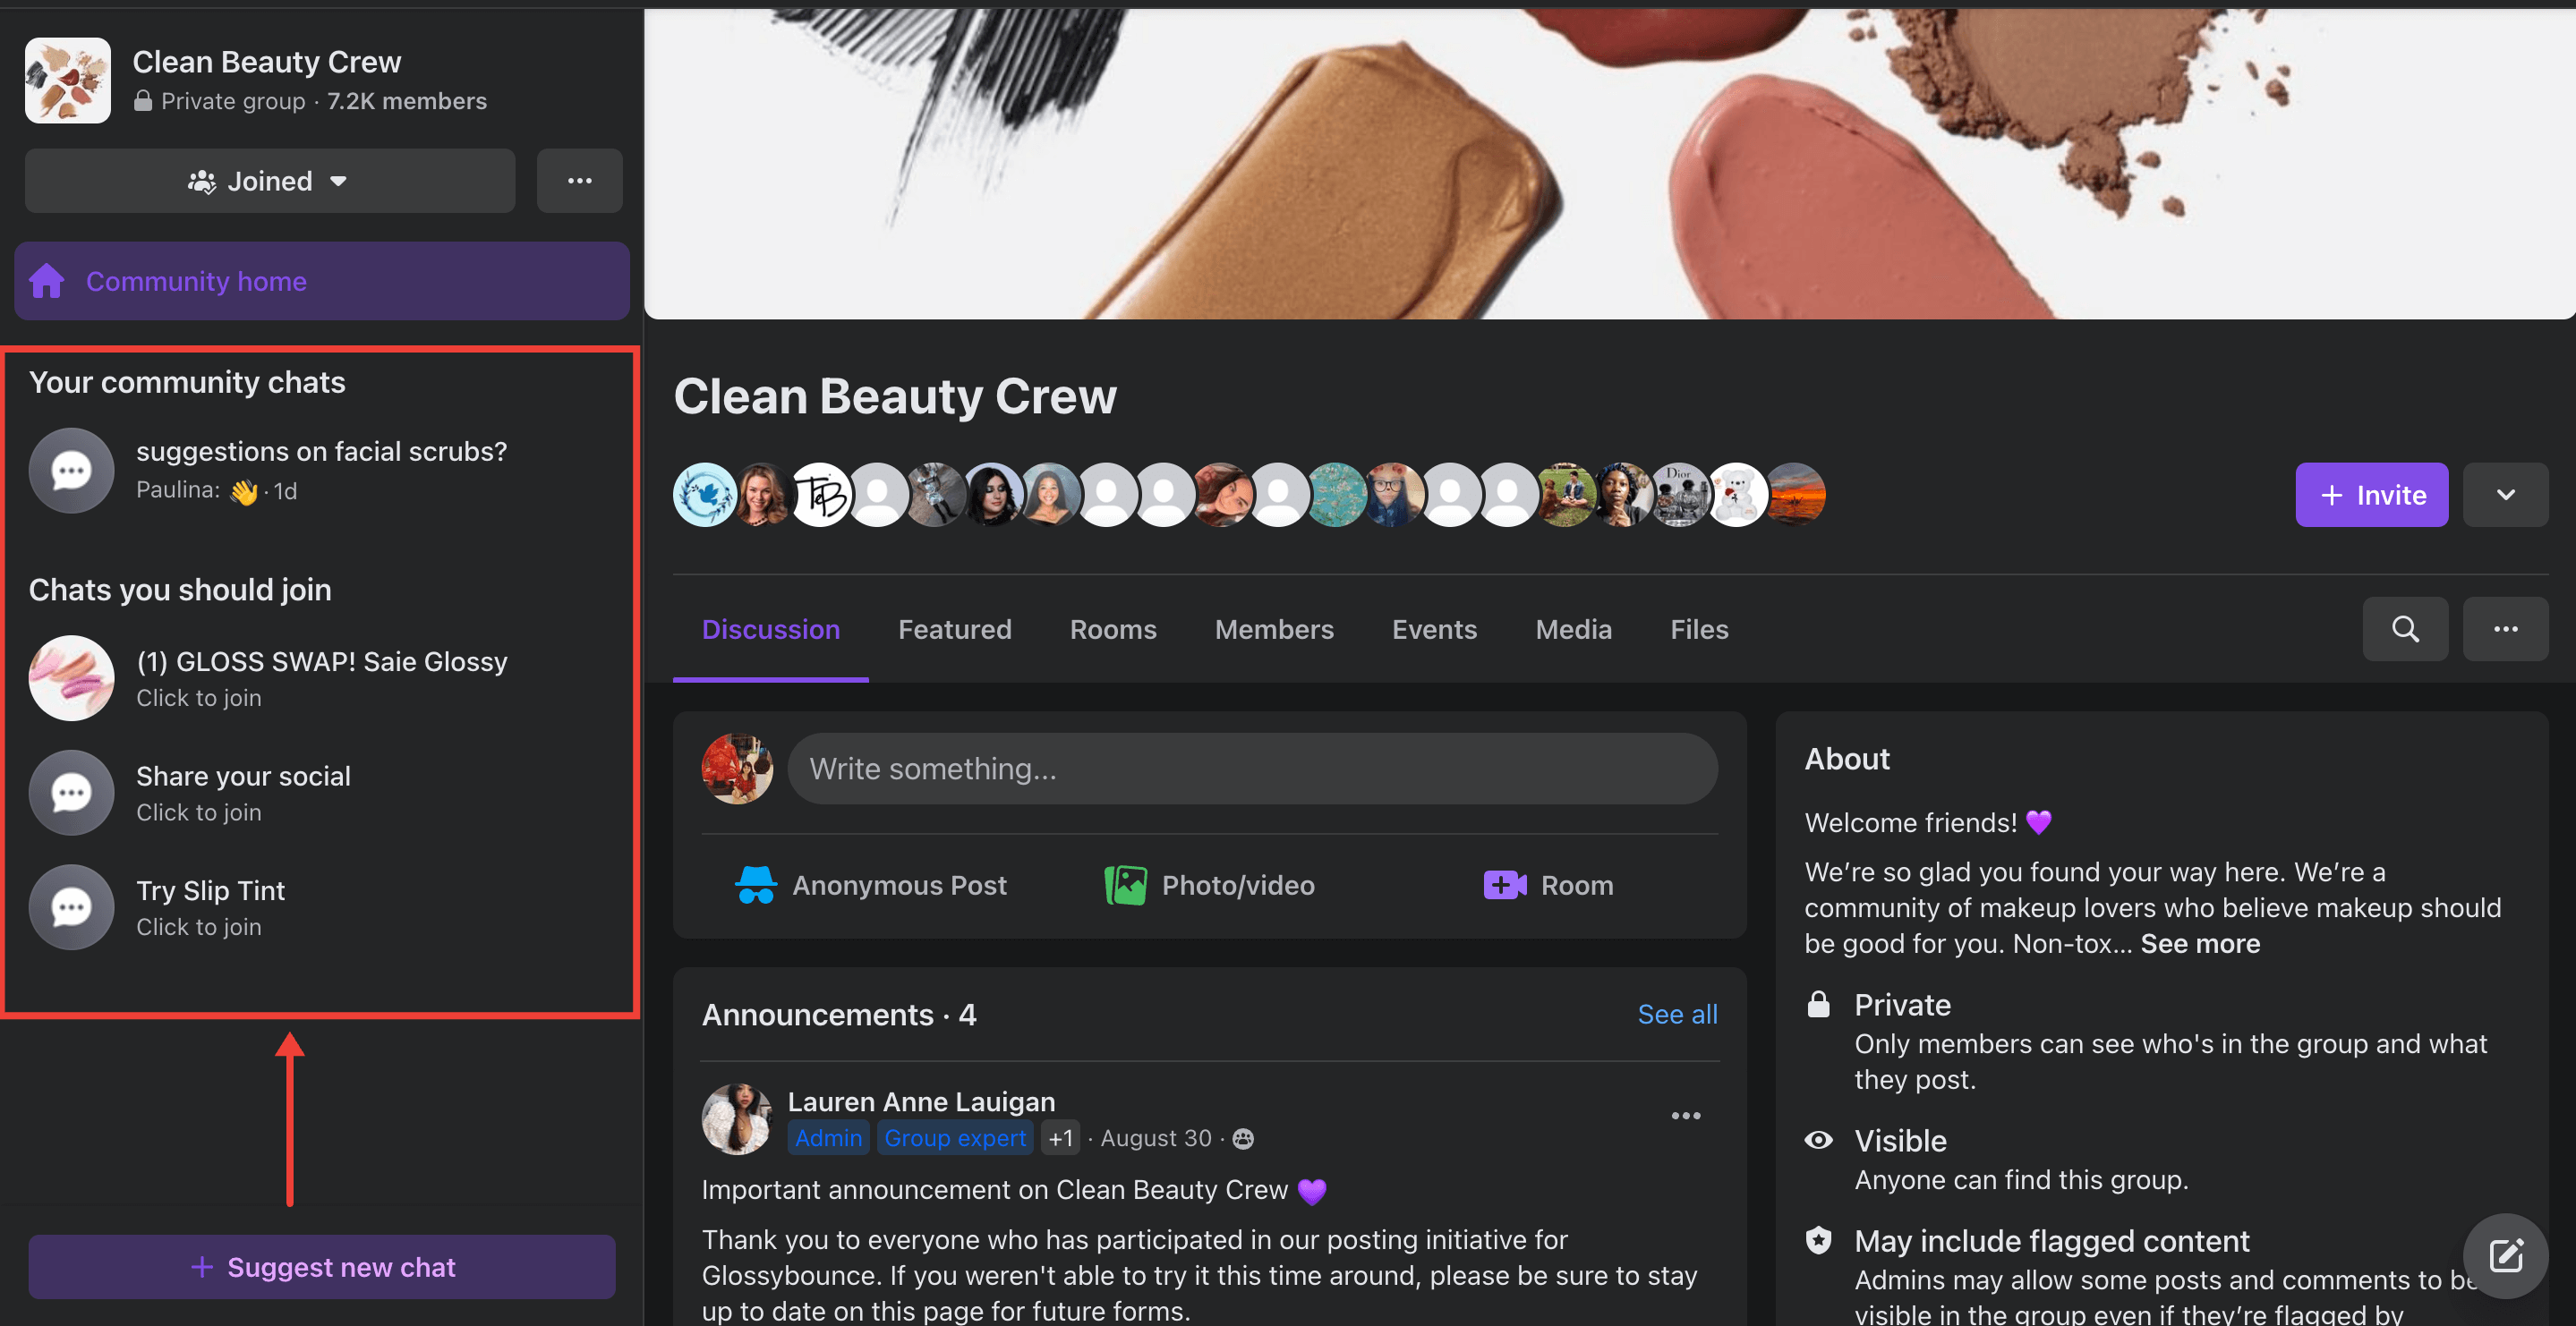
4. Community chats. Facebook has recently launched community chats in over 140 countries. It’s a hybrid of messenger and Facebook Group for members to communicate in real-time about a specific sub-topic. Maybe some members met via the Group and have become friends and would like a separate group chat within the Group.
Facebook might release admin-only chats for admins to communicate and view-only chats like Instagram Broadcast channels in the future. In the “Manage” tab, you’ll find the option to “Add features” and “Community chats” will be housed under it. You can choose whether or not members can create community chats independently.
Community chats are perfect for specific sub-conversations in your Facebook Group. For example, Clean Beauty Crew has several community chats (displayed on the left menu) that its members can join depending on their interests.
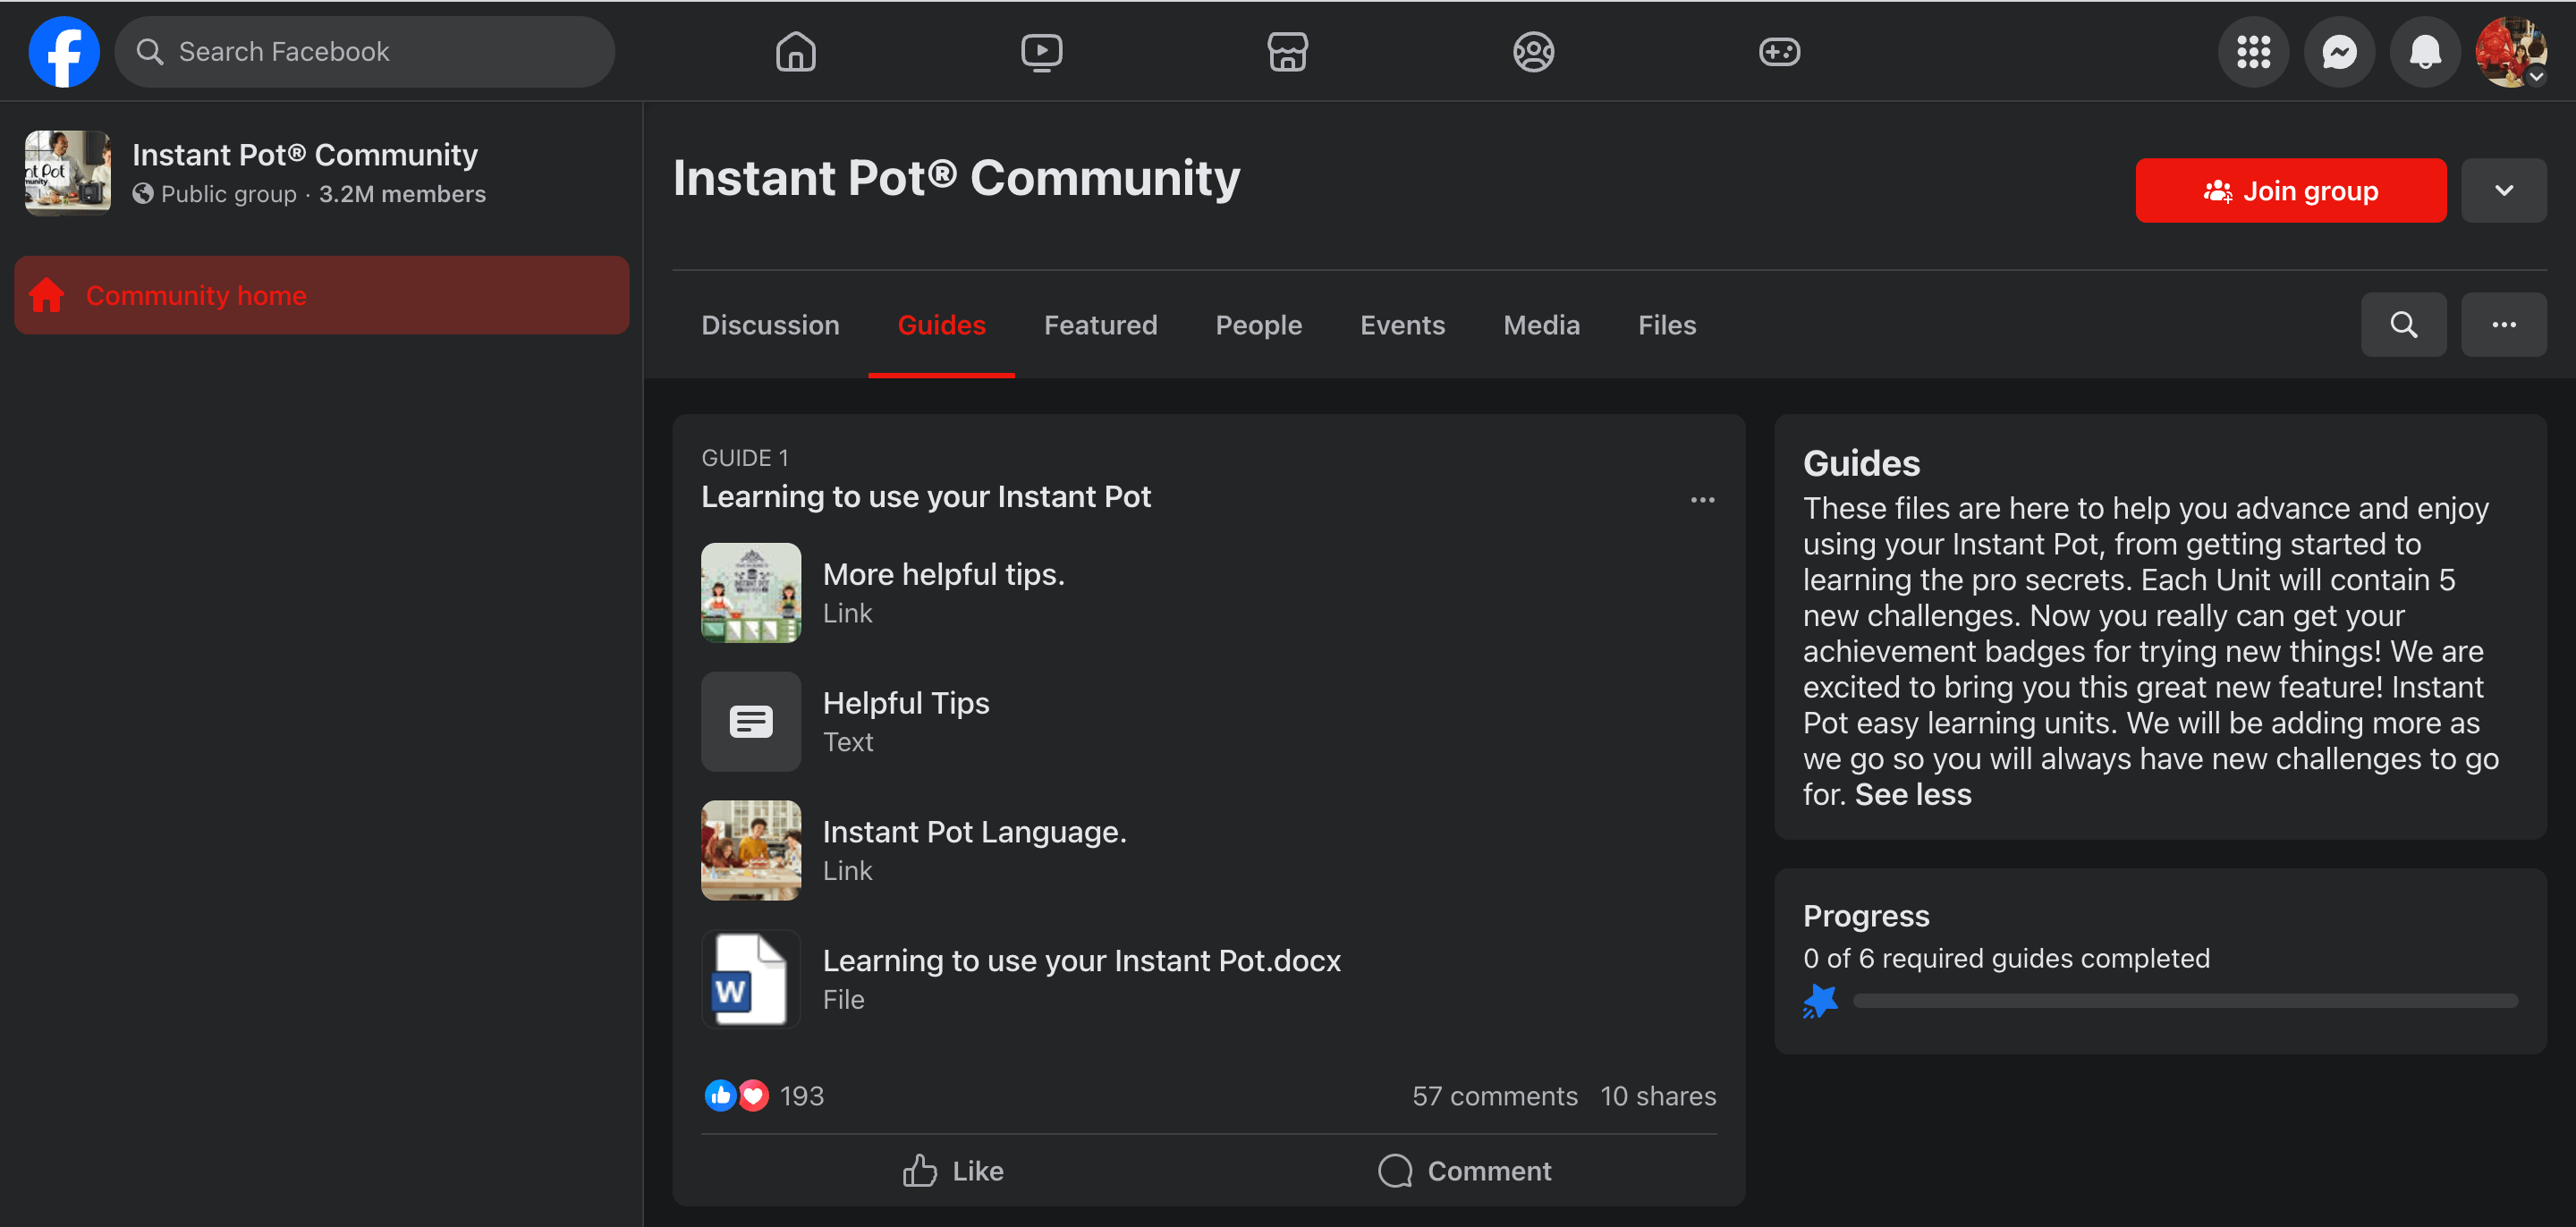
5. Guides and Files. Information in your Facebook Group is unorganized and any member has to stitch various things they’ve read to learn something new. To make this a smoother experience, you can create Guides to organize info neatly into various sub-topics. It's like a mini-course inside your Facebook Group.
These guides can contain Facebook post(s) and quizzes. You can also share external files within these guides. Members can track their progress by clicking on “Done” once they’ve read through a guide. For example, Instant Pot Community has six guides on how to get the best out of its products.
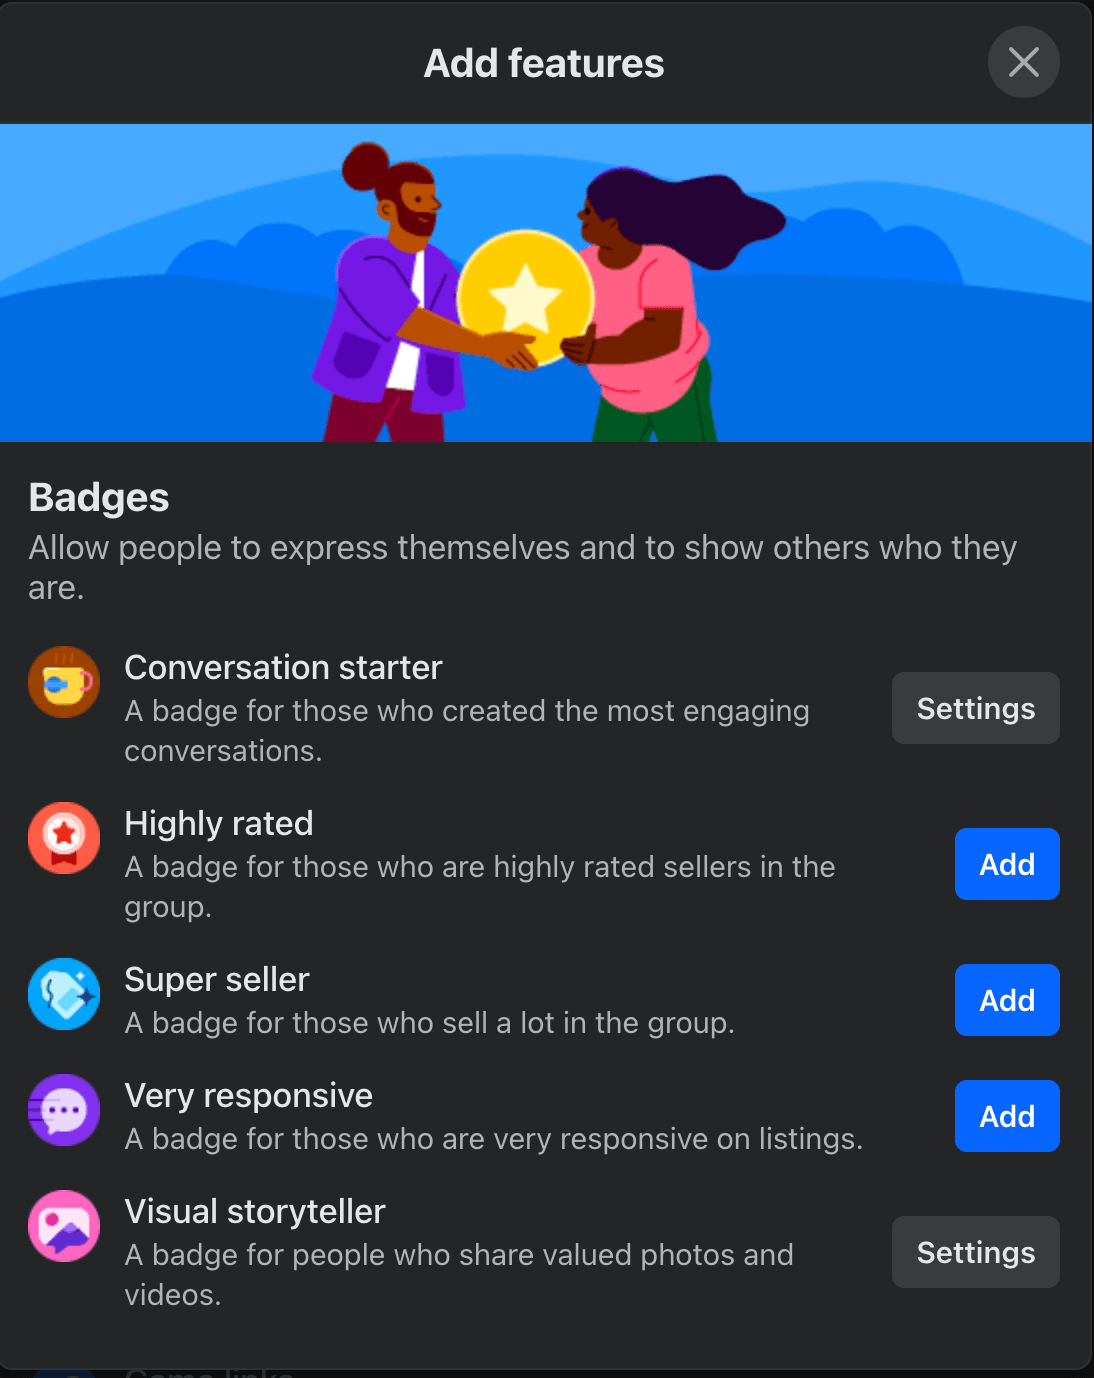
6. Badges. Badges can help you recognize admins and moderators. But Facebook has elevated this feature to help you distribute other badges — like Conversation starter, Highly rated, Visual storyteller, and more. You can select which badges make the most sense for you and allow members to earn badges. This can encourage members to stay motivated to interact more and strengthen their sense of belonging to your Facebook Group.
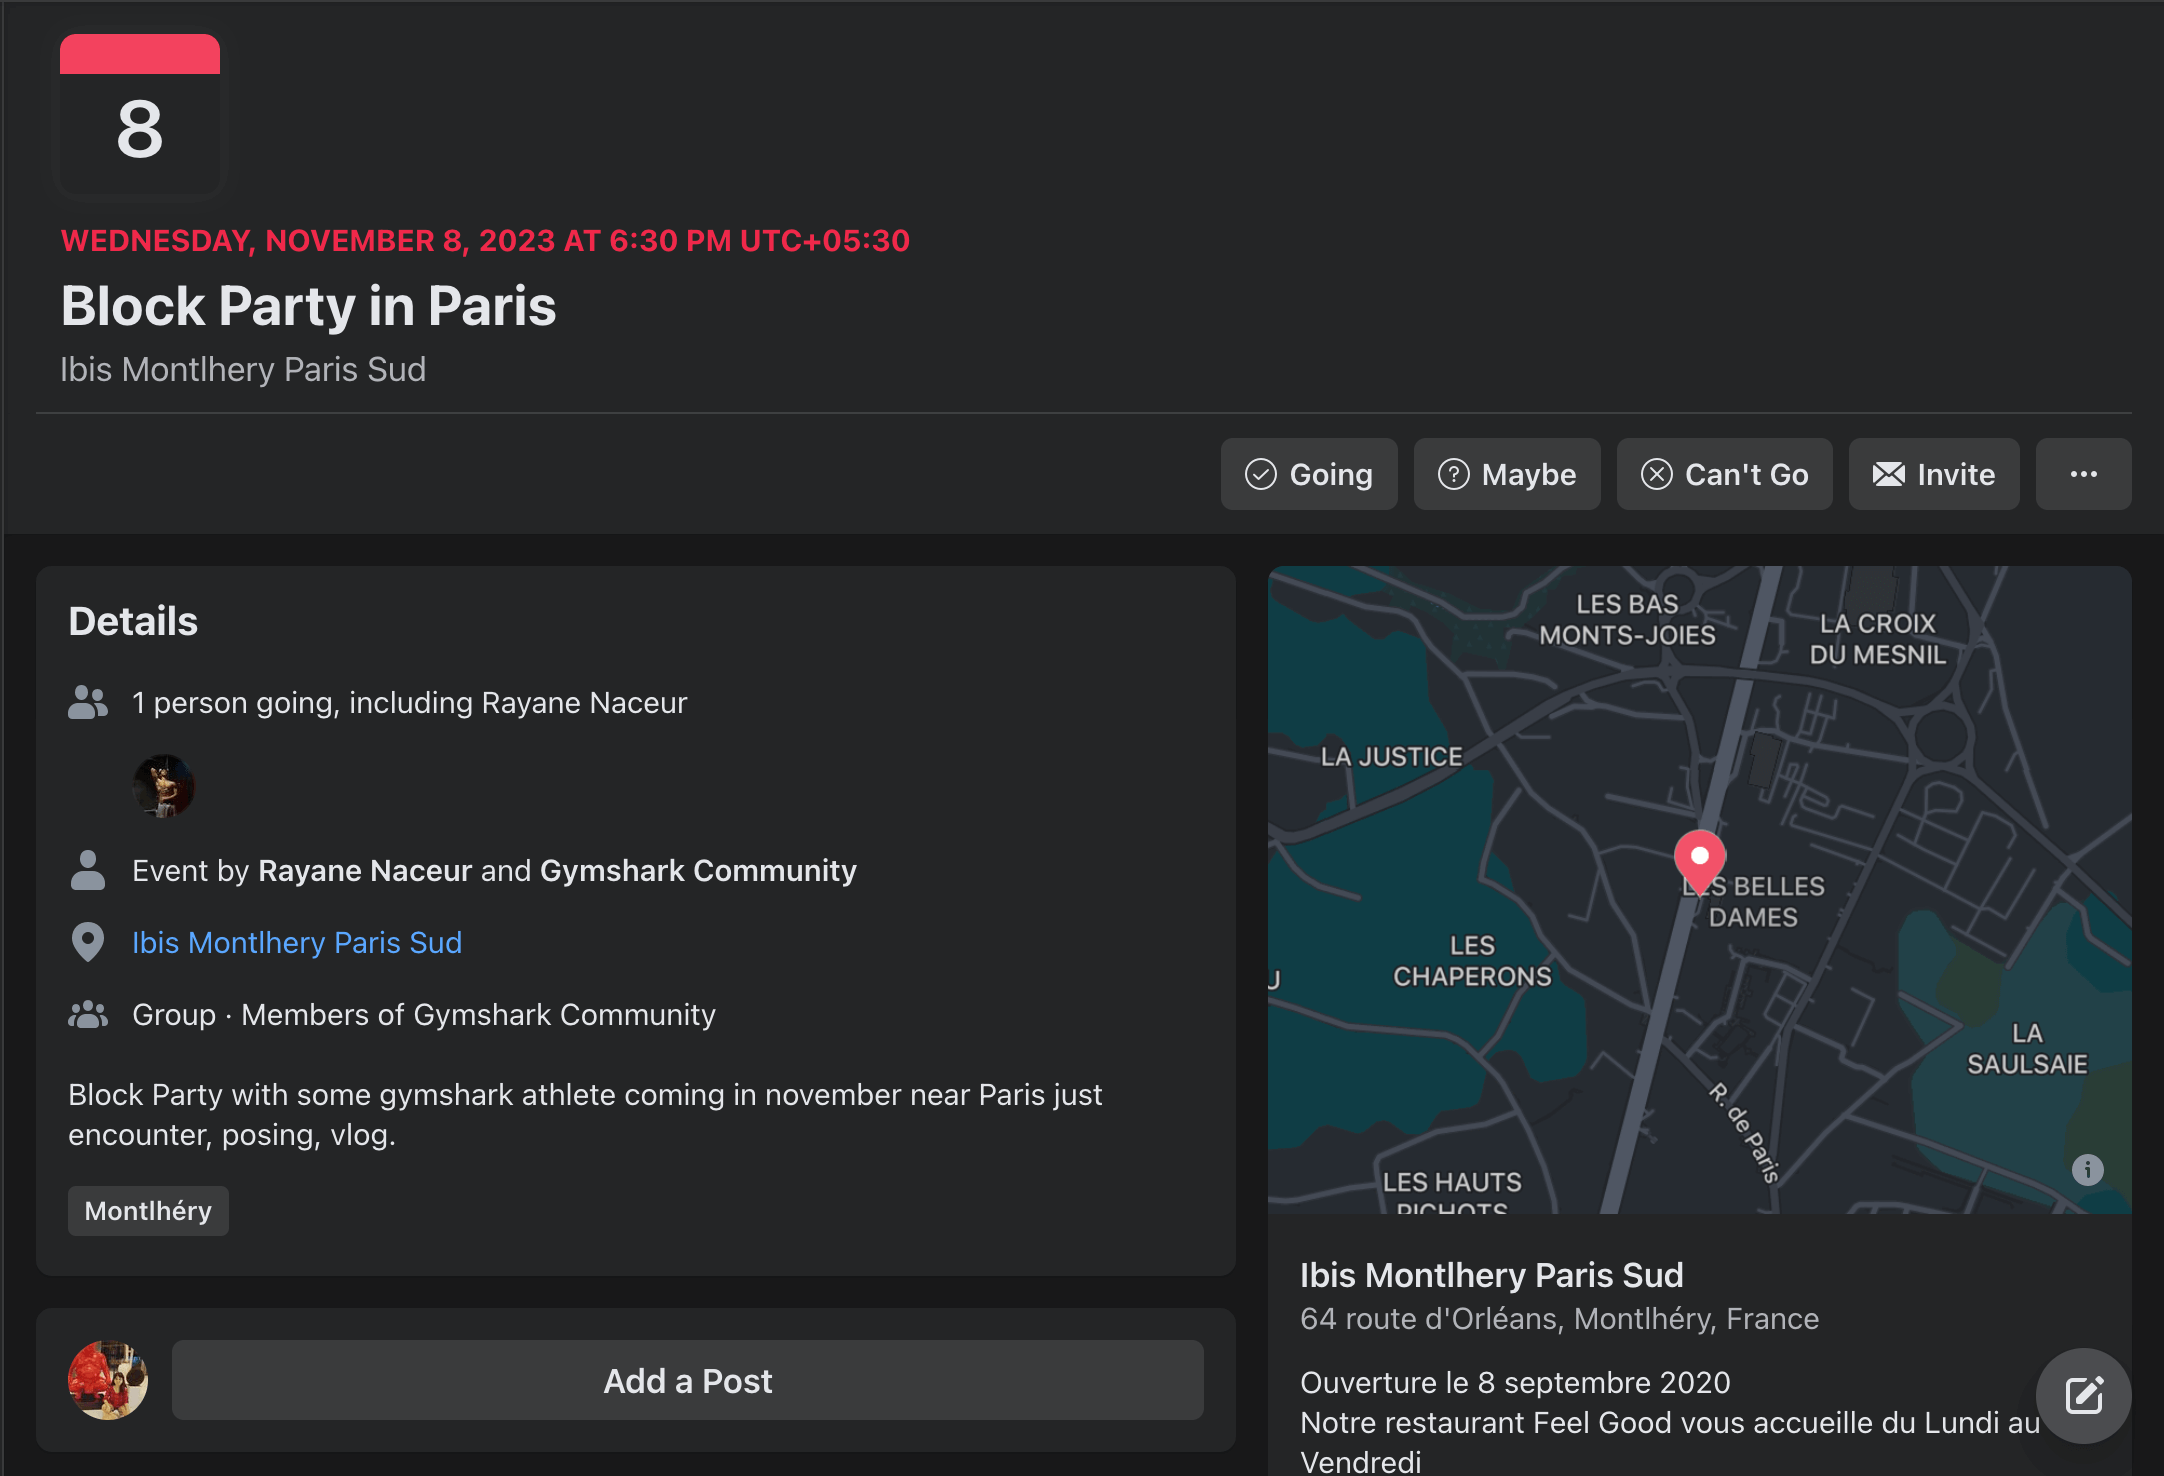
7. Events. Facebook Group allows you to schedule online and offline events within the community. Several members can come together to attend an event. You can share all the details of what, when, where, who. Members can accept or decline these invitations. For example, Gymshark marketed an upcoming event on its Facebook Group.
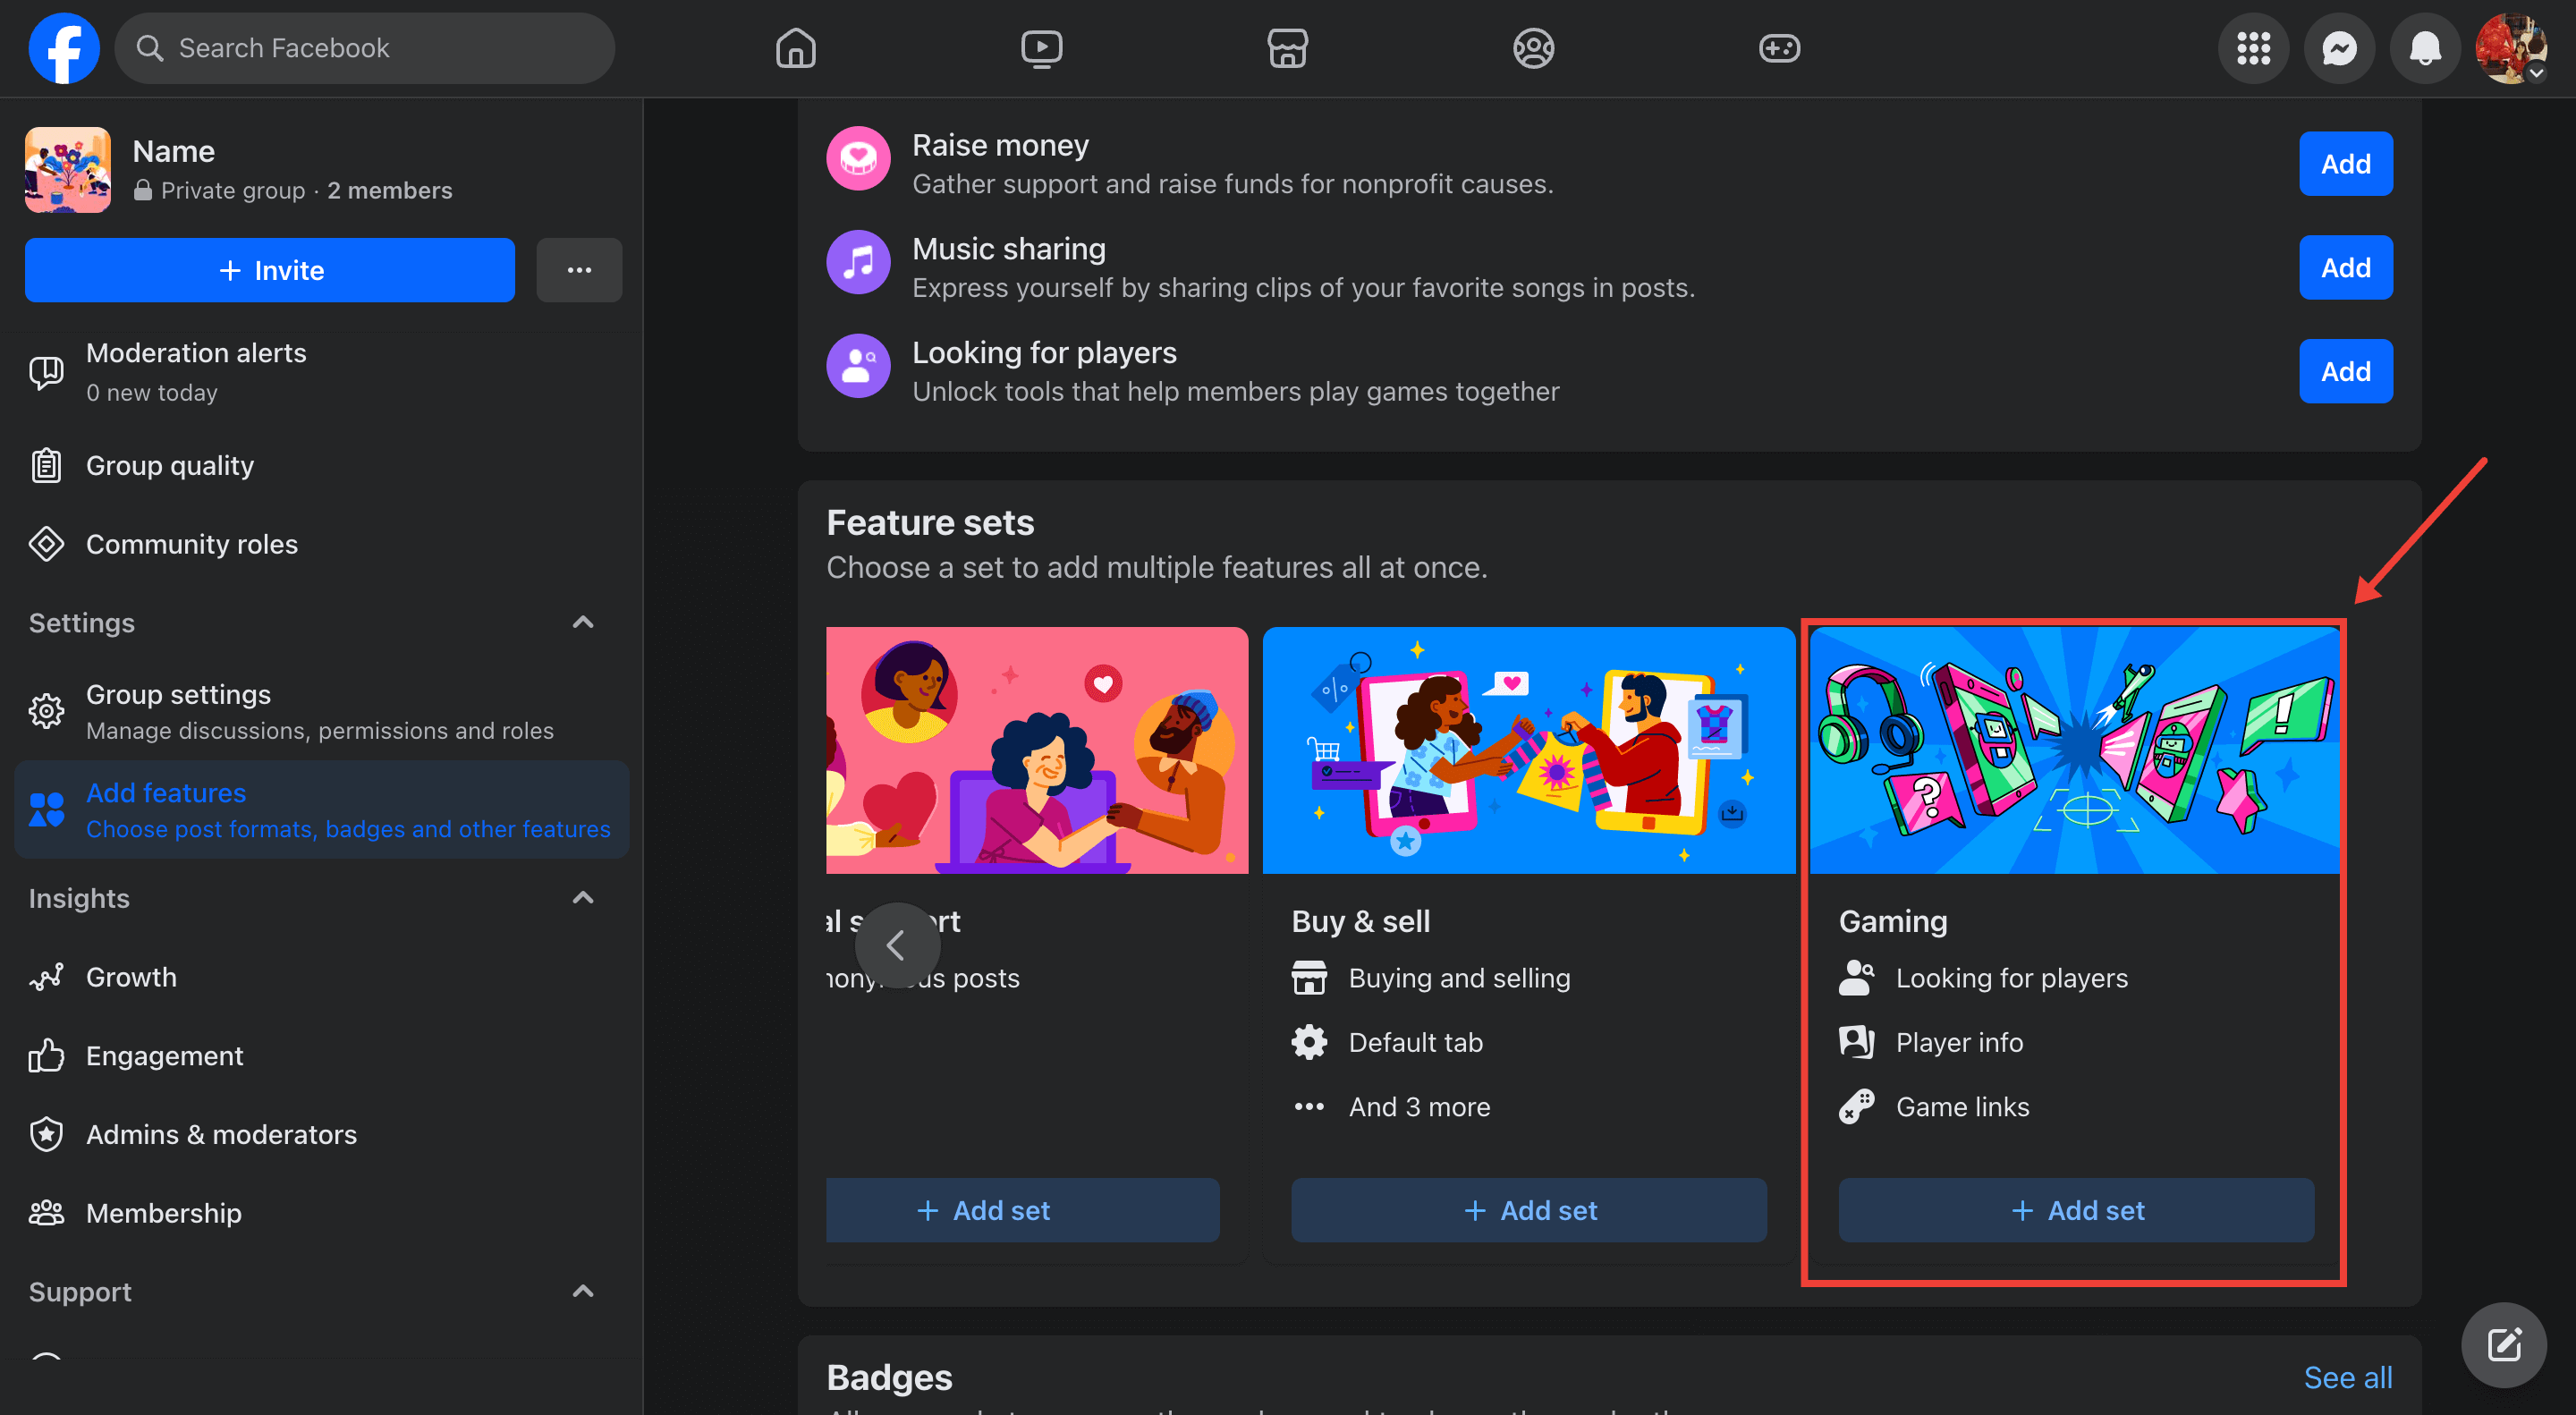
8. Games. If relevant, you can allow members to play Facebook games together within your Group. There are features to let members play directly, share that they’re looking for players, and share game links. These features are under “Add features” in the “Manage” tab of your Facebook Group.
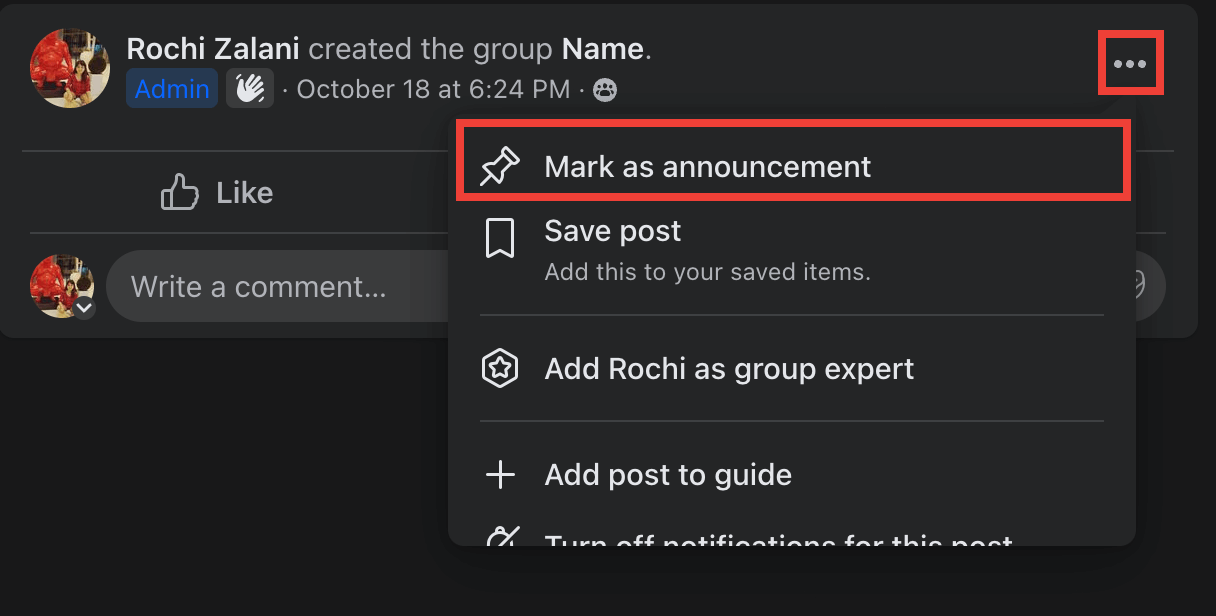
9. Group announcements. Group announcements are the new pinned posts in Facebook Groups. Use them to highlight important information, share company updates, and occasionally reiterate Group rules. You (or other admins) can share something on your Facebook Group and mark it as an announcement by clicking the three dots.
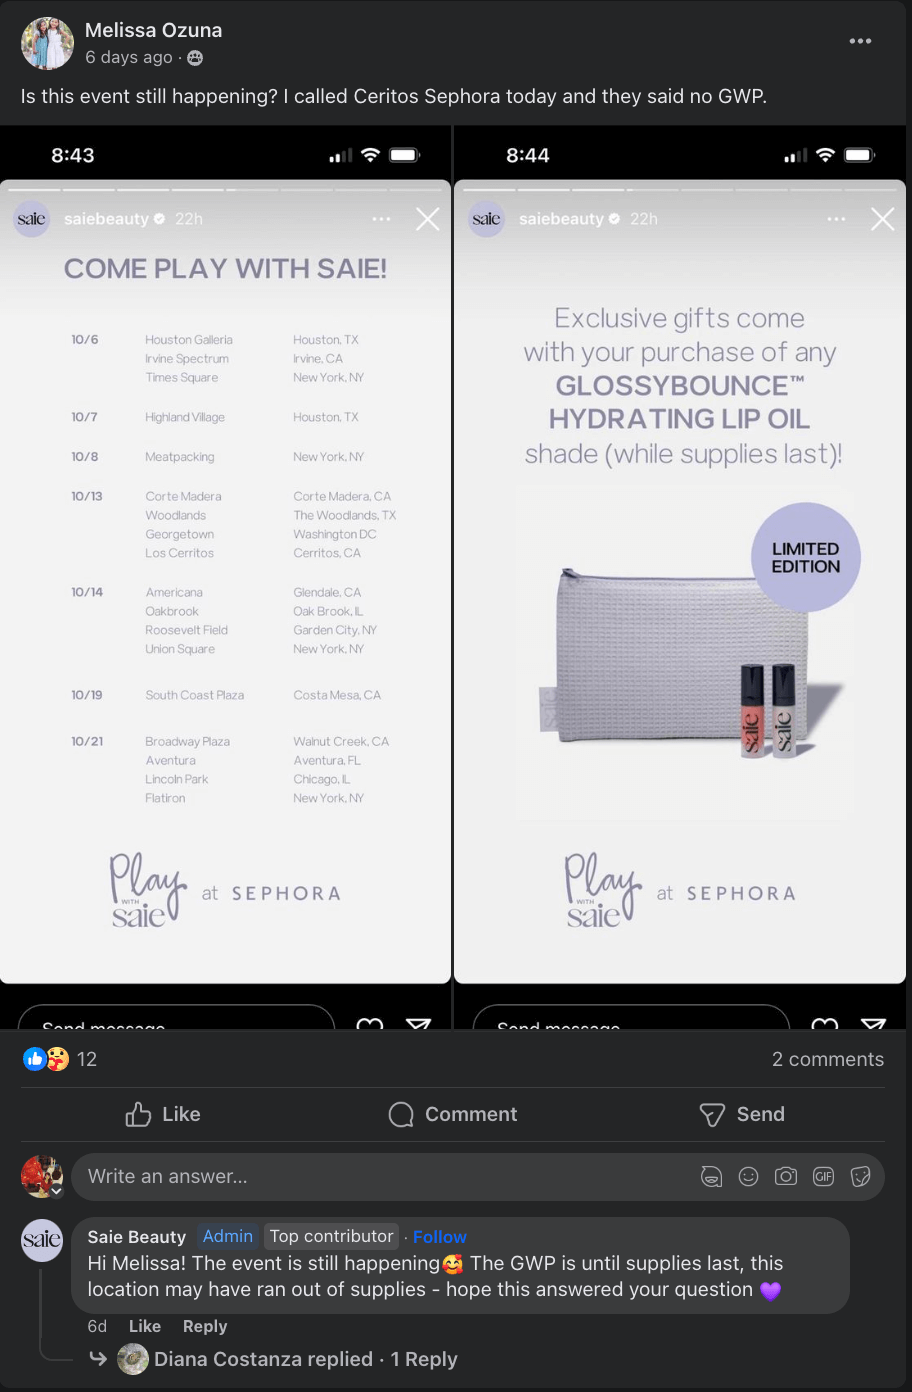
10. Respond to audience posts and comments. An underrated way to communicate with your audience is to simply respond to their comments and interact with their posts. All of Facebook’s fancy features are top-notch for elevating the Group experience, but nothing is more empowering for members than admins and moderators communicating with them directly. For example, Clean Beauty Crew responds to comments from its members as often as possible.
Also, encourage your members to step in wherever they feel they can. Talita Moraes, CMO at Tarotoo, said the feedback and support from ClickFunnels’ Facebook Group is why he loves the community:
“Just last month, I posted a query about optimizing a landing page. I got helpful tips within hours, and a fellow member even shared a video tutorial they'd made. This group has an authentic camaraderie that's rare to find. Their real-time feedback and genuine support have helped to refine our marketing strategies.”
4: Share exclusive content regularly on your Facebook Group to incentivize members
People join groups for the camaraderie of meeting like-minded people who share a passion. But when it comes to small businesses and creators, people also expect exclusive content that the brand isn’t publishing anywhere else.
Posting member-only content for Facebook should be a key part of your Facebook marketing efforts because it helps you incentivize more and more people to join the Group. If you can’t post exclusive content, you can make your Facebook Group the first place where new content drops.
Using Buffer, you can make your Facebook Group’s content calendar and schedule posts in advance. Buffer has a visual calendar that’ll allow you to spread out various exclusive content pieces for the month and monitor their performance.
⚡ Remember: Posting regularly on your Facebook Group is important to increase your Group’s engagement. The Group can run a well-oiled machine without your intervention, but to help your business goals, posting on Facebook Groups is critical. And if people join your brand’s Facebook Group, they sign up to hear more from you. And thus, they expect you to show up.
5: Use Facebook Group insights to understand how you can improve
Meta gives you insight on your Facebook Group’s growth, engagement, admin performance, audience demographics, and guides completed. These Facebook insights are invaluable numbers to help guide your strategy and improve your Group’s performance.

For example, you can find where most of your members are from using audience insights and double down your marketing efforts to that area. Or you might find the kind of posts that perform well and create more posts like that for the next month.
Your Facebook Group is a group chat with your community
Facebook Groups are the group chat equivalent of communicating with your audience. While many other marketing channels like emails, blogs, and posts are a one-way street, Facebook Groups open that to two-way communication with your audience.
This also means you can take the pressure off and be more authentic with your Facebook Group community — like you would in a group chat with your friends. It’s a way to humanize your brand and let people peek behind the curtain.
The only thing that’s non-negotiable is showing up regularly to communicate with your audience. But don’t leave it to chance. Use Buffer to schedule posts in advance for your Facebook Group. Sign up for free today.


